EasyManua.ls Logo

Faller 140316 User Manual

Faller 140316
12 pages
To Next Page IconTo Next Page
Page #1 background imageLoading...
Page #1 background image
Sa. Nr. 225 433 1
KINDERKARUSSELL
CHILDREN’S MERRY-GO-ROUND
MANÈGE D'ENFANTS
KINDERDRAAIMOLEN
Art. Nr. 140316
Vor Beginn des Bastelns sollten Sie sich mit den Spritzlingen und der Anleitung vertraut machen.
Sollte es einmal vorkommen, dass ein Teil im Bausatz fehlt, kreuzen Sie bitte das fehlende Teil in
der Anleitung an und schicken Sie diese bitte an Fa. Gebr. FALLER GmbH, Abt. Kundendienst,
kundendienst@faller.de, Kreuzstraße 9, 78148 Gütenbach. Sie erhalten dann umgehend Ersatz.
Es kann vorkommen, dass bei einem Bausatz Einzelteile übrig sind.
Before beginning with the assembly please familiarize yourself with the parts and read the instructions carefully.
In case of missing parts please indicate these on the instructions leaflet with a circle and return
the leaflet to Gebr. FALLER GmbH, kundendienst@faller.de, Kreuzstraße 9, D-78148 Gütenbach, Germany.
You will receive the replacement by return.
It may happen in a kit that some parts are not required.
Avant de commencer le montage de votre maquette bien lire la notice et repérer les grappes.
Si une pièce manque dans une boîte, cochez la pièce correspondante sur la notice et renvoyez-la-nous à
Gebr. FALLER GmbH, kundendienst@faller.de, Kreuzstraße 9, D-78148 Gütenbach (R.F.A.).
Nous vous ferons parvenir la pièce par retour.
Dans certains kits, il est possible que certaines pièces ne soient pas utilisées.
Vóór het bouwen zou men de gietstukken en de handleiding moeten bestuderen.
Indien onverhoopt een onderdeel aan het bouwpakket ontbreekt, gelieve men het ontbrekende deel
in de handleiding aan te kruisen en deze te zenden aan Gebr. FALLER GmbH, kundendienst@faller.de,
Kreuzstraße 9, D-78148 Gütenbach. U ontvangt dan omgaand en gratis het ontbrekende onderdeel.
Het kan voorkomen dat u bij bepaalde bouwdozen onderdelen overhoudt.
D
F
GB
NL
Art. Nr. 170688
SPEZIAL-SEITENSCHNEIDER
zum gratfreien Abtrennen von feinsten
Spritzteilen.
Nur für Polystyrol geeignet.
Special side cutter for cutting off ultra-fine moul-
ded parts without burrs.
Only suitable for polystyrene.
Pince coupante spéciale pour couper sans bavure
les pièces miniatures moulées par
injection. Convient uniquement au polystyrène.
Speciale zijkniptang voor het braamloos afknip-
pen van de fijnste gietstukdelen.
Alleen geschikt voor polystyrol.
Für den Zusammenbau des Modells empfehlen wir folgende FALLER-Artikel (sind nicht im Bausatz enthalten):
For the assembly of the kit we recommend following FALLER products (not included in the kit):
Pour l’assemblage du modèle, nous vous recommandons les articles FALLER suivants (non inclus dans le kit):
Om dit model te bouwen adviseren wij de volgende FALLER producten (maken geen deel uit van deze bouwset):
Art. Nr. 170492
FALLER-EXPERT
Flüssigkleber in Plastikflasche mit Spezialkanüle
für feinste Klebstoffdosierung.
Liquid cement in plastic bottle with canule
for very fine dosage.
Colle liquide en bouteille plastique
avec bec verseur pour un dosage précis.
Vloeibare lijm in plastic-flacon met doseerbuisje om
nauwkeurig te lijmen.
Inhalt Spritzlinge
Contents Sprues
Contenu Moulages
Inhoud Gietstukken
11 A
1
x
11 B
1
x
12
2
x
3
1
x
5
1
x
3
7
x
Question and Answer IconNeed help?

Do you have a question about the Faller 140316 and is the answer not in the manual?

Faller 140316 Specifications

General IconGeneral
Scale1:87 (H0)
MaterialPlastic
Manufacturer Part Number140316
Recommended Age14+
Weight200 g

Summary

Product Introduction and Support

Initial Setup and Instructions

Guidance on familiarizing with parts and reading instructions before assembly.

Customer Support for Missing Parts

Procedure for reporting missing components and obtaining replacements.

Recommended Assembly Accessories

Details on recommended FALLER accessories to aid in model assembly.

Carousel Assembly - Base and Figures

Base Structure Assembly (A, B, C)

Instructions for assembling the primary carousel structure using marked components.

Coloring Guide for Carousel Elements

Color recommendations for various parts of the carousel model, specifying quantities.

Carousel Assembly - Adding Details

Attaching Carousel Figures and Cabins (D, E, F, G)

Guidance on attaching the model's decorative figures and carriages to the carousel base.

Carousel Assembly - Decorative Panels

Attaching Side Decorative Panels (H, I, J)

Instructions for attaching decorative side panels to the carousel structure.

Completing the Base Structure (K, L)

Steps for finalizing the carousel's base assembly with specified components.

Carousel Assembly - Roof Attachment

Attaching the Roof Structure (L)

Procedure for attaching the main roof section to the assembled carousel body.

Finalizing Carousel Details (M, N, O)

Completing the carousel assembly with final decorative and structural elements.

Carousel Assembly - Decorative Foils

Applying Window Foils (R)

Instructions for cutting and applying decorative window foils to the carousel.

Carousel Decoration - Foil Application

Decorating Carousel Sections (S, T, U)

Guidance on applying different decorative foil patterns to specific carousel sections.

Carousel Assembly - Finishing Touches

Adding Decorative Frames (V, W, X, Y)

Instructions for attaching decorative frames and finishing elements to the carousel roof.

Motor Installation and Wiring

Motor Unit Preparation and Assembly

Steps for assembling and preparing the FALLER motor unit for installation.

Connecting Motor Wiring

Instructions for connecting the motor wiring to the carousel mechanism.

Carousel Canopy Assembly

Preparing Canopy Striped Sections

Guidance on preparing and assembling the striped sections of the carousel canopy.

Finishing the Canopy Attachment

Steps for completing the canopy assembly, including attaching the flag and final fitting.

Final Carousel Assembly and Gluing

Attaching the Completed Canopy

Instructions for securely attaching the assembled canopy to the main carousel body.

Specific Gluing Points

Specific points identified for applying adhesive during the final assembly stages.

Final Carousel View and Power

Completed Model Showcase

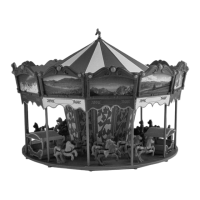
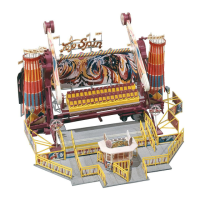
Visual representation of the fully assembled carousel model.

Required Power Connection

Details on the required power supply (16V AC) for operating the carousel.

Related product manuals