EasyManua.ls Logo

Farmi Forest FARMI 260 User Manual

Farmi Forest FARMI 260
44 pages
To Next Page IconTo Next Page
Page #1 background imageLoading...
Page #1 background image
Farmi Forest Corporation
Ahmolantie 6
FIN-74510 Iisalmi, Finland
Tel. +358 (0)17 83 241
Fax. +358 (0)17 8324 372
www.farmiforest.
FARMI 260
HFC260
HF260-EMF260
HF231-HM EUR
HF260-EL-SMHF260-EL-0
OPERATION, MAINTENANCE AND SPARE PARTS MANUAL
CHIPPER FARMI 260
03299720 E-EN-210512-ERFROM MACHINE: 3294316, 3294281,3294325 ->
PLEASE READ THE OPERATING AND MAINTENANCE INSTRUCTIONS OF THE CHIPPER
AND THE SEPARATE OPERATING AND MAINTENANCE INSTRUCTIONS OF THE FEED UNIT
BEFORE YOU OPERATE THE CHIPPER.
Machine combinations for manual feed:
FARMI 260 + F260
FARMI 260 + HF231-HM EUR
FARMI 260 + HF260-EM
EXCLUSIVELY FOR GRAB LOADER FEED!
MANUAL FEED PROHIBITED!
EXCLUSIVELY FOR MANUAL FEED!
GRAB LOADER FEED PROHIBITED!
Machine combinations for grab loader feed:
FARMI 260 + HF260-EL-0
FARMI 260 + HF260-EL-SM
FARMI 260 + HFC260
TRANSLATION OF THE INSTRUCTION MANUAL
Question and Answer IconNeed help?

Do you have a question about the Farmi Forest FARMI 260 and is the answer not in the manual?

Farmi Forest FARMI 260 Specifications

General IconGeneral
BrandFarmi Forest
ModelFARMI 260
CategoryChipper
LanguageEnglish

Summary

General Description and Intended Use of the Chipper

Product Warranty

EC Declaration of Conformity

Warning Symbols in This Manual

Introduction

General Safety Instructions

Transport

Operation

General Safety Instructions for the Chipper

Stickers and Plates

Technical Information

Main Components

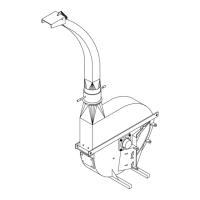
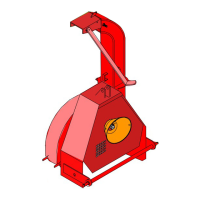
Identification of the primary parts of the chipper with numerical references.

Dimensions

Mounting

Lifting

Procedures and precautions for safely lifting the chipper.

Mounting of the Drawbar

Attaching the drawbar to the chipper for tractor connection.

Mounting of the Feed Unit

Instructions for installing various feed units onto the chipper.

Shortening the PTO Shaft

Installing the Screen and Breaker

Mounting of the Discharge Pipe

Adjusting the Discharge Pipe and Lid

Procedures for adjusting the discharge pipe and its lid for optimal chip flow.

Mounting of the Chipper and Pre-Operation Inspections

Starting the Chipper

Step-by-step guide for safely starting the chipper operation.

Stopping the Chipper

Procedures for safely shutting down the chipper after use.

Chipping

Storage of the Chipper

Guidelines for proper storage of the chipper to prevent damage.

Maintenance

Periodic Maintenance

Regular checks and tightening of fasteners for machine upkeep.

Lubricating the Bearings

Guide to lubricating bearings for proper operation and longevity.

Lubricating the PTO Shaft

Instructions for lubricating PTO shaft components for smooth operation.

Periodic Inspections

Checks on mounting bolts and knife-to-anvil clearance for machine upkeep.

Knife and Anvil Maintenance

Opening and Removing the Upper Chamber

Procedures for opening and removing the upper chamber for access.

Installing the Knives and Anvils

Installing and tightening knives and anvils according to torque specifications.

Adjusting and Checking the Knife-to-Anvil Clearance

Method for adjusting and checking clearance between knives and anvils.

Sharpening the Knives

Removing the Anvils

Steps to remove both vertical and horizontal anvils for maintenance.

Sharpening the Anvils

How to sharpen the vertical anvil to retain its original angle.

Adjusting the Chip Length

Replacing the Splined Shaft

Disk, 2-Knife

Disk, 3-Knife

Short Discharge Pipe, Complete

Long Discharge Pipe, Complete

Twig Crusher, Complete

Cross Braker for Slab, Complete

Plastic Shredding Screen, Complete

Warranty

Product Registration Form

Related product manuals