EasyManua.ls Logo

FastCap ChopShop User Manual

FastCap ChopShop
2 pages
To Next Page IconTo Next Page
Page #1 background imageLoading...
Page #1 background image
FastCap LLC • 888-443-3748 • www.fastcap.com
WE INNOVATE
Assembly and mounting
instructions for the
ChopShop Saw Hood
Remove ChopShop Saw
Hood and aluminum poles
from box.
Insert 1/2” roll pipe into
accessory holes in mitre saw.
Some accessory holes are
1/2” or 5/8” in diameter. If
there is a little movement
this should not be a
problem.
Insert the aluminum pole in
the peacock tail and tighten
knob.
1 3
2
We recommend that you
place a trash can or box under
the ChopShop Saw Hood,
which allows the dust and
debris to collect in one spot.
You can also mount the
ChopShop Saw Hood to a
table. Two mounting holes on
each peacock tail will accept
standard wood screws.
5
6
Unstrap the 3 Velcro hood
wraps and let the saw hood
fall into position.
4
STOP
All miter
box saws
are not the
same
Some small modifications
to the Saw Hood may
be necessary, allowing it
to fit into the accessory
mounting holes on each
individual saw. These
modifications are generally
limited to:
1. Grinding
a corner off
the aluminum
mounting arm
where the
round 3” post
attaches.
2. Making a
bushing out of
a 1/2 copper pipe
allowing the 3”
mounting post to
fit into the larger
diameter accessory
holes.
Question and Answer IconNeed help?

Do you have a question about the FastCap ChopShop and is the answer not in the manual?

FastCap ChopShop Specifications

General IconGeneral
Blade Diameter7-1/4 in
Arbor Size5/8 in
Voltage120V
Weight24 lbs
Bevel Capacity0° - 45°

Summary

ChopShop Saw Hood Assembly and Mounting

Unpacking Saw Hood and Poles

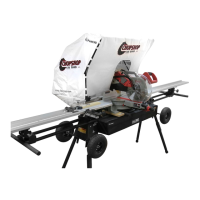
Remove the ChopShop Saw Hood and aluminum poles from the box for assembly.

Aluminum Pole Assembly

Insert the aluminum pole into the peacock tail and tighten the knob securely.

Mitre Saw Mounting Instructions

Insert a 1/2" roll pipe into accessory holes in the mitre saw for mounting.

Hood Positioning and Dust Collection

Unstrap Velcro wraps to position the hood and place a container for dust collection.

Table Mounting Option

Mount the ChopShop Saw Hood to a table using wood screws in provided holes.

Saw Compatibility Modifications

Small modifications like grinding or making a bushing may be needed for specific saw models.

Tile Clamp Accessory Assembly and Mounting

Securing the Tile Clamp

Drill holes into the stand or table and secure the clamp with included screws.

Adjusting Clamp Position

Adjust accessory hole (A) to an upright position and clamp using handle (B).

Attaching Saw Hood to Clamp

Insert the ChopShop Saw Hood accessory rods (D) into the clamp's accessory hole.