1110
MAINTENANCE
Any other servicing should be performed by an authorized service representative.
Clearing a Jammed Grinder
On occasion, Ode Brew Grinder may become jammed and stop grinding.
When this occurs, the grinder will stop grinding before it has nished all the
coee in the hopper and beep "SOS" (save our ship).
Minor jams can be cleared as follows:
1. Check that the catch is empty. Turn the grinds dial to setting 11.
2. Tap the grinder rmly on the side several times and shake.
3. Press the power button and continue to rmly tap the side of the grinder
for several seconds. If grinding resumes, the jam is cleared. If not, proceed
to the instructions for clearing a major jam.
Major jams can be cleared as follows:
1. Unplug the grinder.
2. Remove the burrs as instructed in the “Removing and Replacing Burrs” section
of this manual.
3. Clear coee from the grinds chamber and discard.
4. Inspect burrs for coee beans or foreign materials (rocks, sticks, unroasted coee
bean, etc.) that may be stuck. Remove stuck coee beans and clean burrs as
instructed in the “Cleaning” section of this manual.
5. Reinstall burrs. Run grinder without coee for 5 seconds to check that it operates
as expected. The grinder should spin quietly and at an even speed. If the grinder is
making an unexpected noise, repeat this process and carefully inspect to ensure
that all coee particles have been cleared out. If the problem persists, please
contact Fellow customer service.
For more help, visit fellowproducts.com/odemanual.
1
2
3
4
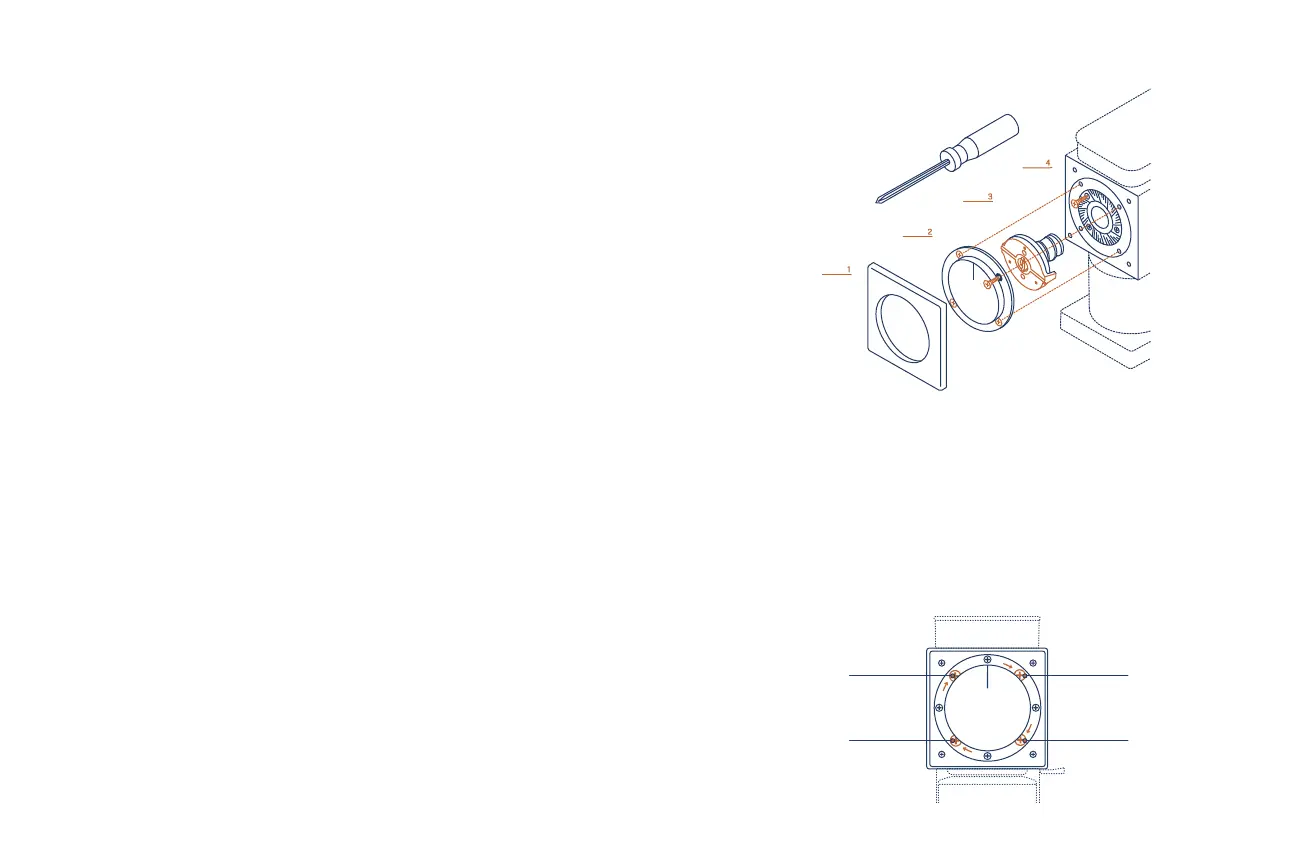
Diagram C: Exploded View
Removing and Replacing The Grinding Burrs
CAUTION: The Grinding Burrs are sharp, please handle carefully!
1. Unplug your grinder and empty it of coee.
2. Start by removing the faceplate of the grinder. The faceplate simply snaps on and
o. Pull gently on the faceplate for it to snap o.
3. Using a Phillips-head screwdriver, unscrew the four larger size screws that have
arrows pointing to them. See Diagram D for reference.
Diagram D
¼¾
¼
¼
¼
2