Do you have a question about the Fellowes esi LOTUS-RT1-BLK and is the answer not in the manual?
Read and follow all instructions and warnings before use, including pinch point and weight capacity warnings.
Lists and illustrates all components included with the workstation, such as screws, wrenches, and the base.
Instructions for attaching the clamp to thicker desks, including orientation adjustments.
Instructions for attaching the clamp to thinner desks, involving clamp removal and re-installation.
Steps for unboxing, placing the workstation, and determining the desired sitting position.
Detailed steps for securing the clamp support plate to the desk using M8 screws and a 6mm Allen Key.
Instructions for removing a zip tie from the lever and optionally relocating the handle to the left side.
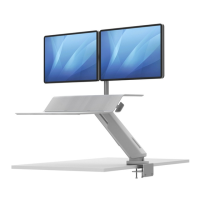
Steps for installing the monitor pole into the platform and securing it with an M10 screw.
Instructions for attaching the fitting to the pole, sliding the VESA assembly, and securing the pole cap.
Guidance on attaching monitors using provided Phillips pan head screws, depending on the monitor type.
Steps to level the worksurface by adjusting M6 nuts and an M4 adjustment screw if corners lift.
| Model | LOTUS-RT1-BLK |
|---|---|
| Brand | Fellowes |
| Color | Black |
| Power Source | Not Applicable |
| Number of Batteries | 0 |
| Material | Steel |
| Battery Type | Not Applicable |