BEFORE OPERATING THE
MACHINE
USE ONLY SHARP DRILLS OF THE
FOLLOWING TYPES
Fig.B
Concrete/masonry
|
Hard metal
Metal
|
HSS
Wood
|
HSS
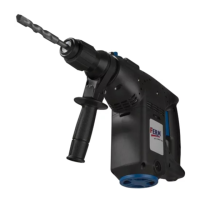
MOUNTING ACCESSORIES
Fig.C
Prior to mounting an accessory always unplug the
tool.
Placing and removing bits
In addition to bits the machine can also hold screw bits
with a hexagonal shaft.
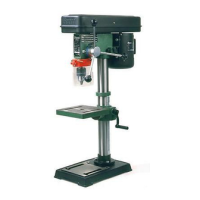
The drill head is equipped with a lock function. To
tighten or slacken the drill head, the lock has to be
unlocked first. This is done as follows:
• Hold the drill head (A) and slide the ring (B) in the
direction of the drilling machine. The ring will jump
and the lock is now unlocked.
• Place the shaft of the bit in the nesting place of the
drill chuck. Tighten the bit by holding ring B and
turning the drill head (A).
• Once the bit has been tightened in, slide ring B in the
direction of the drill head, which will activate the
lock. This will stop the drill head from loosening due
to vibration during use.
• Slide the sidegrip over the drillhead.
• Slide the measuring rod in the sidegrip and tighten
the grip by turning the sidegrip.
• Tighten the workpiece to a workbench by using a
clamp.
• When all preparations are done the machine can be
connected to mains. First check if the switch is in the
‘OFF’-position and if the rotationswitch is in the
RIGHT-position.
OPERATION
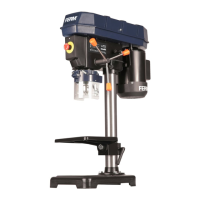
THE ON/OFF SWITCH
Fig.D
• Switch the machine on by pressing the triggerswitch
(A). When you release the triggerswitch (A) the
machine will turn off.
SWITCH-LOCK
• You can lock the On/Off switch by pressing the
triggerswitch (A) and then pressing knob (B). Release
the switch-lock by pressing the triggerswitch (A)
shortly.
SPEED-CONTROL
• The rotation-speed can be continuously adjusted
between 0 and 900 rotations per minute in position
1 and 0 - 2700 rotations per minute in position 2 (E),
by pressing the switch (A) deeper or less deep.
ADJUSTING OF THE MAXIMUM
ROTATIONSPEED
• Switch the machine on by pressing triggerswitch (A).
• Lock the triggerswitch (A) by pressing knob (B).
• Adjust the speed by turning the small wheel (C) to
the desired maximum rotation speed.
SWITCHING THE DIRECTION OF
ROTATION
• Direction of rotation counter-clockwise: shift
switch (D) to “L”.
• Direction of rotation clockwise: shift switch (D) to
“R”.
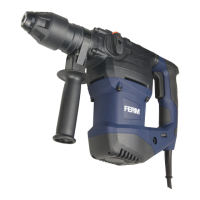
SWITCH FOR PERCUSSION DRILLING
Fig.E
With the switch on top of the machine you can select
normal or percussion drilling.
• Slide the switch to the “Drill” symbol for normal
drilling.
• Slide the switch to the “Hammer” symbol for
percussion drilling.
MALFUNCTION
Below we have listed a number of possible causes and
corresponding solutions in case the machine does not
function as it should:
1. Excessive sparkling
• This usely indicates dirt in the motor or worndown
carbon brushes.
Bring your percussion drill to your Ferm-dealer.
2. The percussion drill is overheating
• The ventilationslots are covered with dirt.
Clean them with a dry cloth.
• The percussion drill is overloaded.
Use the machine for work for which it is ment to be.
Replace the drill for a sharp one or sharpen the drill by
using a benchgrinder and a twist drill grinding
attachment.
• The motor is defect.
Bring your percussion drill to your Ferm-dealer for
repairance.
Ferm 5
18.
.
.
.
19.
,
.
,
, ,
,
.
,
.
.
.
20.!
.
21.
.
,
.
22.
,
.
• :
%
$
% $ ! #
.
•
.
1.5
mm
2
.
• ,
.
•
.
•
, .
:
•
“OFF”.
•
.
•
.
• .
:
•
.
• ,
.
• .
•
.
,
,
.
,
.
!
##
!
$ .
& $ $ ,
! %50144. %,
$ $ .
.
.
,
.
1.5 mm
2
.
, .
72 Ferm
 Loading...