EasyManua.ls Logo

Ferplast Casita 80 User Manual

Ferplast Casita 80
4 pages
To Next Page IconTo Next Page
Page #1 background imageLoading...
Page #1 background image
Cod. 570650
780 x 480 x 500 mm
P
A
T
E
N
T
P
E
N
D
I
N
G
P
A
T
E
N
T
P
E
N
D
I
N
G
A
1 2
3
CLICK
T
P
E
N
Cod.
5
7
0650
Cod. 570660
960 x 570 x 560 mm
Cod. 570670
1190 x 580 x 610 mm
Posizionare la rete in modo tale che le barre verticali siano sul lato esterno della gabbia.
Place the net so that the vertical bars are in the outer side of the cage.
Positionner la grille afin que les barres verticales soient sur le côté extérieur de la cage.
Bringen Sie das Netz so an, dass sich die vertikalen Stäbe auf der äußeren Seite des Käfigs befinden.
Plaats het gaas op zo’n manier dat de verticale spijlen aan de buitenkant van de kooi zitten.
Posicionar la red de modo que las barras verticales estén en el lado externo de la jaula.
Question and Answer IconNeed help?

Do you have a question about the Ferplast Casita 80 and is the answer not in the manual?

Ferplast Casita 80 Specifications

General IconGeneral
MaterialPlastic, Metal
Feeding cupYes
Product typeCage
Product colorBlack, White
Number of doors1 door(s)
Carrying handle(s)No
Recommended for pet typeGuinea pig
Quantity per pack1 pc(s)
Weight and Dimensions IconWeight and Dimensions
Depth480 mm
Width780 mm
Height500 mm

Summary

Cage Models and Initial Assembly

Product Model Specifications

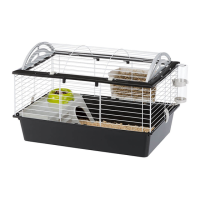
Details product codes and dimensions for three cage models: 570650, 570660, and 570670.

Net Placement Guidance

Instructions on correctly positioning the cage net with vertical bars on the outer side.

Assembly Step Illustration

Diagram showing numbered steps for cage assembly, highlighting connection points.

Assembly of 'Casita' Cage Series

Casita 80 Assembly

Illustrates the assembly process for the Casita 80 model using specific components.

Casita 100-120 Assembly

Details assembly steps for Casita 100-120 models, showing component connection points.

Detailed Assembly and Fitting

Component Attachment Steps

Demonstrates sequential steps for attaching cage components, including a 'click' mechanism.

Accessory Installation

Shows installation of an accessory or part with a clear 'click' indication.

Correct Part Fitting

Illustrates the correct way to fit a part and warns against incorrect placement.

Roof and Side Structure Assembly

Casita Roof Structures

Illustrates roof components for Casita 80-100 and Casita 120 models.

Left Side Assembly

Details assembly steps for the left side of the cage structure, including click points.

Right Side Assembly

Details assembly steps for the right side of the cage structure, including click points.

Cage Attachment

Shows how to attach the assembled cage, possibly to a base or stand.

Related product manuals