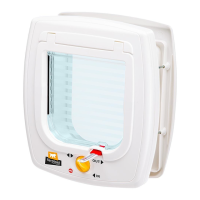
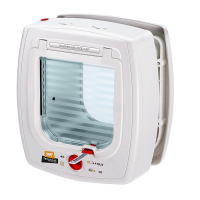
The 4-way locking system: you’ll decide! (Fig.1). The SWING MICROCHIP pet flap has been
designed to meet all your requirements and those of your pet. For this reason you can rely on
the original 4-way locking system that enables you to control the usage by your pet. You can
choose between the following: ACCESS ONLY / EXIT ONLY / ACCESS AND EXIT / CLOSED.
Windstopper system (Fig.8). It’s the innovative system preventing draughts.
The last in or out direction indicator: you always know where they are (Fig.2). SWING
MICROCHIP uses the last IN or OUT direction indicator. It is a system that will help you to know
whether your cat is indoors or outdoors. This feature is useful if you have to go out and you
can’t find your pet. A quick glance is sufficient: the “flag” (see picture) on the bottom part of
the flap will point in the last direction in which he went through the flap after it closed.
Warning! In severe weather conditions (wind, etc.) the total reliability of this system cannot be
guaranteed. If your pet should open the flap without actually going through the tunnel, the
indicator would not be reliable.
HOW TO TEACH YOUR CAT TO USE THE SWING FLAP. To teach your cat how to use the SWING
MICROCHIP flap is much easier than you think. It is important not to expect too much from him
but to let him learn in his own time. The easiest way for your pet to discover it is to leave the
flap completely open. Cats are curious by nature and will be quickly tempted to go through the
open flap towards freedom. If this is not the case – and your pet isn’t that adventurous – you
can always fall back on a foolproof method: of blackmail, metaphorically speaking. Simply
prepare his favourite food and put it in front of its nose, firstly on one side of the flap and then
the other side. Your cat will just not be able to resist the temptation. Once your cat has got used
to going through the flap, it’s time to face the next step. Leave the pet flap closed, but not
locked: your pet, who now considers the flap to be its own, will not think twice about pushing
it to get to the other side. And if this doesn’t happen straight away, go back to the old food
‘blackmail’ method. One sniff and your dog or cat will naturally attempt to reach its target. It’s
a proven method. Often a move of house may provide another reason to install the pet flap. If
you have just moved, remember that your cat also needs time to become familiar with their
new surroundings too. Therefore don’t rush: Only when your cat feels perfectly at home, will it
feel the need to discover all the secrets and new adventures, amongst which, its own private
door. As for the lock, you need a little patience: only start to lock the flap once your pet is used
to coming in and going out of it.
HOW TO INSTALL WITHOUT MISTAKES. Read these instructions carefully and you will find
that the pet flap is easier to install than you think. The tools required are the following:
Template (supplied in the pack), Pencil, Drill, Jig saw, Screwdriver.
Wooden doors (Fig.3).
A Measure the belly height of your cat from the floor and position the template (side A) on the
door with the bottom at the same height. Mark around the perimeter of the TEMPLATE on
the door using the marker.
B Drill 4 holes in the corners of the marked area.
C Cut along the perimeter using the jig saw to join the 4 holes.
D Smooth the edges using a file or sandpaper.
The biggest job is done. Go to paragraph “FIT THE FLAP”.
Glass doors (Fig.4). Warning! Cutting glass can be dangerous. You must consult a glass
merchant before starting the job. It is impossible to drill holes in toughened safety glass or double-
glazing unless they have already been drilled when the panes are manufactured.
A Measure the belly height of your pet from the floor and position the template (side A) on
the door with the bottom at the same height.
B Mark the bottom side using a marker, you will use it as the base to center the compasses
on the points marked on the template. Then drill a circular hole with radius of 108 mm.
(The centre of the hole is marked on the template).
The biggest job is done. Go to paragraph “FIT THE FLAP”.
Metal doors. Follow the same instructions as those for wooden doors. The only difference
lies in the fact that the electronic system does not work near metallic objects. It is to be
isolated using a non-metal material (wood or similar), which must have a minimum thickness
of 50 mm around the entire perimeter (Fig.5b). This prevents any interference and ensures
the correct operational efficiency of the magnetic mechanism. The biggest job is done. Go
to paragraph “FIT THE FLAP”.
Walls. Follow the same instructions as those for wooden doors. (Jobs B-C-D are to be done
using suitable tools). The tunnel supplied can be installed in walls with a thickness of more
than 55 mm. In this case the tunnel must be extended in cement plastering or by purchasing
the special plastic extension (TUNNEL EXTENSION Fig.10) available as accessory for the
SWING flaps range. The biggest job is done. Go to paragraph “FIT THE FLAP”.
FIT THE FLAP (Fig.5a). Position the flap on the hole and using a marker, mark the positions
where the screws are required. Remove the flap and drill 4 holes using a drill with a 4.5 mm
bit. (Warning! The 4-way locking system is to be fitted on the inner side of the door). Fit the flap
and secure it with the screws supplied, which may have to be cut and filed to remove any
sharp edges. 4 short screws are supplied for fitting to glass doors and fly screens and 4 long
screws for all other installations on a thickness of up to 55 mm. The 4 long screws will have to
be shortened for installations on an intermediary thickness (i.e.: for installations on a
thickness of 45 mm shorten the screws by 10 mm; for installations on a thickness of 35 mm
shorten the screws by 20 mm, and so on). Instead, you could purchase a new set of screws to
your specifications at your local hardware store. Too short a screw could strip the thread
whereas too long a screw could break the front panel of the pet door. To finish the job, cover
the screw holes using the plugs supplied, making sure to match the rib to the seat.
INSERT THE BATTERIES (Fig.6). When the flap is fitted you can insert the batteries in their
compartment; the flap requires n°6 1,5V AA LR6 batteries. We recommend using only good
quality alkaline batteries, in order to ensure the product efficient working. Introduce the
batteries in the correct way and wait for 10 seconds. If any microchip has not been previously
recorded the led will start flashing with cycles of 3 consecutive flashes.
Low batteries warning: a low batteries indicator will flash once every 5 seconds requiring
the replacement with new batteries.
YOUR SWING MICROCHIP FLAP IS NOW READY TO USE!
MICROCHIP RECORDING (Fig.7). To record your cat microchip press the memory button
just once, approach your cat to the flap and the code will automatically be recorded
(you’ll hear the door unlocking). Since then, every time your cat gets near the flap the
device will identify him allowing the entrance. The recording time lasts 10 seconds
maximum. To record more microchips, following the instructions in the same order.
MEMORY DELETING. If you need to delete the product memory, it is sufficient to press the
memory button for 10 seconds and it will go back to the initial conditions (the led will
activate with cycles of 3 consecutive flashes).
MANUAL MODE. If you do not wish to use the electronic system, the cat flap can be
converted to work manually. To do so, press the memory button twice and the electronic
system will be excluded. By pressing again the button (just once) the product will reactivate
the electronic working keeping the previously recorded microchips.
CLEANING: QUICK AND EASY (Fig.9). The product does not require any special maintenance,
just an ordinary cleaning of the flap (A) and of the infrared detectors placed inside the tunnel
(B), at the left and right side, by using a soft and dry cloth.
WARRANTY. Ferplast guarantees SWING MICROCHIP and all its parts and accessories within
the limits provided for in this paragraph and the legal regulations currently in force. The
guarantee only covers manufacturing defects and provides for free repair or replacement.
The guarantee does not cover damage and/or defects caused by carelessness, wear and tear,
usage not in accordance with the instructions and warnings in this booklet, accidents,
tampering, improper use, incorrect repairs and purchases not confirmed by receipt.
The
SWING MICROCHIP complies with the following requirements :
- FCC (Federal Communications Commission) Part 15
Operation is subject to the following two conditions :
(1) This device may not cause harmful interference, and
(2) This device must accept any interference received, including interference that may cause
undesidered operatio.
Changes or modification not expressly approved by the party responsible for compliance
void the user's authority to operate the equipment.
FCC ID: 2AGP9007
GB
ES
 Loading...