EasyManua.ls Logo

FERREX DF-1603 - User Manual

FERREX DF-1603
31 pages
Print Icon
To Next Page IconTo Next Page
Loading...
PRODUCED IN CHINA FOR:
GB
IE
Great care has gone into the manufacture of this product and it should
therefore provide you with years of good service when used properly. In
the event of product failure within its intended use over the course of the
first 3 years after date of purchase, we will remedy the problem as quickly
as possible once it has been brought to our attention. In the unlikely event
of such an occurrence, or if you require any information about the product,
please contact us via our helpline support services, details of which are to be
found both in this manual and on the product itself.
ALDI STORES LTD. PO BOX 26, ATHERSTONE
WARWICKSHIRE, CV9 2SH
ALDI STORES (IRELAND) LTD.
PO BOX 726, NAAS, CO. KILDARE
Visit us at www.aldi.com
AFTER SALES SUPPORT
805494
GB IE
support@coreservice.co.uk
MODEL:
DF-1603
08/2021
+44(0) 1904727501
+353(0) 19022605
3
YEAR
WARRANTY
User Manual
14.4V LI-ION CORDLESS
HAMMER DRILL
Original User Manual
Question and Answer IconNeed help?

Do you have a question about the FERREX DF-1603 and is the answer not in the manual?

Overview

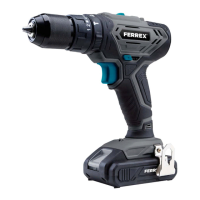
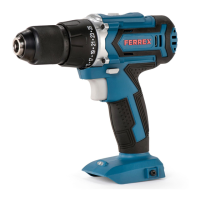
This document describes the Ferrex 14.4V Li-Ion Cordless Hammer Drill, model DF-1603. It is designed for drilling and screwing into wood, stone, and metal.

Function Description:

The Ferrex 14.4V Li-Ion Cordless Hammer Drill is a versatile power tool for various drilling and screwing tasks. It features a quick-release chuck for easy bit changes, a torque adjustment ring to control the fastening force, and a function selector ring to switch between drilling, screwing, and hammer drilling modes. A gear switch allows selection of two speed settings, while a direction switch controls the rotation direction. An integrated LED light illuminates the working area. The device is powered by a 14.4V Lithium-ion battery, which can be charged using the included charger.

Important Technical Specifications:

  • Model: DF-1603
  • Item number: 805494
  • Idle speed n₀:
      1. Gear: 0 to 400 min⁻¹
      1. Gear: 0 to 1350 min⁻¹
  • Blow count per minute:
      1. Gear: 0 to 6000
      1. Gear: 0 to 20250
  • Quick-release chuck: Max. Ø 10 mm
  • Maximum torque: 30 Nm
  • Drills diameter: 1.5 / 2 / 3 / 4 / 5 / 6 mm
  • Battery model: DF1404V01
  • Voltage: 14.4 V
  • Capacity: 1.3 Ah / 18.72 Wh
  • Battery type: Lithium-ion battery (Li-Ion)
  • Charging time: approx. 60 min
  • Charger model: XZ1750-1500G/LB
  • Power supply: 100-240V ~ 50 / 60Hz 1A
  • Output voltage: 17.5 V 1.5 A
  • Protection class: II
  • Sound pressure level Lpa:
    • Drill: 70.00 dB(A)
    • Hammer drilling: 76.30 dB(A)
    • Correction value Kpa: 5 dB
  • Sound power level Lwa:
    • Drill: 81.00 dB(A)
    • Hammer drilling: 87.30 dB(A)
    • Correction value Kwa: 5 dB
  • Hand-arm vibration:
    • Drill: 1.580 m/s²
    • Hammer drilling: 7.395 m/s²
    • Correction value K: 1.5 m/s²

Usage Features:

  • Operating Controls: The device includes a quick-release chuck (7), torque adjustment ring (8), function selector ring (9), gear switch (10), direction switch (11), LED-light (12), and power switch (13).
  • Quick-release chuck: Holds tools and bits.
  • Torque adjustment ring: Presets the limit of torque for tightening screws. Torque can be preset in 1-18 positions.
  • Function selector ring: Selects the drill, screw, or hammer-drill action type.
  • Gear switch: Shifts between low speed "1" and high speed "2".
  • Direction switch: Changes the rotating direction or blocks the power switch. Position arrow pointing to the front (chuck) rotates clockwise. Position arrow pointing to the rear (chuck) rotates counter clockwise. Center position blocks the power switch.
  • LED-light: Illuminates the working area when the power switch is activated.
  • Power switch: Activates the device and electronically controls the rotation speed. Pushing the power switch further increases speed.
  • Battery charge indicator display: Displays the battery charge level using red, yellow, and green LEDs. Red indicates a partially discharged state, red glowing indicates low power, and red flashing indicates an empty battery.
  • Battery charge indicator button: Pressing this button activates the battery charge indicator.
  • LED Charging Process: The LED on the charger lights up red during charging and green when fully charged.
  • Charging the Battery: Plug the power adapter of the charger into the socket. Plug the barrel connector of the charger into the battery socket. The charger LED lights up red when charging and green when fully charged. The battery heats up during charging.
  • Inserting Tools: Open the quick-release chuck by turning it in the + direction. Insert the tool until it is deep enough to ensure sufficient power transmission. Close the quick-release chuck by turning it firmly in the - direction.
  • Removing Tools: Open the quick-release chuck by turning it in the + direction. Remove the tool.
  • Inserting/Removing Battery: Press and hold the battery unlock key. Pull the battery out of the battery holder. To insert, place the battery on the front edge of the battery holder, align, and slide it into the battery holder until it locks.
  • Function Selection:
    • Screwing: Use function selection ring (9) for screwing, torque adjustment ring (8) for 1-18, and gear switch (10) for 1.
    • Drilling (Brickwork/Concrete): Use function selection ring (9) for hammer drilling, no function for torque adjustment ring (8), and gear switch (10) for 2.
    • Drilling (Wood/Metal): Use function selection ring (9) for drilling, no function for torque adjustment ring (8), and gear switch (10) for 1 or 2.
  • Drilling and Screwing: Mark the target spot. Insert the drill. Insert the battery. Set the function selector ring appropriately. Set the direction switch on the arrow that points to the quick-release chuck. Place the drill straight on the mark. Press the power switch lightly to start the device. Press the power switch harder if necessary. To stop screwing, release the power switch. After finishing, let the device and tools cool off. Remove the battery and drill.
  • Resolving Jam: If the drill is jammed, release the power switch and pull the drill out of the drill hole. Check if the device is working by briefly pressing the power switch. If it does not start, find the problem (see troubleshooting). If the device works properly, follow further steps. Check if the jam originates from an unexpected rigid object. If the jam does not originate from an object, follow the steps. When screwing, set the torque adjustment ring to a higher torque. Press the power switch all the way down and apply a little pressure to the device.

Maintenance Features:

  • Maintenance-free: The device and accessories are maintenance-free. Do not lubricate the device. Dust and chips will deposit on a film of grease and increase wear.
  • Cleaning: Switch off the device. Remove the battery from the battery holder. Let the device and the accessory tool cool down completely. Clean the housing with a soft, slightly damp cloth. Clean the connection contacts of the battery holder with a dry, clean cloth. Dry the device thoroughly and leave it to dry completely for a while.
  • Storage: Store the device in a clean, dry, frost-protected place out of the reach of children. Thoroughly clean the device. Always store device parts and accessories together with the device. If possible, pack the device in the original packaging.
  • Troubleshooting:
    • Device does not start: Possible cause is a weak battery or an incorrectly inserted battery. Slide the battery into the battery holder until it clicks into place.
    • Press the direction switch all the way in: If the direction switch is in the middle position, the device will not start.
  • Service: Have your power tool serviced by a qualified repair person using only identical replacement parts. This will ensure that the safety of the power tool is maintained. Never service damaged battery packs. Service of battery packs should only be performed by the manufacturer or authorized service providers.

FERREX DF-1603 Specifications

General IconGeneral
BrandFERREX
ModelDF-1603
CategoryDrill
LanguageEnglish

Related product manuals