This document is a user manual for the FERREX Belt and Disc Sander, model number MM4115A, with item number 805501. It provides comprehensive information on the device's function, technical specifications, usage, and maintenance.
Function Description
The FERREX Belt and Disc Sander is designed for sanding wood of all types, as well as materials that are similar to wood. It is suitable for workpieces small enough to fully rest on the respective worktable. Working on larger workpieces requires additional supports not included with the device. The device is intended for private use only and is not suitable for commercial use. It is suitable for use in non-condensing and non-explosive atmospheres. Any other use is improper and may lead to product damage or even personal injury.
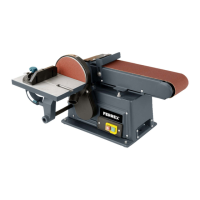
The device features both a sanding disc and a sanding belt, allowing for versatile sanding operations. It can be used for chamfering, mitre sanding, sanding flat surfaces, and sanding curved surfaces. The worktable can be tilted from 0 to 45° for chamfering and is adjustable for both the sanding disc and the sanding belt. The sanding belt also includes a tracking knob for adjustment.
Important Technical Specifications
- Model number: MM4115A
- Item number: 805501
- Input voltage: 230–240 V~, 50 Hz
- Power consumption: 500 W
- Sanding belt speed (without load): 7.6 m/s
- Motor speed (without load): 2950 min⁻¹
- Disc no-load speed: 2360 min⁻¹
- Sanding disc size: 152 mm
- Worktable size: 158 x 225 mm
- Sanding belt size: 100 x 914 mm
- Table tilting range: 0–45°
- Sanding belt tilting range: 0–90°
- Net weight: approx. 22 kg
- Sound pressure level Lpa: 90.00 dB(A)
- Uncertainty Kpa: 3.0 dB(A)
- Sound power level Lwa: 101.00 dB(A)
- Uncertainty Kwa: 3.0 dB(A)
The device comes with a 3-year warranty.
Usage Features
The manual outlines detailed assembly instructions, including attaching rubber feet to the base plate, mounting the base plate, attaching the cord wrap, attaching the disc guard, attaching the worktable to the sanding disc, and attaching the worktable to the belt sander. Required tools for assembly include a Phillips screwdriver (PH1) and an 8 mm spanner.
Before first use:
- Ensure the device is properly assembled and all components are secure.
- Familiarize yourself with the ON/OFF switch.
Operation:
- Turning the device on and off: The device is turned on and off using the ON/OFF switch (22) located on the right-hand part of the device.
- Chamfering: The worktable (26) can be tilted from 0 to 45° for chamfering. This involves loosening the table lock knob (24) and bevel gauge (25) to set the desired tilt angle, then tightening the knobs.
- Mitre sanding: The mitre gauge (2) is inserted into the guide groove of the worktable (26). The fixing screw on the mitre gauge is loosened to set the desired angle using the scale, then tightened.
- Sanding flat surfaces: The workpiece is held firmly and pressed against the work support (18) of the sanding belt (19). Pressure is applied to the workpiece in the direction of the sanding belt.
- Sanding curved surfaces: The workpiece is held firmly and sanded in the area of the position shown by pressing it evenly against the sanding belt (19) and moving it gently back and forth.
Safety Notes:
- Always wear hearing protection, protective goggles, and a dust mask.
- Keep the work area tidy and well lit.
- Do not operate power tools in explosive atmospheres.
- Power tool plugs must match the outlet.
- Avoid body contact with earthed or grounded surfaces.
- Do not expose power tools to rain or wet conditions.
- Do not misuse the power cord.
- Use an extension cord suitable for outdoor use when operating outdoors.
- Use a residual current device (RCD) for electrical safety.
- Stay alert and use common sense when operating a power tool.
- Do not use the tool when tired or under the influence of drugs, alcohol, or medication.
- Use personal protective equipment such as a dust mask, non-skid safety shoes, hard hat, or hearing protection.
- Prevent unintentional starting.
- Remove any adjusting key or wrench before turning the power tool on.
- Do not overreach.
- Dress properly; do not wear loose clothing or jewellery.
- If devices are provided for dust extraction, ensure these are connected and properly used.
- Do not let familiarity gained from frequent use of tools allow you to become complacent.
- Do not overload the power tool.
- Do not use any power tool that has a defective switch.
- Disconnect the plug from the socket and/or remove any removable batteries before making adjustments.
- Keep power tools out of the reach of children.
- Power tools and insert tools must be subject to careful maintenance.
- Keep cutting tools sharp and clean.
- Use power tools, insert tools, insert tool parts, etc. according to these instructions.
- Keep handles and grip surfaces dry, clean, and free of oil and grease.
- Make sure the sanding machine is stably positioned on firm ground.
- Check all screws regularly to make sure they are tight.
- Avoid uncomfortable working positions.
- Be aware that the sanding disc and sanding belt are always running when the machine is in operation.
- Noise levels: use hearing protection.
- To prevent suddenly being caught up in the sanding disc or sanding belt: Do not wear gloves, take off any jewellery or loose items of clothing, tie up long hair, and wear long sleeves.
- Wear gloves when replacing the sanding disc or sanding belt.
- Always pull the mains plug out of the socket before carrying out adjustment and maintenance.
- Never leave the sanding machine unattended.
- In order to prevent electric shocks, do not touch the metal contacts of the plug.
- Do not use the cable to pull the plug out of the socket.
- Only use accessories that are listed in the operating manual.
- Avoid awkward hand positions.
- If the sanding disc or sanding belt get stuck, or if the device is jammed with the material being sanded, switch off the sanding machine immediately, unplug the mains plug, and remove the blockage.
Maintenance Features
Cleaning:
- Always switch off the device and pull the mains plug out of the socket before cleaning.
- Never immerse the device in water or other liquids.
- Make sure that no water or other liquid gets inside the housing.
- Use a soft cloth or brush to clean the housing.
- Remove dust or chips by blowing with compressed air.
Replacing the sanding disc:
- Remove the disc guard (11) as shown in the illustration.
- Pull off the sandpaper off the sanding disc (17) and replace it with an equivalent piece.
- Reattach the disc guard.
Replacing the sanding belt:
- Move the belt tension lever (28) to the right to loosen the sanding belt.
- Remove both screws as shown in the illustration.
- Remove the work support (18) and the belt dust outlet (27).
- Bring the sanding belt (19) into the vertical position.
- Remove the lower belt cover (21).
- Pull off the sanding belt as shown in the illustration.
- Replace the sanding belt with an equivalent belt.
- Pay attention to the belt running direction (arrow on the inside of the sanding belt).
- Align the belt so that it is centred (same distance from both outer edges).
- Follow the steps in the reverse order to put the device back together.
Adjusting belt tracking:
- If the sanding belt (19) shifts to the left or right in the running direction, carry out the following adjustment steps:
- Turn the tracking knob (29) 1/4 of a revolution clockwise if the sanding belt moves towards the sanding disc (17).
- Turn the tracking knob 1/4 of a revolution anticlockwise if the sanding belt moves away from the sanding disc.
- Switch on the device and check whether tracking of the sanding belt is correct.
- Follow these steps to adjust belt tracking as needed.
Storage:
- Allow the device to completely cool down.
- Place the device so that it can't fall into water.
- Store the device in a clean, dry, frost-protected place out of the reach of children.
- Thoroughly clean the device.
- Always store device parts and accessories together with the device.
- If possible, pack the device in the original packaging.
Troubleshooting:
The manual includes a troubleshooting section that lists common problems, possible causes, and remedies. For example:
- Problem: The device cannot be switched on.
- Possible cause: The device is not powered.
- Remedy: Check the cables, plugs, and the power supply.
- Possible cause: The device has a faulty fuse.
- Remedy: Have the device repaired by a qualified technician.
- Possible cause: The motor is defective.
- Remedy: Contact after-sales support or have the device repaired by a qualified technician.
- Problem: The sanding belt (19) shifts significantly to the left or right in the running direction.
- Possible cause: Belt tracking is not correctly set.
- Remedy: Adjust belt tracking (see section "Adjusting belt tracking").
- Problem: The sanding effect of the sanding belt (19) or disc sander (17) is weak.
- Possible cause: The sandpaper is worn down.
- Remedy: Replace the sanding belt or the sandpaper (see section "Replacing the sanding belt" or "Replacing the sandpaper").
The manual also includes a Declaration of Conformity, stating that the product complies with relevant EU directives and harmonized standards. Information on disposal of packaging and old electrical devices is provided, emphasizing environmentally responsible practices.