7
GB
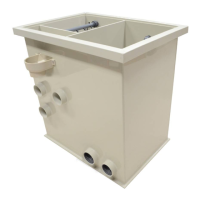
INSTALLING FILTREAU COMBI PF20; SEE FIGURE 2
1. Determine the exact location of the lter and place it on a stable, level suboor.
2. Place the lter behind the pump at a suitable location. Keep in mind when doing this that the maximum water
level of the pond is never higher than the lter outlets.
3. Remove the top section of the lter and ll the moving-bed bio-chamber with lter material (approx. 100L).
4. Connect the air pump (min. 40L/h) to the grommet (D).
5. Put the top section of the lter back.
6. Connect the pump outlet to the lter inlet using high-quality pressure PVC and/or one or more exible sleeves.
7. Connect the lter outlets to your pond’s return line (see also INSTALLING HIGH PRESSURE PUMP).
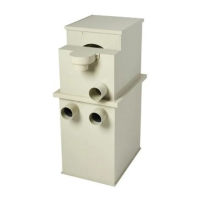
8. Fill pond until the maximum water level has been reached. (See owchart p. 5).
9. Place the lid (E) back on the housing (F).
10. Now connect the plugs of the devices to the appropriate sockets on the control box (G)
(see indications on the control box (G)).
11. Insert the plug (H) of the control box (G) in the appropriate socket and switch on the system by toggling
the switch (I).
12. Wait until the pump has lled the entire lter.
13. Now check all pipes, hoses and connections for leaks.
14. Hold the button (J) for ten seconds to activate the motor and high pressure pump.
15. Now check again all pipes, hoses and connections for leaks.
16. Aer about 20 to 30 minutes the rinse cycle should be repeated automatically.
17. For longer delays, you can adjust the height of the oat (K).
(PLEASE NOTE! Immediately aer the lter is installed/used, the rinse cycle may be very short and will increase in
length as the contamination/oating debris decreases, up to a cycle of 20 to 30 min. When adjusting the
oat (K)/ opening the cover (E), the power supply must always be switched o.)
MAINTENANCE & DISASSEMBLY; SEE FIGURE 2/3
The device requires maintenance at least once a month. During maintenance the power supply must be
disconnected. The screen panel should be checked for wear and tear.
1. Disconnect the power supply and close the piping.
2. Ensure that the water can drain out of the housing (F).
3. Turn the entire drum (L) one revolution by hand and check the assembly for wear.
If necessary, you can replace the screen panel (M) (see heading: REPLACING SCREEN PANEL).
4. Also check the drain (N) for any lamentous algae/dirt that may have collected.
5. Place the lid back on the housing (F) and put the plug (H) back in the socket.
ACTIVATION OF ‘COMBI PF20’ BYPASS:
During a treatment or in the event of a problem the drum can be short-circuited by means of the bypass.
ACTIVATION OF BYPASS:
1. Switch o control box.
2. Remove two red caps from the partition wall.
3. Connect circulation pump to 230V mains outlet.
# SETTING SLIP CLUTCH TORQUE 65 NM
The drive sha is tted with a slip clutch that allows the sha to turn freely if something prevents the drum from
turning.
 Loading...