and connect the nozzle. Check the pressure gauge on the nozzle for the correct
tire pressure reading.
6a. If the pressure reading is less than 2 bar / 29 psi, THE TIRE IS TOO
DAMAGED TO REPAIR. Return the kit to its compartment inside the vehicle,
then call for roadside assistance.
6b. If the pressure reading is 2 bar / 29 psi or above, switch on the ination
nozzle [8] and inate the tire to the required level (Fig. ). Disconnect the
kit and return it to its compartment inside the vehicle, then call for roadside
assistance. Drive carefully and take the vehicle to a specialist or the
manufacturer’s assistance service as soon as possible.
Fix&GoINFLATION
Connect the valve connector [11] of the black ination tube [10] to the air tank
of the truck and the fast connector [9] to the ination nozzle [8]. Remove the
cap from the tire valve and connect the nozzle. Operate the nozzle until the
required pressure is reached (Fig. ).
Fix&GoREPLACEMENT
Only use original rells that can be purchased online from the website
store.xandgo.com or from authorised Fix&Go retailers. Remove the sealant
container [4] by pressing the release button [7]. Insert the new cartridge,
pressing it rmly downwards. For more information, see the images on the
product label.
CAUTION: The information required by current standards is provided on the label used
on the Fix&Go kit. Please read all of the warnings and instructions before use. Do not use the
sealant after its expiration date provided on the label. Show this sealant container and label
to any staff who need to handle tires treated with the tire repair kit. Fix&Go is a temporary tire
repair system. See a tyre specialist as soon as possible after use. The kit only repairs holes in
the tyre tread; if the hole is over 6 mm / 0.24 in in diameter and/or in other points of the tire, do
not use the kit, but call for roadside assistance. Do not remove any foreign bodies from the tire.
The sealant uid is effective only at temperatures between -40°C / - 40°F and +50°C / +122°F Do
not leave the compressor working for over 20 minutes at any one time: danger of overheating
the unit. The sealant will not damage the tire or the pressure sensors (TPMS).
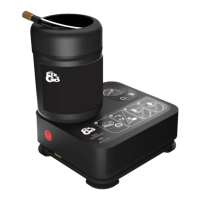
Fix&GoTIRE REPAIRS
1. Park the vehicle in a safe, accessible place and engage the handbrake. Take
out the kit and open the stabilisers. Remove the cap from the valve on the
punctured tire and connect the transparent sealant tube [6] (Fig. ).
2. Make sure that the function select button [1] is set to off (o). Insert the fast
connector [9] of the black ination tube [10] into the compressor and the valve
connector [11] into the truck’s air tank (Fig. ).
3. Switch on the vehicle’s engine and run the compressor by turning the
function select dial [1] to position two (●●). As soon as the sealant has lled
the tire, turn the dial to position three (●●●) to inate the tire more quickly (Fig.
); to adjust any excess pressure in the tire, press the air release button [2].
Once the pressure has reached the ideal level, as stated in the vehicle’s Use
and Maintenance manual, switch off the compressor (Fig. ).
If, after 15 minutes from the compressor being switched on, the pressure gauge
[3] still shows a pressure of less than 2 bar / 29 psi, switch off the compressor
and disconnect the sealant tube [6] from the tire valve. Tighten the valve cap on
the valve and move the vehicle so that the tire makes about 5 turns to allow the
sealant to be distributed inside it. Stop the vehicle, release the fast connector
[9] from the compressor and insert the inator nozzle [8] before connecting this
to the punctured tire. Operate the nozzle until the required pressure is reached.
If, after 15 more minutes of compressor use, the pressure continues to be less
than 2 bar / 29 psi, THE TIRE IS TOO DAMAGED TO REPAIR. Return the kit to its
compartment inside the vehicle, then call for roadside assistance.
4. Disassemble the kit, removing all tubes, then tighten the cap onto the tire
valve. Afx the maximum speed sticker [5] in a position where it is easily seen
and resume driving, according to the limit shown, and without any sudden
acceleration or braking (Fig. ). After driving for about 10 minutes, park the
vehicle in a safe place, leaving the engine running.
5. Insert the valve connector [11] to the air tank of the truck and the fast
connector [9] to the ination nozzle [8]. Remove the cap from the tire valve
EN
USER GUIDE
 Loading...