20 www.ama.pt
IMPORTANT:
Press and hold the accessory release
buon while ng or removing the tube
or accessories. Do not force any of the
components, as this could damage the
appliance.
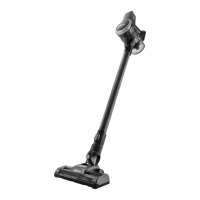
DESCRIPTION
1. Vacuum cleaner body
2. Dust bin
3. Bin lid buon
4. Bin release buon
5. HEPA lter
6. HEPA lter enclosure
7. Metallic lter
8. Baery
9. ON/OFF buon
10. Use/baery indicator
11. Wand
12. Accessory release buon
13. Wand/accessory connecon
14. Mul-surface motorized cleaner head
15. Socket
16. Rotang brush
17. Rotang brush release buon
18. Upholstery brush
19. Crevice tool
20. Wall dock
21. Wall dock rear cover
22. Charger
23. Screws and dowels for the wall dock
INSTALLATION/ASSEMBLY
Remove all labels, sckers and tags except
the product nameplate.
Wall dock
The appliance has a wall dock, which should
be axed to the wall.
Aach the wall dock as you see t, using
dowels, screws, glue, etc.
Make sure that the dock can support at
least double the weight of the appliance.
Dock the appliance in the wall dock.
The appliance can be charged without
using the wall dock. To do so, unscrew the
rear cover of the wall dock and remove
the cable from the charger, which can be
directly connected to the vacuum cleaner.
Assembling the dust bin (Fig. 1)
Align the UNLOCK symbol on the dust bin
with the mark on the vacuum cleaner body.
Set the bin into the body.
Pressing and holding the bin release buon,
turn the dust bin counterclockwise unl
you hear a CLICK.
Assembling the baery (Fig. 2)
Insert the baery and make sure it is
securely aached.
Warning: New baeries are not fully
charged and should be charged completely
before using the appliance for the rst me.
Charge the baery at room temperatures
between 4 and 40ºC (39-104ºF).
Connect the charger to a wall socket.
The me needed for a full charge is around
3 to 4 hours. Never overload the baeries
(only the rst charge is recommended to be
done over 5 consecuve hours).