15
PD 2G 18.0-EC HD / DD 2G 18.0-EC HD
Max.
torque
Nm 70/158 70 / 158
No-load
speed
r.p.m 0-550/2000 0-550/2000
TURBO
speed
r.p.m 0-700/2500 0-700/2500
Impact rate bpm
0-8800/
32000
-
TURBO
impact rate
bpm
0-11200/
40000
-
Chuck mm 13 13
Max. drill
diameter
– in wood
– in steel
– in
masonry
mm
mm
mm
89
13
16
89
13
-
Weight
according
to”EPTA
Procedure
01/2003”
(without
battery)
kg 1.68 1.6
Battery AP 2.5 AP 5.0 AP 8.0
Weight of
battery/kg
0,42 0,72 1,18
Working
Temperature
-10~40°C
Charging
Temperature
4~40°C
Storage
Temperature
0~50°C
Charger CA 10.8/18.0, CA 18.0-LD
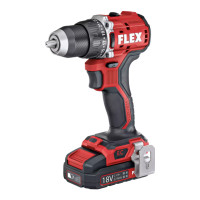
Overview (see figure A)
The numbering of the product features refers
to the illustration of the machine on the
graphics page.
1 Trigger switch
For switching on and off and for
accelerating up to maximum rotational
speed
2 Direction preselector switch
3 Speed selector switch
4 Operating mode turning dial
5 Torque setting turning dial
6 Chuck jaws
7 Workplace lamp
8 Handle
9 Turbo function indicator light
10 Insertion slot for battery
11 Turbo function button
12 Auxiliary handle
13 Li-ion battery
14 Release button for battery
15 Power-indicator button
16 Power indicator
17 Belt clip
18 Fastening screw
19 Bit bracket
Operating instructions
WARNING!
Remove the battery before carrying out any
work on the power tool.
Before switching on the power tool
Unpack the percussion drill driver and check
that here are no missing or damaged parts.
NOTE
The batteries are not fully charged on delivery.
Prior to initial operation, charge the batteries
fully. Refer to the charger operating manual.
Inserting/replacing the battery
Press the charged battery13 into the power tool
until it clicks into place (see figure B).
To remove, press the release button 14 and pull
out the battery (see figure C).
CAUTION!
When the device is not in use, protect the
battery contacts. Loose metal parts may short
circuit the contacts; explosion and fire hazard!
Battery state of charge
Press the power indicator 15 button to
check the state of power indicator 16.
When the lowest level of the power
indicator starts flashing after pressing
power indicator button, the battery must
be recharged.
Removable belt clip and bit clip
Remove the battery pack from the tool.
 Loading...