20
www.flexit.com
b
Installation
The fan should be fitted as high as possible on the wall to achieve the
best result. It must be fitted in compliance with existing laws and
regulations. The fan is double insulated and do not require a
connection to electrical earth. The protection rating is IP45. The fan
should be fitted as far from the fresh air intake as possible to achieve
the best possible air through-flow in the room. Fresh air is supplied
directly from outside through a wall ventilator or from adjacent rooms,
i.e. through a grate or slot in a door.
1. Cut out a hole that is slightly larger than the diameter of the fan.
Recommended hole opening, see Fig. 2.
2. Adjust a wall lead-through/duct between the exterior and interior
openings. The wall lead-through is to slope gently towards the
outer wall to allow any condensation to run out.
3. Remove the front cover by releasing the snap fasteners at the
bottom or top.
4. Hold the fan on the wall and mark the four screw holes. Make sure
that the fan is straight.
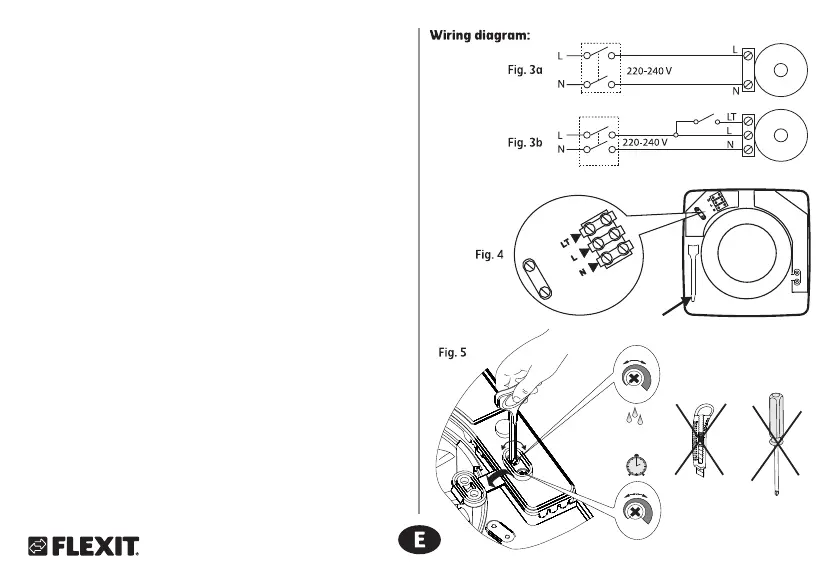
5. Electrical connection must be carried out by an authorised electri-
cian as shown in the circuit diagram, 3a - 3b. Make sure that there
is around 25 cm of cable from the cable lead-in so that electrical
connection can be carried out.
6. Connection point, Fig. 4, is accessed by lifting off the plastic cover.
The cable is fed through the rubber nipple. Make sure that the
cover is re-fitted and that the gasket is correctly in place.
7. Fit the front cover by pressing it towards the fan until it is locked
into position by the snap fasteners. The fan is fitted with the light
diodes on the right side (above the circuit board/lamp).
The damper which is fitted behind on the sleeve, can be removed.
Remove by pulling off. This ensures low levels of ventilation when the
fan is not in operation. NB! The damper cannot be re-fitted after it
has been removed.
-
60%
90%
H
+
-
+
+
-
2min
30min
T
 Loading...