Document Title Document No. Revision
Date Section
Supplement S3 to the AMM CTLS-LSA –
CTLS-LSA with ROTAX 912iS
AF 0480 0011 00 05-Aug-12 28-00-9
Approval Ref.: Approved on the Basis of Manufacturer Self Declaration
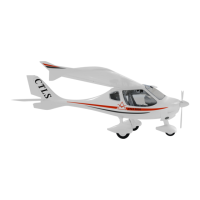
C. Gascolator Inspection
1 Drain all fuel from the system.
2
Remove lock wire from Gascolator and remove gascolator bowl.
3 Clean gascolator bowl and inspect for damage, cracks and scuffing marks.
4 Clean gascolator filter screen.
5 Assemble gascolator in reverse order.
D Shut off valve Inspection
1 Remove lower instrument panel.
2
Inspect shut off valve attachment and for leakage. Check that valve engages
noticeable into the position ON/OFF. Ensure that both valves open / close
simultaneously.
E Fuel Tanks Inspection
1 Drain all fuel from the system.
2 Remove the wings as per instructions in the basic AMM.
3 Inspect external surfaces of fuel tank for leakages and foreign objects.
4
Inspect sight gauges for security and presence of fuel leakage, and readable
indication. Replace gauges if necessary
5 Inspect Fuel filler caps for proper locking and leakage.
6 Check that the placards are present and readable.
7
Unscrew 6 nuts M6, securing the cap plate at the root rib. Inspect inner surfaces
of fuel tanks, condition of sealant and inner structure. Clean if required.
8 Inspect fuel flap in slosh rib for proper functioning and attachment.
9
Inspect the strainer at the fuel tank outlet for contamination through opening in
root rib. Clean if required.
11
Check fuel vent lines and connections for leakage and blockage. Blow through if
required.
12
Remove all remains of the old Hylomar sealant and of the old rubber seal ring
KF 2800 0009 from the cap plate and from the flange at the wing.
13
Apply the Hylomar Universal Blue onto the surfaces of the root rib ring, of the
cap plate, and onto both contact surfaces of the rubber seal ring.
 Loading...