2 EN-US English
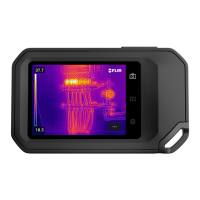
2.7.3 Screen elements
1. Result table.
2. Status icons.
3. Live view button.
4. Gallery button.
5. Settings button.
6. Menu button.
7. Spotmeter.
8. Temperature scale.
2.8 Quick start guide
1. Push the On/off button to turn on the camera.
2. Follow the instructions on the camera screen to select the language, units,
date and time formats, etc.
3. To enable upload of images for storage online, you need to connect your
camera to a FLIR Ignite account. Use a computer or other device with inter-
net access and follow the instructions on the camera screen.
4. To enable automatic upload of images, select Settings > Save options & stor-
age > Auto upload = On.
5. To save an image, push the Save button.
6. If automatic upload is enabled, new images will automatically be uploaded to
your FLIR Ignite account when the camera is connected to the internet. You
can also upload images manually or move images from the camera using
the USB cable.
7. To access your FLIR Ignite account, go to https://ignite.flir.com.
#T810521; r. AE/84372/84372; mul 5
 Loading...