EasyManua.ls Logo

Flowmaster Outlaw Series User Manual

Flowmaster Outlaw Series
3 pages
To Next Page IconTo Next Page
Page #1 background imageLoading...
Page #1 background image
409S Stainless Steel
Before you begin, please understand that the installation of this system requires significant
disassembly of the rear fascia.
1) Before you begin, please understand that the installation of this system
requires significant disassembly. The entire lower rear bumper fascia
(Blue portion in photo) must be removed. Because this is a painted body
panel, you may want to consider covering it with masking tape for the
disassembly/assembly process to prevent any scratches. Note: Do not
turn the vehicle ignition on anytime during the removal/assembly
process
2) Begin by removing the rear license plate. Next, along the bottom of the
bumper fascia there are several screws that secure the lower edges.
Remove all of these screws (save all fasteners for reassembly).
3) On outside ends of each side of the bumper fascia there are small, plastic
vertical grates that must be removed. These are held in place by small
clips. Use a small screwdriver to carefully pop these out. At the bottom,
where the red and black panels touch, they clip together. Use a small flat
blade screwdriver to carefully separate them.
Installation Instructions for:
SYSTEM #817754
2014-17 CHEVROLET CORVETTE
6.2L ENGINE · AXLE-BACK SYSTEM
NOT INTENDED FOR VEHICLES W/ DUAL MODE OPTION
PACKING LIST
Qty Description Part #
1 Left Muffler 15188S
1
Right Muffler 15189S
1
Parts kit PK837
1 Laser Cut Spacer HA1626
4 ¼-20x3/4 Button Head HW238
4 ¼-20 Hex Nut HW101
4 ¼ Split Lock Washer HW301
Question and Answer IconNeed help?

Do you have a question about the Flowmaster Outlaw Series and is the answer not in the manual?

Flowmaster Outlaw Series Specifications

General IconGeneral
Sound LevelAggressive
SeriesOutlaw
TypeMuffler
MaterialAluminized Steel
Inlet DiameterVaries by model
Outlet DiameterVaries by model
ApplicationUniversal
Muffler Body ShapeOval
Muffler FinishBlack

Summary

System #817754 Installation Instructions

Initial Disassembly Warning and Preparation

Understand significant disassembly is required. Protect painted panels and avoid turning ignition on during removal.

Remove Rear License Plate and Lower Fascia Screws

Remove the rear license plate and all screws securing the bottom edges of the bumper fascia. Save fasteners for reassembly.

Remove Side Bumper Grates and Separators

Carefully remove small plastic vertical grates from bumper fascia ends using a screwdriver. Separate clipped panels at the bottom.

Continued Fascia Removal and Muffler Preparation

Remove Red Reflectors and Fascia Bolts

Carefully pop out red reflectors, then remove hex bolts securing fascia to frame and under license plate area.

Remove Final Fascia Bolts and Rear Fascia Panel

Remove two last hex bolts above exhaust tips. With a helper, carefully pull off the rear fascia panel secured by top edge clips.

Prepare for Under-Car Work and Remove Muffler Brackets

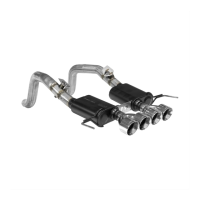
Position car on hoist/stands. Remove small brackets connecting factory mufflers before separate muffler removal.

Exhaust System Component Removal and Transfer

Disconnect Exhaust Pipe Clamps and Actuators

Loosen clamps forward of rear sub-frame. Disconnect electrical connectors for the top-mounted butterfly actuators.

Remove Mufflers and Transfer Hanger Brackets

Remove bolts securing muffler hanger brackets. Wiggle muffler assembly loose and over axle. Transfer brackets to new mufflers.

Remove and Transfer Butterfly Actuators

Remove butterfly actuators from original muffler pipes using three small hex head screws.

New Muffler Installation and Final Steps

Install Butterfly Actuators on New Mufflers

Install the removed butterfly actuators onto the new Flowmaster muffler valves using the provided hex head screws.

Reinstall Mufflers and Connect Components

Position new mufflers over axle into clamped connections. Re-use original bolts for rear hanger brackets. Reconnect electrical connectors.

Secure Mufflers Together and Final Adjustments

Use supplied bolts, nuts, and washers to connect mufflers. Reconnect actuators. Adjust alignment and tighten inlet clamps.

Related product manuals