9
Schmidt Armaturen
AI - FlowTop
Reassembly
Step 04
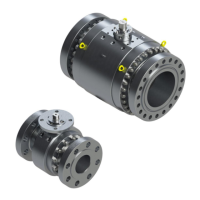
• Insert Special Tool (change seat - tool) in the body
(Ensure that the pin clicks in place!) and tighten using the
torque wrench
CAUTION !
Tightening moment for the screwed seat (2.1)
as per Table 02 (Page 64).
Disassembly
Step 04
• Insert Special Tool (change seat - tool) in the body
(Ensure that the pin clicks in place!) and remove using a
suitable tool
Disassembly
Step 05
• Remove screwed seat (2.1) and profi le ring (2.5)
CAU TION !
Remove profi le ring remains (2.5) in the body.
Do not damage sealing surface !
Reassembly
Step 05
Reassembly takes place in reverse order.
CAUTION !
Clean parts
Check screwed seat, thread in the body and
sealing surface for damage.
Usenewprolering(2.5)!
• Insert pro le ring (2.5) in the body, grease the thread
screwed seat (2.1) and screw in by hand
CAUTION !
Lubrication as per Table 06 (Page 65)