Do you have a question about the Fluke Ti450 SF and is the answer not in the manual?
Insert SD memory card into the slot under the rubber cover on the side of the camera.
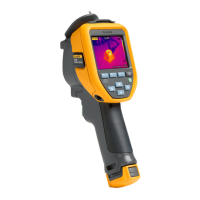
Insert a fully charged battery into the base of the hand grip. Battery life is indicated on the LCD.
Press the Power button until an audible tone signals camera startup or shutdown.
Adjust focus ring manually or use laser-assisted auto focus trigger for optimal image focus.
Select Image, then Palette, and choose from available color selections using buttons or touchscreen.
Select Image, then IR-Fusion. Choose between IR only, Picture in Picture, or Visual modes.
From the home screen, select SF Gas Detection Mode and then SF Gas Detection Mode On.
Select Low Gain (Handheld) Mode for small leaks or High Gain (Tripod) Mode for larger leaks.
Select Image Capture for single images or Video Capture for video sequences.
Pause live image, then select Save or Edit to add details before saving the image.
Press trigger to start recording, press again to pause, then select Done and Save.
Select Memory, then an .IS2 file, and open it to view the stored still image.
Select Memory, then an .IS3 file, and open it to view the stored video sequence.
| Resolution | 320 x 240 pixels |
|---|---|
| Temperature Range | -20°C to +1200°C (-4°F to +2192°F) |
| LaserSharp Auto Focus | Yes |
| Image Capture Frequency | 60 Hz |
| Laser Pointer | Yes |
| IP Rating | IP54 |
| Detector Type | Uncooled microbolometer |
| Focus System | LaserSharp Auto Focus |
| Display | 3.5 inch LCD |
| Battery Life | 4 hours |
| Accuracy | ±2°C or ± 2% |
| Wireless Connectivity | Wi-Fi |
| Dimensions | 27.7 cm x 12.2 cm x 16.7 cm (10.9 in x 4.8 in x 6.5 in) |
| Field of View | 24° x 17° |