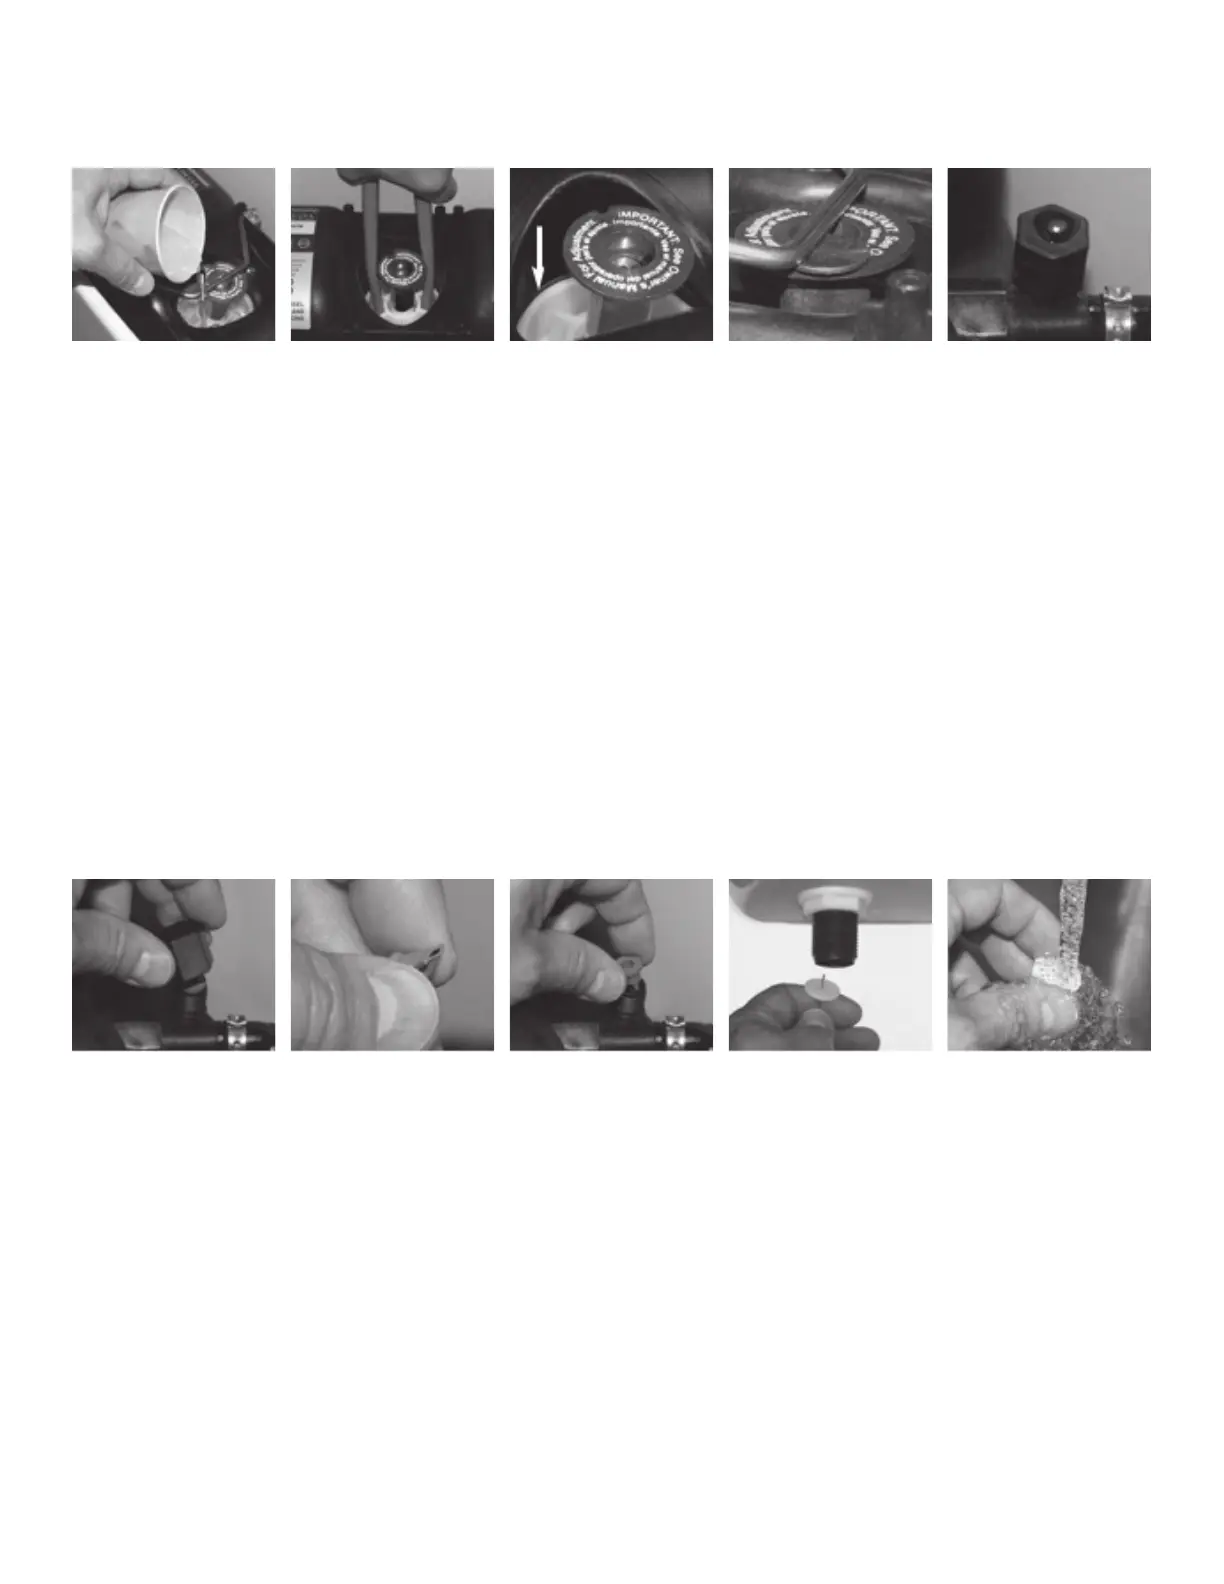
Step 1. Check Flush Cartridge 3
A. Turn off water supply and flush toilet.
B. Pour water onto top of cartridge (Fig. 1) and turn on water.
C. Watch for air bubbles. Consistent flow of bubbles indicates cartridge needs to
be replaced. No bubbles visible, move on to Step 4.
Step 2. Flush Cartridge 3 Installation
A. Turn off water and flush the toilet.
B. Use the handle end of pliers (Fig. 2) to unscrew the cartridge from the
vessel.
C. Drop in new cartridge and screw in until one female thread (Fig. 3) of vessel
is showing.
D. Turn on water. Continue to screw in cartridge slowly, 1/8 to 1/4 turn
increments until water stops running into the bowl and tank pressurizes.
Step 3. Actuator 3 (F) Adjustment
A. Start by loosening the setscrew in the center of the actuator. Adjust the
height of the actuator by screwing it up or down. There should be a gap
(Fig. 4) (about the thickness of a penny) between the rod and actuator when
gently lifting the rod. When accomplished tighten the setscrew in the center
of the actuator.
Step 4. Check Air Inducer 2 (D)
A. Place several drops of water over hole on top of air inducer and flush toilet
(Fig. 5). If drop is vacuumed in, move onto step 6. If not, air inducer needs
to be cleaned.
Step 5. Clean Air Inducer 2 (D)
A. Turn off water and flush toilet. Unscrew the cap of the air inducer (the
smaller of the two caps) (Fig. 6).
B. Pull the duckbill out from the cap and clean it by gently squeezing it (Fig. 7)
between your fingers under a flow of water. Inspect the lips of the duckbill.
If they are deformed, the duckbill needs to be replaced.
C. Reassemble, insert the duckbill into the housing (Fig. 8) body and reinstall
the cap finger tight.
Step 6. Clean Inlet Screen 1 (A)
A. Clean the inlet screen by turning off the water supply, disconnecting the
water supply line from the supply shank and removing the screen with a
paper clip (Fig. 9).
B. Clean screen (Fig. 10) and replace.
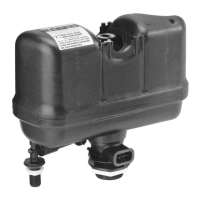
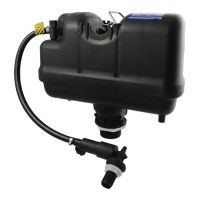
Other Points to Remember
1. Pressure-assist toilets get their energy from the water supply.
2. Refer to the toilet manufacturers’ specifications for minimum operating
pressure for the fixture.
3. A blocked bowl or drain will affect the fixture’s performance. To check for
this, pour 2 to 3 gallons of water into the bowl. If the bowl accumulates
water in it, this would indicate that something is blocking the bowl/drain. If
you need additional help, please contact the manufacturer of the flushing
system, or do a word search on “pressure-assist toilets” on the web.
Fig. 1 Fig. 2 Fig. 3 Fig. 4 Fig. 5
Fig. 6 Fig. 7 Fig. 8 Fig. 9 Fig. 10
Operation
All pressure-assist toilets get their energy from the water supply line. It is important to have sufficient pressure at the supply. Refer to the toilet manufacturers’
specifications for minimum operating pressure for the fixture.
Winterizing
1. Turn off the water supply valve and flush the toilet to relieve the pressure.
2. Place a bucket under the lower Supply Shank (A) and disconnect the water supply line, allowing the water to drain into the bucket.
3. Push down on the Actuator and pull it up momentarily to allow air into the vessel.
4. Follow the fixture manufacturer’s instructions for winterizing the bowl.
5. Do not put antifreeze or any other chemical agents in the china holding tank or in the FLUSHMATE
®
Tank.
Points to Remember
• When replacing components on the FLUSHMATE
®
Flushometer-Tank System, make certain that the water supply valve is turned off and the toilet has been flushed
to relieve pressure in the FLUSHMATE
®
tank.
• Water supply requirement: cold water, potable water system.
• The Flush Valve Cartridge can be removed by inserting the handles of a pair of pliers into the top of the Flush Valve Cartridge and turning counterclockwise.
• With each flush, a small amount of water may be emitted from the upper supply group. A drain at the base of the FLUSHMATE
®
system will eliminate most of this
water. Depending on usage, you may see some residual water (less than 1”) in the china holding tank. This is a normal occurrence.
• Your water pressure is adequate if your water supply line will yield one or more gallons of water within thirty (30) seconds.
• Replacement parts are readily available by contacting Consumer Services at 800-533-3460 or by visiting the “Where to Buy” section of our website, www.
flushmate.com, or purchase online at www.eflushmate.com.
If you would like additional information or require technical assistance, please contact FLUSHMATE
®
Consumer Services at 800-533-3460, or visit our website,
www.flushmate.com. For faster service, please be prepared to provide the serial number and date of installation of your FLUSHMATE
®
system.
For support outside the United States, visit our local contact website at www.flushmate.com/localcontact.
FLU-eMKT8015EN 0616
 Loading...