14 www.x.bike
F5 Trail|OwnersManual
15www.x.bike
F5 Trail|OwnersManual
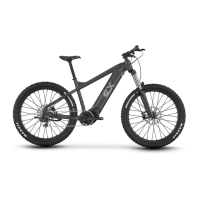
Figure6.InsertingtheThruAxle Figure7.TighteningtheThruAxle
4.Tightentheendcapoftheaxleabout3/4thsoftheway.Then,iptheleverontheother
sideintotheupward/closedpositionandholdittherewhileyoutightentheaxletherestof
theway.(Tightening the axle should be done from the bolt side, not the clamp side)
5.Testthetensionbyopeningtheleveragain.Ifitiseasytoopen,tightentheaxleendcap
furtherandtryagain.Youwanttomakesurethereisgoodtensionasthiswillensurethat
yourwheelisonsecurely.Do not over-tighten the axle, as this can cause malfunction.
STEP 4: Install the Seat
1.Loosenthequickreleaseleverontheframeanddroptheseatintotheopening.
Findaheightthatworksforyouandclosethequickrelease.
Figure10.DroppingSeatintoBike
Note: The seat post must be
inserted to at least 5” in depth
to avoid damage to your frame.
If you need to raise the seat
above this height, please
purchase a longer seat tube to
satisfy the depth requirements.
STEP 3: Secure the Front Wheel
1.Removethethru-axlefromin-betweentheforks.Pushintheendtocollapsetheteeth
holdingitinplace,thenslideitoutbypullingontheotherend.
2.Slidethewheelintoplace,makingsurethebrakecaliperslidesontotherotorandthe
forksareproperlylinedupwiththewheel.
Figure4.PushtoremoveThru-Axle Figure5.PlacingtheWheel
Ensure that your Axle is properly seated by checking that the teeth have
expanded fully as this is essential in order for the axle to hold the wheel
secure. Failure to do so may result in serious injury or death.
Figure8.ProperlySecuredAxle-ExpandedFully Figure9.ImproperlySecuredAxle-NotExpanded
3.Insertthethru-axleonthesamesideasthebrakecaliper/rotor.