Do you have a question about the Flybar Swurfer and is the answer not in the manual?
Fold rope in half, drape over branch, pull ends through loop, and wrap tightly.
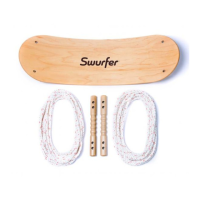
Lace rope through handles and board holes, tie knots, adjust, and trim rope.
Begin swurfing and visit the website for additional gear.
Adjust handles, position feet shoulder-width apart, grip firmly, and slide to dismount.
Regularly check tree, ropes, and swing for damage; replace rope periodically.
The Swurfer is a unique swinging device designed for outdoor recreational use, offering a dynamic and engaging experience. It consists of a durable plastic board, adjustable grip handles, and looped nylon ropes, allowing it to be easily hung from tree branches or swingsets. The primary function of the Swurfer is to provide a swinging platform that allows users to stand, sit, or kneel while swinging, offering a more active and versatile experience compared to traditional swings.
The Swurfer operates by suspending a board from an overhead support, typically a sturdy tree branch, using two sets of ropes and handles. Users stand or sit on the board and use their body weight and momentum to swing. The design emphasizes core engagement and balance, making it a fun way to exercise and enjoy the outdoors. The adjustable handles allow users to customize their grip position for comfort and control, accommodating different heights and swinging styles.
The Swurfer is distributed by Flybar, Inc., located at 323A Fairfield Rd, Freehold, NJ 07728. Additional Swurfer gear and information can be found at www.swurfer.com.
| Brand | Flybar |
|---|---|
| Model | Swurfer |
| Category | Sports & Outdoors |
| Language | English |