EasyManua.ls Logo

Flycam Vista-II - User Manual

Flycam Vista-II
7 pages
Print Icon
To Next Page IconTo Next Page
Loading...
1
Whats In The Box
Please inspect the contents of your shipped package to ensure you have received everything that
is listed below.
Vista-II Stabilizer Arm & Vest (VSTA-II-AV)
All rights reserved.
No part of this document may be reproduced, stored in a retrieval system, or transmied by any form or by any means,
electronic, mechanical, photo-copying, recording, or otherwise, except as may be expressly permied by the applicable copyright
statutes or in wring by the Publisher.
Assembly Manua l
Vista-II Vest back (Part-1a)
Vista-II Arm (Part-3)
Storage Bag (Part-5)
Vista-II Vest front (Part-1)
2x Heavy
Tension Springs
3/16mm,2.5mm,
1.5mm Allen Key
Hip Pad (Part-2)
2x Bush (Part-4)
Question and Answer IconNeed help?

Do you have a question about the Flycam Vista-II and is the answer not in the manual?

Summary

Safety Hints and Precautions

Hand and Finger Safety

Cautiously operate the equipment to avoid pinching your hands or fingers inside the arm.

Weight Balance Establishment

Always establish correct weight balance before telescoping the arm length for stable operation.

Fixture Security

Ensure all knobs and screws are locked tightly to prevent unbalancing the camera setup.

Assembly Vigilance

Maintain high vigilance during assembly to prevent substantial damage to the equipment.

Unattended Arm Handling

Never leave the arm unattended; do not let an unloaded arm swing freely.

Single Arm Configuration and Adjustment

Arm Tension Adjustment

Adjust the arm tension for the heaviest camcorder to prevent it from bottoming out.

Arm Positioning for Comfort

Adjust the arc of your arm and the rig for comfort and optimal camera positioning.

Equipment Maintenance Guide

Bearing Maintenance

Oil bearings with light lubricating oil if they become stiff; keep oil away from camera.

Cleaning Procedures

Use water and mild detergent; avoid solvents or harsh cleaners on the unit.

Storage Recommendations

Store upright in a dry area or an airtight container to prevent damage during long periods.

Warranty and Customer Support

Product Warranty Details

One-year warranty covers parts and labor, excluding transportation and accidental damage.

Liability Limitations

Not liable for damage from mishandling, transit, accident, misuse, or unauthorized service.

Contacting Customer Service

Contact us for any dissatisfaction for prompt support and care until product use is satisfactory.

Overview

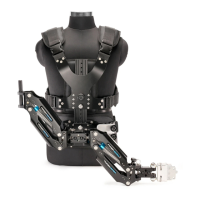
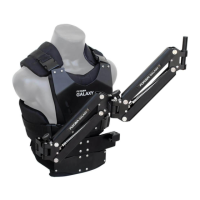
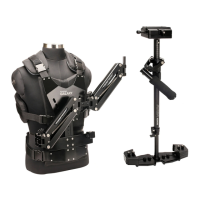
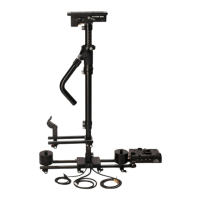
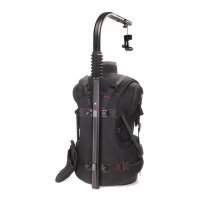
The Flycam Vista-II Stabilizer Arm & Vest (VSTA-II-AV) is a professional camera stabilization system designed to provide smooth, stable footage by isolating camera movement from the operator's body. This system is ideal for filmmakers and videographers who require fluid camera motion during tracking shots, walking, or running.

Function Description:

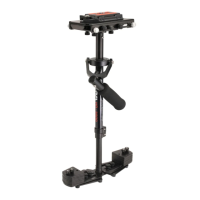
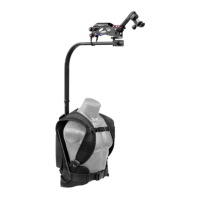
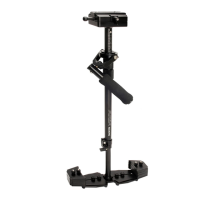
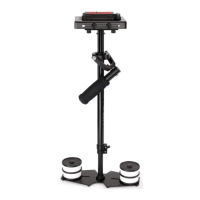
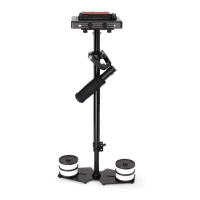
The Vista-II system comprises three main components: a vest, a stabilizer arm, and a stabilizer (not included in this manual but essential for the complete setup). The vest is worn by the operator and distributes the weight of the camera system across the body, reducing fatigue and allowing for longer shooting times. The stabilizer arm connects the vest to the camera stabilizer, acting as a shock absorber. It uses a series of springs and pivots to absorb vertical and horizontal movements, ensuring the camera remains level and steady regardless of the operator's motion. The stabilizer itself (often a gimbal with a counterweight system) holds the camera and fine-tunes its balance.

The primary function of the Vista-II system is to achieve cinematic-quality stabilization, eliminating the shaky footage often associated with handheld cameras. It allows for dynamic shots where the camera can move freely through space while maintaining a smooth and controlled perspective. The system is designed to be highly adjustable to accommodate various camera weights and operator preferences, ensuring optimal performance in diverse shooting scenarios.

Important Technical Specifications:

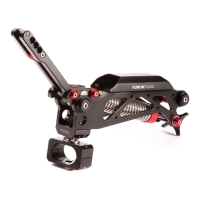
While specific weight capacities are not detailed in the provided manual, the system is designed to handle a range of camcorder weights, with the arm tension being adjustable for the heaviest camcorder it can hold. The arm includes a 16mm mounting post, and the package provides 19mm and 22mm bushes to accommodate different stabilizer handles. The system can be configured for single-arm operation by removing one section of the arm, offering versatility for different shot requirements or to reduce the overall footprint. The package includes two heavy tension springs, suggesting that the arm's tension can be customized for different camera loads. Allen keys (3/16mm, 2.5mm, 1.5mm) are provided for adjustments.

Usage Features:

The Vista-II system emphasizes user comfort and adaptability. The vest features multiple adjustment points to ensure a snug and secure fit for various body types. The chest plate height, hip pad position, and socket block height are all adjustable, allowing the operator to customize the vest for optimal comfort and balance. The arm can be operated efficiently by either right-handed or left-handed individuals, enhancing its versatility.

Assembly and Setup:

  1. Vest Setup:

    • Attach the top shoulder buckles of the vest back (Part-1a) to the vest front (Part-1).
    • Secure the vest by attaching the hip pad (Part-2) to the vest back (Part-1a) using the buckles and tightening the strap.
    • Adjust the length of the chest plate (Part-1) according to the operator's height by using the pin and knob.
    • Adjust the height of the socket block (Part-1) using the knob.
    • Adjust the left and right position of the socket block (Part-1) using the provided knob.
  2. Arm Setup:

    • Loosen the knobs of the socket block on the vest (Part-1).
    • Insert the male connecting socket of the arm (Part-3) into the socket block of the vest (Part-1).
    • Tighten both knobs of the socket block on the vest (Part-1) to secure the arm.
    • Adjust the tension of the arm (Part-3) using the provided knob, first for the 'forearm' (nearest to the stabilizer) and then the 'upper arm' section. The arm should lift slightly when adjusted, and both arm sections should track together.
    • Insert the appropriate bush (Part-4) (19mm or 22mm) onto the arm mounting post (Part-3).
    • Insert the stabilizer handle (not included) into the bush on the arm mounting post.
  3. Single Arm Configuration:

    • Pull the pin from the middle jointer of the arm.
    • Remove one section of the arm (Part-3).
    • Attach the remaining single arm section (Part-3) and insert the pin from the middle jointer to secure it.

Arm Adjustment:

The arm tension is pre-adjusted for heavy camcorders. To fine-tune the arm for your specific camcorder weight:

  • With the vest on, attach the arm and unlock the rig.
  • Move the arm to the middle of its booming (up and down) range and release it. If it stays in place, the adjustment is likely close.
  • Make small adjustments until the camcorder neither rises nor falls when released in the middle of its booming range.

Positioning the Arm:

  • Move the camcorder to your left so the arm crosses your body.
  • Adjust the arc of your arm for comfort.
  • Keep the camcorder close to your body.

Maintenance Features:

  • Bearing Maintenance: If bearings become less smooth over time, apply a few drops of light lubricating oil. Care should be taken to avoid getting oil on the camera.
  • Cleaning: Use only a cloth or sponge with water and a mild detergent to clean the unit. Avoid solvents or harsh cleaners.
  • Storage: For long-term storage, keep the Flycam Vista-II Arm & Vest upright in a dry, low-humidity area. If such an environment is unavailable, store it in an airtight plastic container or bag to reduce stress on the system.

Safety Hints:

The manual emphasizes several safety precautions:

  • Hand Safety: Operate cautiously to avoid pinching hands/fingers in the arm.
  • Balance: Always establish correct weight balance before telescoping the arm length.
  • Secure Fixtures: Ensure all knobs and screws are tightly locked to prevent unbalancing.
  • Vigilance During Assembly: Pay close attention when attaching the stabilizer, arm, and vest to prevent equipment damage.
  • Unattended Arm: Never leave an unloaded arm unattended, as it may swing and cause injury.

The Flycam Vista-II Stabilizer Arm & Vest is a comprehensive system designed to enhance the quality of video production by providing stable and fluid camera movements, while also prioritizing operator comfort and safety through its adjustable design and clear operational guidelines.

Flycam Vista-II Specifications

General IconGeneral
BrandFlycam
ModelVista-II
CategoryCamera Accessories
LanguageEnglish

Related product manuals