Safety Precautions
Use
1. Use the lawnmower only in daylight or good
artificial light.
2. Avoid operating your lawnmower in wet grass,
where feasible.
3. Take care in wet grass, you may lose your
footing.
4. On slopes, be extra careful of your footing and
wear non-slip footwear.
5. Mow across the face of slopes, never up and
down.
6. Exercise extreme caution when changing
direction on slopes. Walk never run.
7. Mowing on banks and slopes can be
dangerous. Do not mow on banks
or steep
slopes.
8. Do not walk backwards when mowing, you
could trip.
9. Never cut grass by pulling the mower towards
you.
10. Switch off before pushing the mower over
surfaces other than grass.
11. Never operate the lawnmower with damaged
guards or without guards in place.
12. Always start the lawnmower carefully with feet
well away from the blades.
13. Do not tilt lawnmower when the motor is
running, except when starting and stopping. In
this case, do not tilt more than absolutely
necessary and lift only the part which is away
from the operator. Always ensure that both
hands are in the operating position before
returning the appliance to the ground.
14. Never pick up or carry a mower when it is
operating or still connected to the mains supply.
15. Remove the plug from the mains :
- before leaving the mower unattended for any
period;
- before clearing a blockage;
- before checking, cleaning or working on the
appliance;
- if you hit an object. Do not use your
lawnmower until you are sure that the entire
lawnmower is in a safe operating condition.;
- if the lawnmower starts to vibrate abnormally.
Check immediately. Excessive vibration can
cause injury.
Maintenance and storage
1. Keep all nuts, bolts and screws tight to be sure
the lawnmower is in safe working condition.
2. Check the grassbox frequently for wear or
deterioration.
3. Replace worn or damaged parts for safety.
4. Only use the replacement blade, blade bolt,
spacer and impeller specified for this product.
5. Be careful during adjustment of the lawnmower
to prevent entrapment of the fingers between
moving blades and fixed parts of the machine.
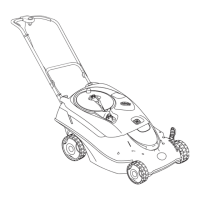
Assembly Instructions
C1 - Grassbox lid
C2 - Lower handle fixing pins
Assembly of Lower Handles to Deck
1. Insert lower handle into holes in the deck and
push into place. (A)
2. Release the grassbox catch and lift the
grassbox lid (B).
3. Rest the grassbox lid against the lower handle
and remove the grassbox.
4. Ensure that the holes in the lower handle are
correctly located behind the holes in the deck.
5. Secure the lower handles to the inside of the
deck with the lower handle fixing pins. (C).
6. Ensure the fixing pins are securely located.
7. Should a problem occur when securing lower
handle to deck, carefully lever fixing pins out of
location and repeat steps 4 to 6 above.
8. Replace the grassbox and close the grassbox
lid.
D1 - Bolt
D2 - Washer
D3 - Handle knob
Fitting Upper Handles to Lower Handles (D)
1. Ensure the upper handle is located correctly
with the lock-off button on the switchbox
uppermost.
2. Ensure the upper handle and the lower handle
are aligned correctly.
3. Fit the bolts, washers and handle knobs.
4. Fit the cable to the handles with the clips
provided. Make sure the cable is not trapped
between the upper and lower handles.
Adjusting the Cutting Height
F - Front Power Compact 330
G - Highest height of cut
H - Lowest height of cut
Cutting Height Adjustment
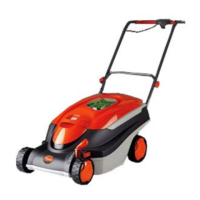
Power Compact 330
Rear Height Adjustment
1. Select one of the 5 locations and note it as the
other lever will need to be adjusted to the same
position. (E)
2. Lift the lever out of location and rotate to the
desired position. (E)
Front Height Adjustment
• Using the same height adjustment position
repeat the procedure for the other lever (F).
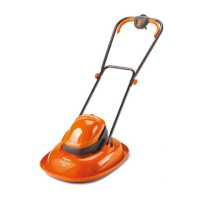
Cutting Height Adjustment
Power Compact 400
• Lift the lever out of location and rotate to the
desired position. (E)
Heights of cut
1 & 2 low
3 & 4 medium
5 & 6 high
ENGLISH - 2