Paragraph
11
FORD
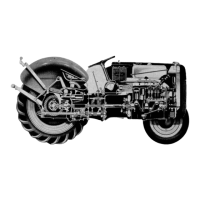
Fig. n-Exploded view of
outer drive assembly used
on 2110 models.
1.
Wheel axle
2.
Oil seal
3.
Outer cover
4.
Bearing
5.
Snap ring
6. Bevel gear
7.
Bearing
8. Bearing
9. Pinion gear
10.
Reduction gear housing
11.
Drive shaft
12.
Bearing
13.
Seal
14.
Pinion gear case
15.
Bearing
16.
Snap rings
17.
Bearing
18A.
"0"
ring
19A. Kingpin
20A.
Arm
21A. Steering arm
22.
"0"
ring
23.
Pinion gears
24.
Bearing
25.
Axle housing (R.H.)
26.
Dipstick
27.
Axle shaft
28.
AxJe housing
(L.H.)
29.
Drag link
30.
Tie rod
31.
Differential housing
32.
Cover plate
33.
Oil seal
34.
Tie rod arms
differential case. Remove pinion gear
shafts
(10 and
lOA), pinion gears (15),
thrust washers (16) and pinion shaft sup-
port (11). Remove
the
other side gear
(14) and thrust washer (8).
Backlash between differential pinion
gears and side gears should be 0.10-0,15
mm (0.004-0.006 inch)
on 1110, 1210,
1310 and 1510 models and 0.05-0.10 mm
(0.002-0.004 inch
on 1710, 1910 and
2110 models. Renew thrust washers
and/or gears
if
backlash
is
excessive.
Clearance between pinion gear shaft
and pinion gears should be 0.10-0.30 mm
(0.004-0,012 inch). Renew shaft and/or
gears
if
clearance exceeds
0.50 mm
(0.020 inch).
Bevel ring gear
(13) and
pinion
(20)
must be renewed as
a
matched set on all
models. Cap screws attaching ring gear
to differential case should
be
tightened
to 30-34
N-m
(22-25 ft.-lbs.) torque
on
1110 and 1210 models and to 47-55 N-m
(35-40 ft.-lbs.) torque
on all
other
models.
Install bevel pinion (20-Fig.
17, 18,
19
or
20)
in
differential housing (19) us-
ing shims
(22)
that were originally
in-
stalled.
To
adjust pinion bearing
preload, wrap
a
cord around pinion shaft
as shown
in
Fig. 21. Use
a
spring scale
to measure pull required
to
rotate
the
shaft. Tighten inner
nut
(25—Fig.
17,
18,
19
or
20) until
the
specified spring
scale reading is obtained as listed below.
Models 1110-1210
New Bearings 5-6 kg
(11-13 lbs.)
Used Bearings 2.5-3 kg
(5.5-6.5 lbs.)
Models 1310-1510
New Bearings 7-9 kg
(15,5-20 lbs.)
Used Bearings 3.5-4.5 kg
(8-10
lbs.)
Models 1710-1910
New Bearings
11-15
kg
(24.5-33 lbs
Used Bearings
5.5-7.5
kj
(12-16.5 lbs.J
Model 2110
New Bearings
.,
15-20 kg
(33-44 lbs.)
Used Bearings 7.5-10 kg
(16.5-22 lbs.)
Install lockwasher
(26) and
tighten
outer
nut
securely, then recheck rolling
torque. Bend tabs of washer into slots of
nuts when preload adjustment
is cor-
rect.
If differential case (12), carrier bear-
ings (9), axle bearings, axle housings
or
differential center housing (19) were re-
newed, differential carrier bearing pre-
load must be adjusted as outlined in par-
agraph
11.
Bevel ring gear
to
pinion
backlash and gear mesh should be check-
ed and adjusted as outlined in paragraph
12.
If
none
of
these components are be-
ing renewed, reassemble differential
and front axle installing original shims
in their original locations.
11,
DIFFERENTIAL CARRIER
BEARING PRELOAD.
To
adjust
car-
rier bearing preload, proceed as follows:
On 1110
and 1210
models, assemble
axle shaft
(18
-
Fig.
17), shims
(17),
bear-
iri&
(7),
spacer
(8) and
differential
sembly into right axle housing
(19).
Sup-
port the axle housing in the upright posi-
tion with differential
up.
Make certain
there is clearance between ring gear and
bevel pinion.
Add
shims
(17) if
neces-
sary. Assemble left axle shaft (5), inner
bearing and spacer with more shims (6)
than necessary into left axle housing.
Position the axle housing assembly onto
differential housing making sure there is
clearance between
the two
housings.
Use
a
feeler gage
to
measure
the gap
between
the
housings, then remove left
axle housing
and
subtract shims from
shim pack (6) equal to the measured gap.
Fig. 16—Check bevel gear
(6) to pinion gear (9)
backlash using a dial In-
dicator (4) as shown. Refer
to text.
14
 Loading...