EasyManua.ls Logo

Forte 250 Series - User Manual

Forte 250 Series
17 pages
Print Icon
To Next Page IconTo Next Page
Loading...
Installation Manual
Inch Stainless Steel Dishwasher
18
F18DWS250SS

Other manuals for Forte 250 Series

Question and Answer IconNeed help?

Do you have a question about the Forte 250 Series and is the answer not in the manual?

Summary

IMPORTANT SAFETY INSTRUCTIONS

BEFORE YOU BEGIN

Read all instructions carefully. Observe codes and ordinances. Keep for future reference. Basic mechanical and electrical skills required.

FOR YOUR SAFETY

Observe all cautions and warnings. Wear gloves, safety glasses, or goggles during installation.

INSTALLATION REQUIREMENTS

DRAIN REQUIREMENTS

Follow local codes. Do not exceed 10 feet drain distance. Use air gap or 32" minimum high drain loop.

INSTALLATION PREPARATION

PREPARE DISHWASHER

Ensure proper cabinet opening dimensions, drain hose length, and full enclosure for the dishwasher.

DRAIN PREPARATION

Determine drain installation method based on local codes and installation height requirements.

CABINET PREPARATION

Drill a 1-1.5" diameter hole in the cabinet wall for the drain hose, ensuring smooth edges.

PREPARE AND ROUTE THE ELECTRICAL SUPPLY

Ensure a 120-volt, 60Hz, 12-amp fused electrical supply and a grounded 3-prong outlet.

PREPARE HOT WATER LINE AND POWER CORD HOLE

Prepare holes for water line and power cord, connect water line, and flush water line to clean debris.

INSTALLATION

STEP 1 - HANDLEBAR ASSEMBLY

Install the outside door handle using a hex wrench.

STEP 2 - CHECK DOOR BALANCE

Test the door balance by opening and closing; adjust the screw if necessary.

STEP 3 - INSERT DRAIN HOSE AND POWER CORD THROUGH CABINET

Route the drain hose and power cord through the appropriate cabinet wall holes.

STEP 4 - SLIDE DISHWASHER PARTIALLY INTO CABINET

Slide the dishwasher into the opening a few inches at a time, avoiding damage to the front panel.

STEP 5 - POSITION DISHWASHER UNDER COUNTERTOP

Ensure wires are secure and push dishwasher flush with cabinet doors, being careful not to cause damage.

STEP 6 - LEVEL DISHWASHER

Use a level to ensure the dishwasher is balanced front-to-back and side-to-side for optimal performance.

STEP 7 - FIXATION OF DISHWASHER

Secure the dishwasher to the cabinet by inserting screws through the designated holes.

STEP 8 - CONNECT DRAIN LINE

Connect the drain hose to the air gap, waste tee, or disposer, cutting the hose as needed.

STEP 9 - CONNECT POWER SUPPLY

Plug the power supply cord into a grounded 3-prong outlet, ensuring socket compatibility.

STEP 10 - INSTALLATION OF KICK PLATE

Install the kick plate, adjusting its height as needed for aesthetics and smooth door operation.

STEP 11 - PRETEST CHECKLIST

Review checklist to avoid unnecessary service calls; verify power, connections, and proper installation.

STEP 12 - DISHWASHER WET TEST

Perform a wet test by running a cycle, checking for leaks during fill, operation, and drain phases.

STEP 13 - LITERATURE

Ensure the complete literature package and installation instructions are left with the consumer.

Overview

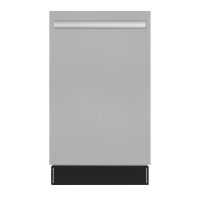
This document is an installation manual for the FORTÉ F18DWS250SS 18 Inch Stainless Steel Dishwasher. It provides comprehensive instructions for preparing the installation site, installing the dishwasher, and performing pre-test and wet-test checks.

Function Description:

The FORTÉ F18DWS250SS is an 18-inch stainless steel dishwasher designed for residential use. Its primary function is to wash and clean dishes, providing convenience and efficiency in kitchen operations. The manual focuses exclusively on the installation process, ensuring the appliance is correctly set up for optimal performance and safety.

Important Technical Specifications:

  • Dimensions:
    • Rough cabinet opening: At least 23" deep and 17.7" wide.
    • Height: 32.5" - 34.5" from the underside of the countertop to the floor.
    • Minimum required space when the door is open: 20.5" (height) x 17.6" (width) for the dishwasher, with an additional 24.8" (height) x 22.0" (width) for the door swing.
    • Kick Plate: Adjustable height from 3.15 inches to 4.33 inches, with a minimum back and forth adjustment of 1.57 inches.
  • Electrical Supply:
    • Voltage: 120-volt, 60Hz, AC-only.
    • Amperage: 12-amp, fused electrical supply.
    • Connection: Requires a grounded 3-prong outlet, located in a cabinet next to the dishwasher opening. A separate circuit and a time-delay fuse or circuit breaker are recommended.
  • Water Supply:
    • Hot Water Temperature: Adjustable water heater for 120°F to 150°F (a minimum of 120°F is required for best wash performance).
    • Pressure: Hot water supply line pressure must be between 6-145 PSI.
    • Inlet Line: Connects to a 3/4-inch FHT (Female Hose Thread) and then to the dishwasher. If the shut-off valve is 3/8 inch I.D., the inlet line can be directly connected.
  • Drainage:
    • Drain Hose Length: No more than 10 feet in total length (including any extensions). The factory-installed hose can be extended by up to 42 inches using a 5/8" or 7/8" inside diameter hose and a coupler, secured with hose clamps.
    • Drain Connection: Must be connected to a waste line with an air gap (not supplied) or a 32” minimum high drain loop to prevent backflow. An air gap is mandatory if the waste tee or disposer connection is less than 18" above the floor to prevent siphoning.
    • Cabinet Hole for Drain Hose: A 1-1.5" diameter hole in the cabinet wall is required for the drain hose connection, with smooth, non-sharp edges.
  • Weight: Door balance adjustment range is 6.61-15.43 lbs.
  • Handlebar Assembly: The manual includes specific instructions for installing the outside door handle using a hex wrench, applicable to the F18DWS250SS model.
  • Door Balance Check: After panel installation, users are instructed to check the door balance. The door should remain stable when opened between 30° and 90°. If not, a screw can be adjusted clockwise or counterclockwise to achieve proper balance. This feature ensures the door stays in position during loading and unloading.
  • Leveling: The dishwasher must be level for proper dish rack operation and wash performance. Leveling is achieved by turning the adjustable feet. The manual advises placing a level on the door and rack track inside the tub to check both front-to-back and side-to-side levels.
  • Fixation: The dishwasher is secured to the cabinet using four ST4*26 screws through holes in the liner on the right, left, and top sides. Hole plugs are provided to cover these holes after fixation.
  • Kick Plate Installation: The kick plate's height is adjustable to ensure aesthetic alignment and smooth door operation. If the standard adjustment range is insufficient, sections of the kick plate can be cut along grooves (each 10mm high) by a professional.
  • Pre-test Checklist: A detailed checklist is provided to ensure all installation steps are correctly completed before initial operation. This includes verifying power is off, removing packaging, checking door alignment and balance, securing wiring, leveling, checking water supply and drain lines for kinks or contact, and confirming hot water temperature (120°F-150°F).
  • Dishwasher Wet Test: This step involves plugging in the power cord, selecting a "Rinse Wash" program, and observing the dishwasher's operation. It includes checks for water entry, leaks under and around the door, proper draining, and overall functionality. Any leaks or issues require immediate power shut-off, correction of plumbing/connections, and re-testing.
  • Drain Plug Removal: A critical maintenance note during installation is to ensure the disposer drain plug is removed if connecting to a disposer. Failure to do so will prevent the dishwasher from draining.
  • Debris Flushing: Before connecting the hot water line, the manual instructs flushing the water line to clean out any debris, preventing potential blockages or damage to the dishwasher.

The manual emphasizes safety throughout the installation process, including warnings about electrical shock hazards and the importance of wearing gloves, safety glasses, or goggles. It also highlights the responsibility of the installer for proper installation, as product failure due to improper installation is not covered under the appliance warranty.

Forte 250 Series Specifications

General IconGeneral
BrandForte
Model250 Series
CategoryDishwasher
LanguageEnglish

Related product manuals