GB
13
OVEN ENERGY EFFICIENCY
OVEN ENERGY EFFICIENCY
• Remove the glass protection by turning as indicated in the gure on the left
side. If you - Ovens with high e ciency in electricity use and heat insulation
should be preferred.
• Frequently opening the oven lid causes cold air outside the oven to enter
inside, thereby causing energy loss. Therefore, oven lid shouldn’t be opened
if not necessary.
• You shouldn’t try to cook more than one meal in the oven at once. Meals
that cook earlier should be taken out rst, thereby use less energy without
changing oven temperature.
• Residual heat after the meal cooked in the oven should be used for another
meal. You will save energy this way.
• Preheating should be done for a short time (10 minutes the most).
• Frozen meals should be deiced before cooking in the oven.
• Combustible, in ammable materials that ignite easily must be kept away
from the oven.
• Ovens must be installed on a location far from in ammable environments.
• Ovens will continue cooking in current temperature by using less energy if
the lid is closed a few minutes before cooking.
OVEN TECHNICAL SPECIFICATIONS
ENVIRONMENTAL WARNING:
• After you installed your product, please dispose of its packaging materials
according to the safety and environment conditions.
IMPORTANT: All interventions regarding appliance installation,
maintenance and conversion must be made with original factory parts.
Manufacturer refuses all responsibility caused by not adhering to this
liability.
REPLACEMENT OPERATIONS FOR OVEN AND GRILL BURNER
INJECTORS.
Some models are provided with an injector set for di erent gas types.
If the injector is not supplied, it can be purchased from Service Center.
Select the injectors to be changed fromthe «Injector Selection Chart»
The jet diameters speci ed in one hundredth of a millimeter are marked on the body
of each injector.
OVEN BURNER
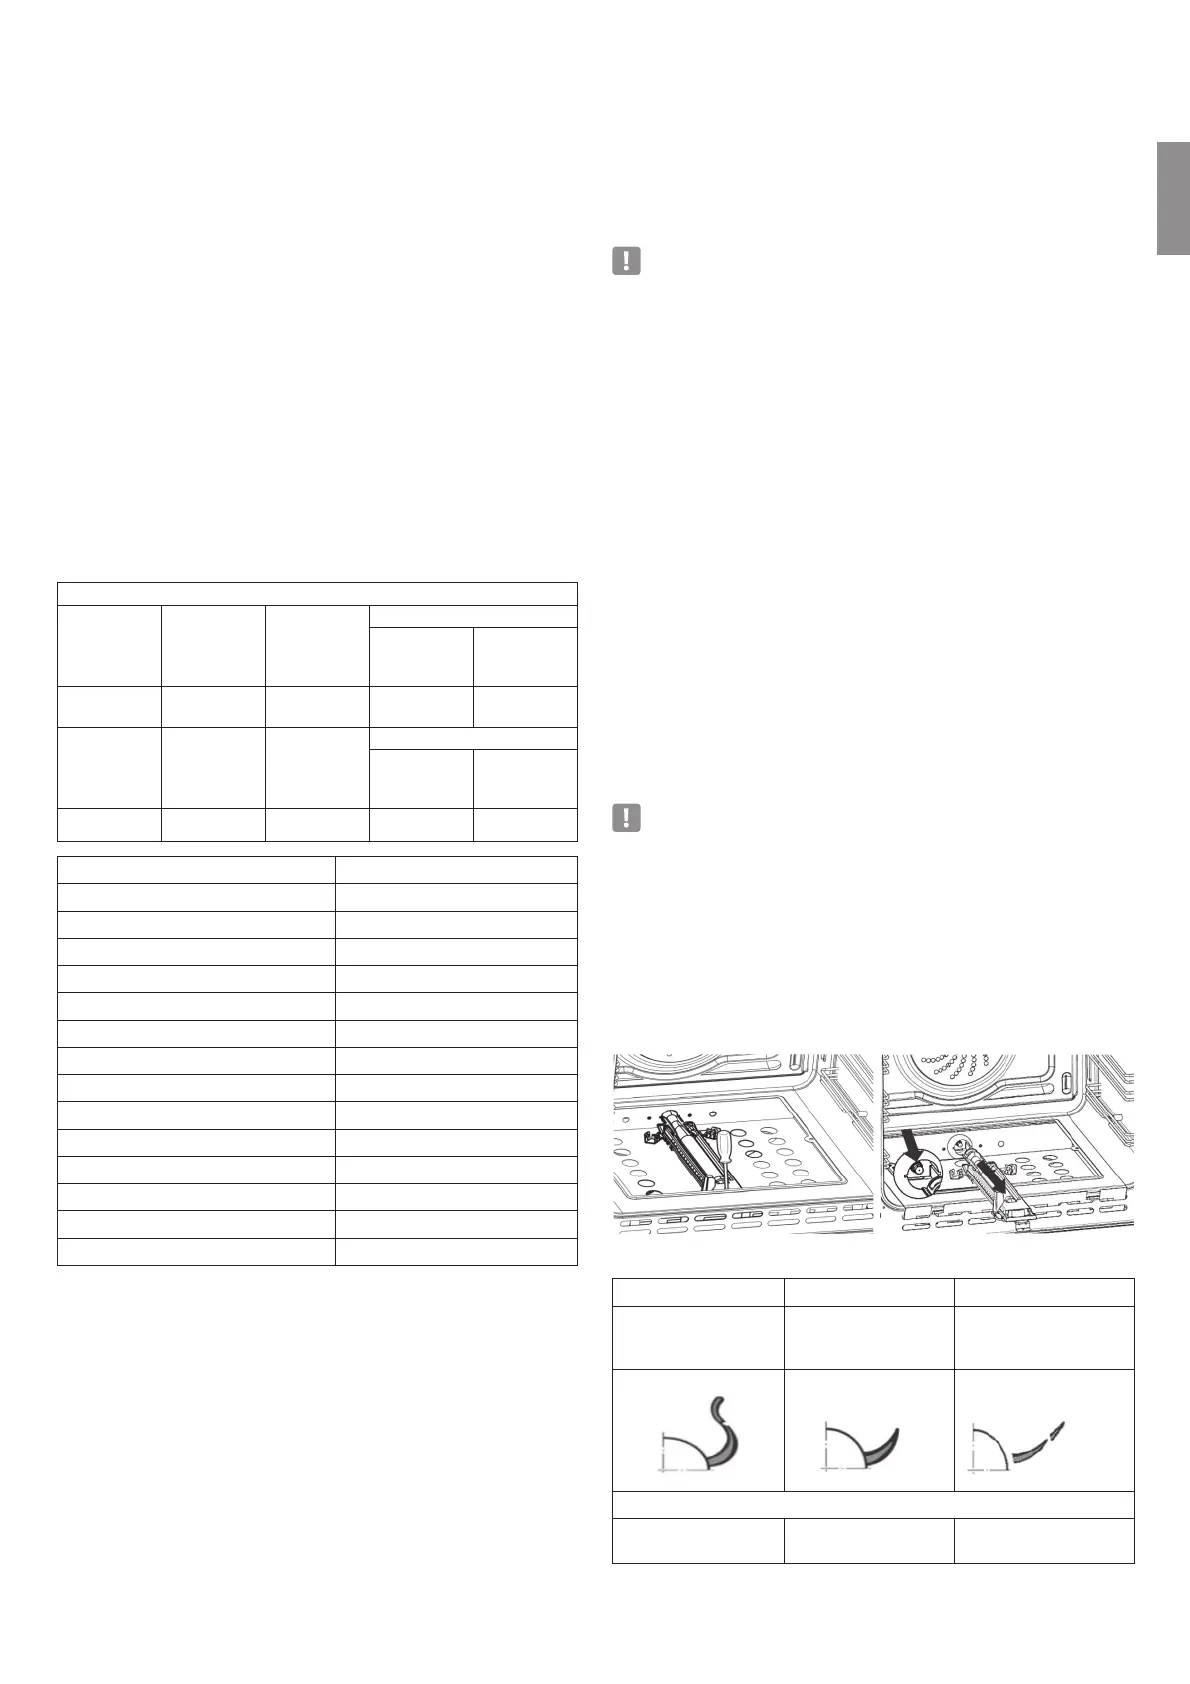
• Lift and remove the lower pane inside the oven.
• Remove the screws and remove the burner screw «A» (Figure 31).
• Remove the burner as shown in Figure 29 and place it into the oven. Take
care not to damage the safety valve probe and electrical ignition electrode.
• Remove the screws of the injector using 7 mm box strainer (shown with an
arrow in Figure 32) and replace with a new injector selected according to
the «Injector Selection Chart».
• Adjust the air supply to the oven burner as speci ed in the «Oven and Grill
Burners Air Supply Adjustment» chapter; then follow the steps in reverse
order to replace the burner and other parts back into their places.
IMPORTANT: Checkwhether the safety valve and the ignition electrode
work correctly or not.
• Remove the screws and remove the burner screw «A» (Figure 33).
• Remove the burner as shown in Figure 34. Take care not to damage the
safety valve probe and electrical ignition electrode.
• Remove the screws of the injector using 7 mm box strainer (shown with an
arrow in Figure 34) and replace with a new injector selected according to
the «Injector Selection Chart».
• Adjust the air supply to the grill burner as speci ed in the «Oven and Grill
Burners Air Supple Adjustment» chapter; then follow the steps in reverse
order to replace the burner and other parts back into their places.
Bottom Heater 1200 W
(*) = Reference value 15-25 W
Cooling Fan 22 W
Oven Lamp 25 W
Turbo Fan 25 W
Oven External Dimension (WxDxH) 595x560x598 mm
Installation Cabin Dimension WxDxH) 560x575x560 mm
Oven Interior Volume 53 lt
Net Weight 37 Kg
Gross Weight 40 Kg
Voltage 220-240V 50-60 Hz
Maximum Power 1275 W
Supply voltage 220-240 V 50/60 Hz.
Grill heater 2000 W
Supply voltage 220-240 V 50/60 Hz.
Primer Air Insu cient Correct Air Primer Air TooMuch
spread, yellow and
ickering
light insides blue cone
short and sharp too blue
inner cone, prone to
separation
Primer
Air
Correc
t Air
Primer Air
TooMuch
CAUSE
Air adjustment bottle
closed too much
Bottle in correct
distance
Air adjustment bottle
open too much
Injector Selection Table
BURNERS
Nominal
Power [kW]
LPG
30mb
Reduced
Power
[kW]
LPG 30mb
Injector
diameter
[1/100 mm]
Ring gap
[mm]
Oven 1,9 - 70
Completely
open (*)
BURNERS
Nominal
Power [kW]
G20mb
Reduced
Power
[kW]
Natural Gas G20mb
Injector
diameter
[1/100 mm]
Ring gap
[mm]
Oven 1,9 - 97 2(*)
Fig. 31 Fig. 32
 Loading...