43
Anleitung, Manual, Instruction | Fritz!box 5490 - Fiber7 - Crossover7 08 | 2020 | Nr. 01
EN
Installation guidelines FRITZ!Box 5490
1
Connecting the components
1. Use the provided fiber patch cable to connect the Fritz!Box to the
OTO socket (green=OTO socket, blue=Fritzbox).
2. Connect the Fritz!Box to the power supply.
3. Connect your computer to the Fritz!Box with a ethernet cable.
2
Basic configuration of the Fritz!Box
1. Open now a web browser and enter http://fritz.box.
2. Choose your language.
3. Enter the password of your Fritz!Box, you find it on the bottom side
of the device (see illustration on the back).
4. Choose «Switzerland» out of the list.
5. The Fritz!Box saves the configuration and restarts, this takes approx.
2 minutes.
Attention: Due to firmware updates, the layout of the overview page
may change.
3
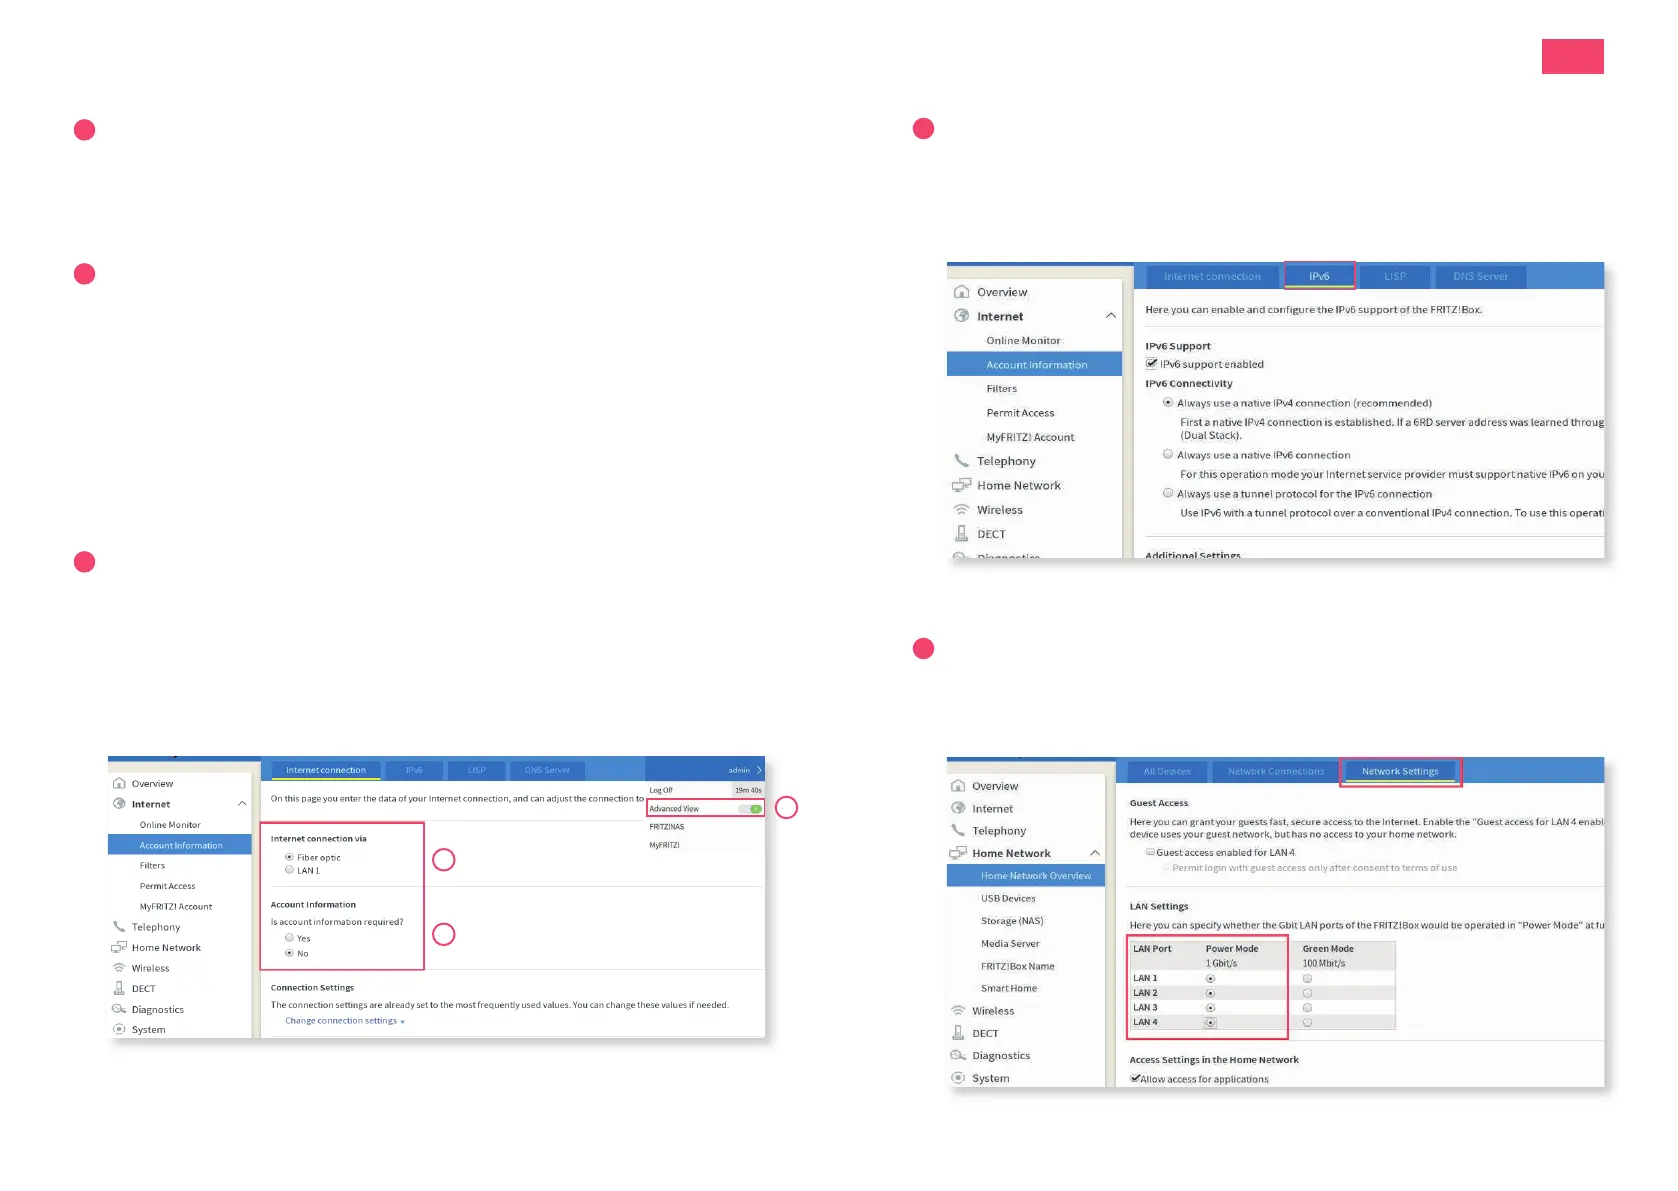
Configuration of the network settings
1. Reconnect you on http://fritz.box.
2. Chose in the right upper corner «Advanced View».
3. Select in the left-hand column «Internet» and then «Account Information».
4. Make sure that the Internet connection is provided via «Fiber optic».
5. Select «No» under «Is account information required?».
6. Save the settings.
Step 1: Connecting the com ponents
1. U s e t h e p r o v id e d fi b e r p a tc h c a b le t o c o n n e c t t h e F R IT Z !B o x t o t h e O T O
s o c k e t .
2. C o n n e c t t h e F R IT Z !B o x t o t h e p o w e r s u p p ly .
3. C o n n e c t y o u r c o m p u t e r t o t h e F R IT Z !B o x w it h a n e t w o rk c a b le .
S t e p 2 : B a s ic c o n fi g u r a t io n o f t h e F R IT Z !B o x
1. O p e n a w e b b ro w s e r a n d e n t e r h t t p :/ / fr it z .b o x .
2. C h o o s e y o u r la n g u a g e .
3. E n t e r t h e p a s s w o rd o f y o u r F R IT Z !B o x , y o u fi n d it o n t h e b o t t o m s id e o f
the device.
4. C hoose „S w it z e rla n d “ o u t o f t h e lis t .
5. h e F R IT Z !B o x s a v e s t h e c o n fi g u ra t io n a n d r e s t a r t s , th is ta k e s a p p ro x . 2
m in u t e s .
Step 3: Configuration of the netw ork settings
1. R e c o n n e c t y o u o n http ://fritz.box.
2. S e le c t in t h e le - h a n d c o lu m n „ In t e r n e t “ a n d t h e n „ A c c o u n t
Inform ation“.
3. M a k e s u r e t h a t t h e In t e r n e t c o n n e c tio n is p r o v id e d v ia „ F ib e r o p t ic “ .
4. S e le c t „ N o “ u n d e r „ Is a c c o u n t in fo r m a t io n re q u ire d ? “ .
5. S a v e t h e s e t t in g s .
DE
EN
FR
.2
.4
.5
4
Home
Network Settings
1. Select «Home Network» in the left-hand column and then
«Home Network Overview».
2. Change to the tab «Network Settings» and activate the «Power Mode»
of all four LAN ports, then save the settings.
The installation is now completed.
5
IPv6 Settings (optional)
1. Change to the tab «IPv6».
2. Activate IPv6 according to the following illustration.
3. Save the settings.
6. G o t o In t e r n e t → A c c o u n t In fo r m a t io n → „ IP v 6 “ .
7. A c t iv a t e IP v 6 a c c o r d in g t o t h e fo llo w in g illu s t r a t io n :
8. S a v e t h e s e t t in g s .
9. S e le c t „ H o m e N e t w o rk “ in t h e le -h a n d c o lu m n a n d t h e n „ H o m e
N e t w o r k O v e r v ie w “ . G o t o t h e t a b „ N e t w o r k S e t t in g s “ a n d a c t iv a t e t h e
„ P o w e r M o d e “ o f a ll fo u r L A N p o r t s , t h e n s a v e t h e s e t t in g s .
 Loading...