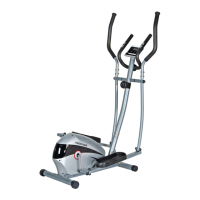
Assembly Instruction
PREPARATION:
• Before assembling, make sure that you will have enough space around the item; Use the
present tooling for assembling; Before assembling please check whether all needed parts
are available.
• It is strongly recommended this machine to be assembled by two or more people to avoid
possible injury.
Step 1:
• Fix the Front stabilizer (3) and Rear stabilizer
(4) to the Main frame (1) with Carriage bolt (12),
Arc washer (13) and Acorn nut (14).
Step 2:
• Connect the Sensor wire (20) well with Extension
wire (18) and then connect the Tension cable (19)
well with wire of Tension controller (17) as shown.
• Fix the Handlebar post (2) to the Main frame (1)
with Allen screw (16), Spring washer (56).
Step 3:
• Fix the Swing bar (6L) on the long axle of the Handlebar post (2) with Hex bolt (24), Spring
washer (52), Flat washer (25), Waveform washer (54) and Handlebar shaft (27) as shown. Do
not tighten them this time.
• Attach the connecting joint together with Pedal Support (5L) to the Crank (22) using Pedal
support bolt (38L), Waveform washer (62), Spring washer (41) and Nylon nut (42L) as shown.
Please do not tighten them this time.
• Connect Swing bar (6L) with Pedal support (5L) using Hex bolt (30), Flat washer (31) and Nylon
nut (32). Tighten the Hex bolt (24) (30) and Nylon nut (42L). Finally Cover the Nut caps (23)
(57) (43) (36).
• Fix the Pedal support (5R) and Swing bar (6R) to Crank (22) and Handlebar post (2) in the
same way.
• Fix the Pedal (10L/R) to the Pedal support (5L/R) with Hex bolt (33), Flat washer (34) and
Nylon nut (35).
EN
 Loading...