Do you have a question about the FrSky TANDEM X20 Pro and is the answer not in the manual?
Details on the types and positions of various switches on the transmitter.
Explanation of the USB port for upgrades and the Smart Port for firmware updates.
Guide to selecting model type and creating a new model in the ETHOS system.
Steps for configuring the channels for a newly created model.
Instructions on naming the model and assigning a picture for identification.
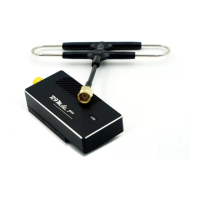
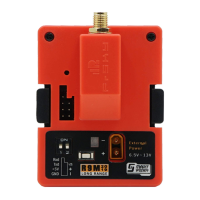
Configuring RF system parameters like state, type, antenna, and power.
Setting up the channel range for the internal RF module.
Assigning a unique Model ID for receiver identification.
Process for registering a receiver with the transmitter for TW Mode.
Steps for automatically binding receivers using the Smart Match feature.
Adjusting RF power levels for extended control range.
Setting up a special function to play text output.
Enabling the TTS function and defining its activation conditions.
Inputting text for the Text to Speech function using the on-screen keyboard.
Explanation of the three available failsafe modes: No Pulse, Hold, and Custom.
Detailed steps for configuring custom failsafe positions for each channel.
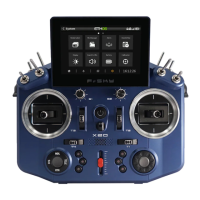
The FrSky TANDEM X20 PRO is an advanced radio system designed for RC applications, offering robust performance and a comprehensive suite of features. Its core functionality revolves around a dual-band 900M/2.4G RF signal link, providing multiple operating combinations of RF modes. The X20 PRO enhances this by incorporating a dual 2.4G TW RF mode and supporting simultaneous activation of both TW and ACCESS R9 modes. This configuration allows for the connection of TW and ACCESS R9 receivers via SBUS IN/OUT ports, enabling redundant backup. This unique RF signal connection method facilitates the simultaneous use of three distinct RF links, significantly boosting signal reliability, especially for long-distance RC operations.
The X20 PRO is designed for intuitive use, integrating and optimizing the functional inputs found in previous TANDEM series models. Building on the foundation of the X20/X20S, it includes two additional trims for more precise adjustments during operation. The slider levers on both sides of the transmitter are customizable, allowing users to position the center according to their habits and preferences. For enhanced safety, a self-locking switch is positioned on each side of the handle top, preventing accidental triggering of the Kill Switch and ensuring the safety of the surrounding environment.
The device boasts a premium construction, with its main body crafted from all CNC-machined metal, and a central panel featuring genuine carbon fiber material. Key input components such as trim caps, slider levers, and knobs are also made from metal, ensuring rugged quality and enhanced durability for outdoor use.
A significant feature of the X20 PRO is its built-in 8GB flash storage, eliminating the need for users to decide on storage capacity. This ample storage accommodates all radio storage needs and offers high data transmission speed. Complementing this, the upgraded storage feature enables the Text-to-Speech (TTS) function, which can quickly and conveniently convert typed English words into spoken speech. This allows the ETHOS system to flexibly match triggered operational statuses with generated speech files when specific functions are activated, providing clear outdoor alerts through the digital power amplifier module.
The X20 PRO also supports 2S Li-battery balance charging via USB-C. The green LED indicator provides clear status updates: solid for charging, off for end of charge, and flashing for a charge fault. For optimal charging, it is recommended to use a USB adapter with a voltage of 5V+0.2V and a current greater than 2.0A. The charging effect is improved when the initial charging voltage is lower and the voltage difference between cells exceeds 50 mV.
Navigation is user-friendly, with the left navigation control managing RTN, SYS, MDL, DISP, and Page Up/Down functions, while the right navigation control handles scrolling and entering. Both navigation controls and the touchscreen can be used to operate the system.
The ETHOS Suite is an integral part of the X20 PRO experience, allowing users to update the radio bootloader, firmware, SD card, and flash memory. It also facilitates image and audio format conversion. Users can find the latest information and download the ETHOS Suite from ethos.frsky-rc.com. To ensure proper functionality, it is crucial to always keep the radio bootloader updated to the latest version when using the ETHOS Suite application.
Setting up a model is a straightforward process within the ETHOS Operating System. Users first select the model type from the Model Select menu, then create a new model. The system guides users through configuring the model channels and naming the model, allowing for the addition of a model picture.
For internal module setup, users enable the RF Module within the RF System menu, accessible via the touchscreen or navigation encoder key. They then choose the Internal Module. The ACCESS 900M mode can be activated simultaneously with ACCESS 2.4G mode or Dual 2.4G TW mode using the internal module. Users turn on the internal RF state and set the binding mode corresponding to their receiver (ACCST D16, ACCESS, TW, TD, and TD-Pro Mode).
Channel range setting is the next step, where the internal RF module supports up to 24 channels (CH1-8 / CH1-16 / CH1-24). The channel range can be configured by pressing the channel bars, and users must ensure correct channel configuration before using the module.
Model ID setting involves the system automatically assigning a receiver number (Model ID) when a new model is created. The Model ID can be set from 00 to 63, with the default being 1.
Registration is a key step, particularly for TW Mode. Users select "Register" to put the radio into Registration status within the RF System-Internal Module tool, then press the F/S button on the receiver and power it on. Once the "RX Connected" page appears, pressing "REGISTER" completes the procedure, after which the receiver should be powered off. The system automatically assigns a unique UID to each receiver in the same model when multiple receivers are bound simultaneously.
Automatic Binding (Smart Match) simplifies the binding process. Users move the cursor to RX1 [BIND], press it, and repower the receiver. Clicking the RX option completes the binding, and the system confirms "Bind succeed." A crucial note is that the registration procedure does not need to be repeated if the receiver was previously registered, even if deleted. Pressing [Reset] and repowering the receiver can restore the bound connection.
RF Power Setting allows the internal RF Module to offer multiple power options, enabling users to achieve a desired controlling range. Users open the Power menu bar and select the appropriate power level based on their usage.
A pre-flight range check is essential before every flight to mitigate signal loss due to reflections from nearby metal fences or concrete, or shading from buildings or trees. The model should be placed at least 60 cm (2 feet) above non-metal contaminated ground, with the receiving antenna in a vertical position. Entering the ETHOS system, navigating to "RF System," scrolling to select "RANGE" mode, and pressing Encoder activates range check mode, which reduces the effective distance to 1/30.
The TTS (Text to Speech) function is configured by creating a Special Function of "Play Text." Users enable the function and set up an "Active Condition" for it. Basic settings are completed by typing alphabet letters or English words.
Failsafe settings offer three modes: No Pulse, Hold, and Custom. In No Pulses Mode, the receiver produces no pulses on any channel upon signal loss; this takes effect 9 seconds after selection. Hold Mode causes the receiver to output the last positions before signal loss, also taking effect after 9 seconds. Custom Mode allows users to pre-set required positions on signal loss. Users move the cursor to the failsafe mode of the channel, press Encoder, choose Custom mode, then set failsafe On for each channel, adjust positions, and short-press Encoder to finish, with a 9-second delay for effect. It is important to note that if failsafe is not set, the model will continue with the last working status, potentially causing damage. If failsafe is disabled on the RF module side, the receiver-side failsafe will apply. The SBUS port does not support No Pulses mode and always outputs a signal, so "Hold" or "Custom" mode should be set for SBUS.
For maintenance, regular checks are crucial. Although the TANDEM X20 PRO uses non-volatile EEPROM memory for model memories, which doesn't require periodic replacement, regular check-ups for wear and tear are recommended. FrSky suggests sending the system to a FrSky Service Center annually during the non-flying season for a complete check-up and service.
Updates are continuously provided by FrSky to add features and improvements. Updating the radio system via USB Port or Micro SD card is easy and free. Users can check the download section of the FrSky website for the latest firmware and guides for adjusting sticks.
| Frequency Range | 2.4 GHz |
|---|---|
| Channels | 16 |
| Protocol | ACCESS, ACCST D16 |
| Operating Current | 300 mA |
| Operating Temperature | -10°C to 60°C |
| Operating System | ETHOS |
| External Module Bay | Yes |
| Telemetry | Yes |
| Voice Output | Yes |
| Haptic Feedback | Yes |
| Operating Voltage | 6.5V - 8.4V |
| LCD Resolution | 480x272 pixels |
| Charging Port | USB Type-C |
| Battery | 2S Li-ion 7.4V 5000mAh |
| Display | 4.3 inch color touchscreen |
| Internal RF Module | Dual-band (2.4GHz & 900MHz) |
| RF System | Dual-band (2.4GHz & 900MHz) |