88
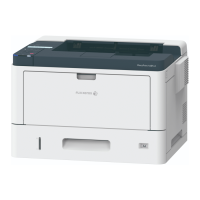
Routers or access points that support WPS are marked with this symbol:
1.
Press
▲
or
▼
to select the [Network] option, and then press OK.
2.
Press
▲
or
▼
to select the [WLAN] option, and then press OK.
3.
Press
▲
or
▼
to select the [WPS w/PIN Code] option, and then press OK.
4.
When [WLAN Enable?] appears, press
▲
to select On.
This will start the wireless setup wizard. To cancel, press Cancel.
5.
The LCD displays an eight-digit PIN and the machine starts searching for a wireless LAN access point/router.
6.
Using a computer that is on the network, type "http://access point's IP address" in your browser (where "access
point's IP address" is the IP address of the device that is being used as the Registrar).
7.
Go to the WPS settings page and type the PIN, and then follow the on-screen instructions.
• The Registrar is usually the wireless LAN access point/router.
• The settings page will differ depending on the brand of wireless LAN access point/router. For more
information, see the instructions supplied with your wireless LAN access point/router.
If you are using a Windows
®
7, Windows
®
8, or Windows
®
10 computer as a Registrar, complete the
following steps:
8.
Do one of the following:
• (Windows
®
7)
Click (Start) > Devices and Printers > Add a device.
• (Windows
®
8)
 Loading...


