EasyManua.ls Logo

Furinno FB19821T User Manual

Furinno FB19821T
3 pages
To Next Page IconTo Next Page
Page #1 background imageLoading...
Page #1 background image
ASSEMBLY INSTRUCTIONS
MODEL: FB19821T
FB19821T20190904 PAGE 1/3
Tool Required
30 min
x 2
IMPORTANT NOTES:
USEFUL HINTS BEFORE YOU START:
1. Read each step carefully before starting.
2. It is important that each step is performed in correct order
to avoid difficulties.
3. Identify, sort and count the parts before assembly.
4. Assemble the product on packaging cardboard to prevent
scratch or damage.
5. Using uncompatible hardware might cause damage to the
product. DO NOT FULLY-TIGHTEN the nut until all nuts
are ready assembled.
* This unit has been designed to support maximum loads:
Exceeding these load limits could cause sagging,
instability, product collapse, and/or serious injury.
* Keep all hardware parts out of reach of children.
NEED HELP? For replacement requests or product inquiries,
please contact our Customer Service Team by emailing us at
support@furinno.com. Thank you for selecting Furinno!
TWIN & TWIN XL: 200 lbs, FULL: 400 lbs,
QUEEN: 500 lbs, KING & CAL.KING: 600 lbs
FURINNO BED FRAME
Question and Answer IconNeed help?

Do you have a question about the Furinno FB19821T and is the answer not in the manual?

Furinno FB19821T Specifications

General IconGeneral
BrandFurinno
ModelFB19821T
CategoryIndoor Furnishing
LanguageEnglish

Summary

Furinno Bed Frame Assembly Instructions

General Assembly Guidance

Read instructions carefully, identify parts, and assemble on cardboard to prevent damage.

Important Load Capacity Notes

Details maximum weight limits for different bed sizes and safety warnings regarding exceeding them.

Customer Support Information

Contact details for replacement parts or product inquiries via email.

Bed Frame Assembly Steps

Step 1: Headboard and Side Rail Attachment

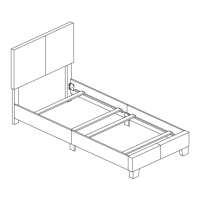
Assemble headboard cushion with legs and attach side rails, ensuring cleat is on the outside edge.

Step 2: Footboard Cushion and Leg Assembly

Connect the footboard cushion to its legs and prepare for frame connection.

Step 3: Connecting Side Rails to Frame

Join the side rails to the main frame structure, advising not to fully tighten screws yet.

Step 4: Installing Support Legs and Rails

Attach the side rail support legs and remaining side rails to the bed frame.

Step 5: Adding Slats and Initial Tightening

Place the slats onto the frame and begin tightening all hardware once the bed is level.

Step 6: Final Assembly Check

Confirm all components are securely fastened and the assembly is complete.

Related product manuals