EasyManua.ls Logo

Furinno FNCJ-33019 - User Manual

Furinno FNCJ-33019
2 pages
Print Icon
To Next Page IconTo Next Page
Loading...
Recomm. 1 Person
Approx. 20 minutes
No tools Required
WARNING:
>This unit has been designed to support the
maximum loads shown. Exceeding these
load limits could cause sagging, instability,
product collapse, and/or serious injury.
>DO NOT allow children to climb on unit.
>Put heavier items on lower shelves.
Recommended Maximum Weight
*Unit in Pound(lbs)
10
120
10
STEP 2
Attach Top Panel (A) to the finished product from STEP 1 with Screw/Washer/Nut (1).
Note: Hold nut with spanner (4) while screw in the screws.
(1)X 12pcs
Approx. 30 minutes
No tools Required
Assembly Instruction
Customer Support
Recomm. 1 Person
Pine Wood Shoe Rack Bench
NEED HELP? For replacement requests or product inquiries, please contact our
Customer Service Team by emailing us. Thank you for selecting our products!
Question and Answer IconNeed help?

Do you have a question about the Furinno FNCJ-33019 and is the answer not in the manual?

Summary

Assembly Instruction

STEP 2

Attach Top Panel (A) to the finished product from STEP 1 with Screw/Washer/Nut (1). Hold nut with spanner (4) while screwing.

Recommended Maximum Weight

Diagram showing maximum weight limits for shelves: 120 lbs total, 10 lbs per shelf.

WARNING

Exceeding load limits can cause instability, collapse, or injury. Do not allow children to climb. Put heavier items on lower shelves.

STEP 1

Hardware and Parts List

Lists the necessary hardware (screws, wrench, spanner) and parts (panels, legs) for assembly.

USEFUL HINTS BEFORE YOU START

Provides essential pre-assembly advice including reading steps, sorting parts, and proper cleaning.

Overview

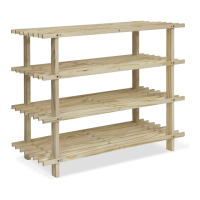
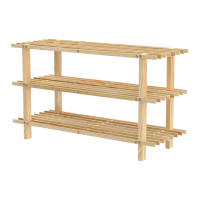
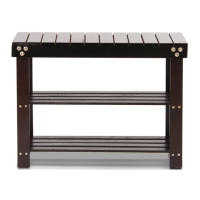
This document provides assembly instructions and details for a Pine Wood Shoe Rack Bench.

Function Description:

The device is a multi-tiered shoe rack designed to organize and store shoes, while also serving as a bench. It features a flat top panel that can be used for sitting or placing items, and two lower shelves for shoe storage. The open design allows for air circulation, which can help in keeping shoes fresh.

Important Technical Specifications:

  • Product Type: Pine Wood Shoe Rack Bench
  • Material: Pine Wood
  • Components:
    • Top Panel (A): 1 piece
    • Shelf Panel (B): 2 pieces
    • Support Leg (C): 4 pieces
  • Hardware:
    • Screw/Washer/Nut (1): 12 pieces
    • Socket Head Cap Screw (2): 16 pieces
    • Hex Wrench (3): 1 piece (for Socket Head Cap Screws)
    • Spanner (4): 1 piece (for Screw/Washer/Nut)
  • Maximum Weight Capacity:
    • Top Panel: 120 lbs
    • Lower Shelves: 10 lbs each
    • Note: All weight capacities are in pounds (lbs).
  • Assembly Time: Approximately 30 minutes
  • Recommended Persons for Assembly: 1 Person
  • Tools Required for Assembly: Hex Wrench (included), Spanner (included) – No additional tools are required.

Usage Features:

  • Multi-functional Design: Serves as both a shoe storage unit and a bench for sitting.
  • Tiered Storage: Provides two lower shelves for organizing multiple pairs of shoes.
  • Open Structure: Facilitates easy access to shoes and promotes ventilation.
  • Compact Footprint: Designed to fit in various spaces such as entryways, hallways, or closets.
  • Natural Wood Finish: The pine wood construction offers a natural aesthetic that can complement various interior decors.
  • Weight Distribution: Users are advised to put heavier items on lower shelves to maintain stability and prevent tipping.

Maintenance Features:

  • Cleaning: The product should be cleaned with a mild cleanser using a soft, damped cloth. Harsh or abrasive cleansers should not be used as they may damage the wood finish.
  • Assembly Precautions:
    • Read each step carefully before starting assembly.
    • Perform each step in the correct order to avoid difficulties.
    • Identify, sort, and count all parts before beginning assembly.
    • Assemble the furniture on packaging cardboard or a soft surface to prevent scratches or damage to the product.
    • Using incompatible hardware can cause damage to the product and compromise its structural integrity.
  • Safety Warnings:
    • The unit is designed to support specific maximum loads. Exceeding these limits can lead to sagging, instability, product collapse, and potential serious injury.
    • Children should not be allowed to climb on the unit to prevent accidents and injuries.
    • Heavier items should always be placed on the lower shelves to enhance stability and prevent the unit from becoming top-heavy or tipping over.

Assembly Process Overview:

The assembly process is divided into two main steps:

  • Step 1: Attach the Support Legs (C) to the Shelf Panels (B) using Socket Head Cap Screws (2). This forms the base structure with the shelves.
  • Step 2: Attach the Top Panel (A) to the assembled structure from Step 1 using Screw/Washer/Nut (1). During this step, it is important to hold the nut with the spanner (4) while tightening the screws to ensure a secure fit.

The manual emphasizes the importance of following the instructions carefully and using the provided hardware to ensure a safe and stable final product. Customer support information is provided for replacement requests or product inquiries, accessible via email.

Furinno FNCJ-33019 Specifications

General IconGeneral
BrandFurinno
ModelFNCJ-33019
CategoryIndoor Furnishing
LanguageEnglish

Related product manuals