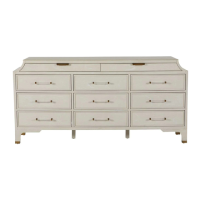
The Alexandra Dresser is a piece of furniture designed for storage, featuring multiple drawers and an anti-tip mechanism for safety. This manual provides detailed assembly instructions and hardware specifications to ensure proper setup and use.
Function Description:
The primary function of the Alexandra Dresser is to provide organized storage for clothing, linens, or other personal items within a living space. It features a multi-drawer design, allowing for segregation and easy access to stored contents. The dresser is also equipped with an anti-tip kit, an essential safety feature designed to prevent the unit from accidentally tipping over, especially in households with children or pets. This kit ensures the dresser remains securely anchored to a wall, mitigating potential hazards. The inclusion of levelers on the underside of the legs allows for stability on uneven floor surfaces, ensuring the dresser sits flat and does not wobble.
Important Technical Specifications:
Hardware Components (Included):
- A. Bolts: 4 pieces. These are likely used for securing handles or other structural components.
- B. Handles: 2 pieces. These are the primary handles for the top two drawers.
- C. Anti-Tip Kit: 2 sets. This kit is crucial for safety and includes:
- I. Small Screws: 4 pieces. Used for attaching brackets to the dresser.
- II. Large Screws: 4 pieces. Used for attaching brackets to the wall, specifically into a wall stud.
- III. Brackets: 4 pieces. These are the physical components that connect the dresser to the wall.
- IV. Retention Belt: 2 pieces. This strap threads through the brackets to secure the dresser to the wall.
- Screwdriver: Essential for fastening screws during assembly.
Usage Features:
Assembly Process:
The assembly process is divided into three main steps:
-
Step 1: Handle Installation:
- The first part of this step involves installing the two main handles (B) onto the top two drawers of the dresser. These handles are typically found in a blister pack. A screwdriver is required for this task.
- The second part of Step 1 addresses the handles for the nine lower drawers. These handles are pre-installed but need to be re-positioned. They are initially located at the backside of the face drawer and must be moved to the front for proper use. This suggests a design where handles are secured during shipping to prevent damage and then flipped or re-attached by the user.
-
Step 2: Leveler Adjustment:
- This step focuses on ensuring the dresser is stable on any floor surface. The dresser is equipped with levelers located on the underside of its legs.
- To adjust, the user needs to lift the side of the dresser that requires elevation to gain access to the levelers.
- The levelers are then turned until adequate contact with the floor is achieved, eliminating any wobbling or unevenness. This feature is vital for the stability and longevity of the dresser, preventing stress on its joints and ensuring drawers open and close smoothly.
-
Step 3: Anti-Tip Kit Installation (Safety Feature):
- This is a critical safety step that involves securing the dresser to a wall to prevent tipping.
- Attaching Brackets to Dresser: Two brackets (III) are attached horizontally to the top back of the dresser using the small screws (I).
- Attaching Brackets to Wall: The remaining two brackets (III) are attached vertically to the wall, approximately 1 inch below the dresser-attached brackets. It is crucial to screw the large screws (II) into a wall stud for maximum security. A wall stud provides a solid anchor point, significantly enhancing the anti-tip mechanism's effectiveness.
- Connecting with Retention Belt: The brackets on the dresser and the wall are then aligned vertically. The retention belt (IV) is threaded through these aligned brackets.
- Securing the Strap: The user must confirm that the strap is securely laced and locked, ensuring a firm connection between the dresser and the wall. This final check is essential for the anti-tip mechanism to function correctly.
Maintenance Features:
While the manual does not explicitly detail ongoing maintenance, the design implies several aspects:
- Stability Check: Regular checks of the levelers (Step 2) are recommended to ensure the dresser remains stable, especially if the dresser is moved or if the floor settles.
- Anti-Tip Kit Inspection: Periodically inspecting the anti-tip kit (Step 3) for any signs of loosening or damage is crucial for continued safety. The retention belt should be checked to ensure it remains securely laced and locked.
- Handle Tightness: Over time, handles may loosen. A simple retightening with a screwdriver can maintain their functionality and appearance.
The Alexandra Dresser is designed with both aesthetic appeal and practical functionality in mind, emphasizing user safety through its anti-tip mechanism and stability features. The clear, step-by-step instructions ensure a straightforward assembly process, allowing users to quickly set up and utilize their new storage solution.