4. PROGRAMMING v (Fig. G – J)
Fig. G:
1 Set time (hours) | 2 Set time (mins) |
3 day setting (Mon ‒ Sun) | 4 Ready for schedule
Fig. H: 1 Select schedule | 2 Set schedule |
3 Confirm schedule | 4 Device programmed
P1, P2, P3 denote watering schedules. You can
save up to 3 independent schedules. Irrigation
days must be selected and confirmed individ ually.
The current weekday will be underlined.
By pressing On / Off, schedules can be activated
or deactivated individ ually.
Soil Moisture Sensor v (Fig. D and I):
After a soil moisture sensor is connected, the
word “Sensor” will be displayed – this can take
up to 1minute.
Once the soil is sufficiently moist, awatering
operation is interrupted or a schedule is disabled
so that it cannot be activated. This does not affect
active (manual) watering.
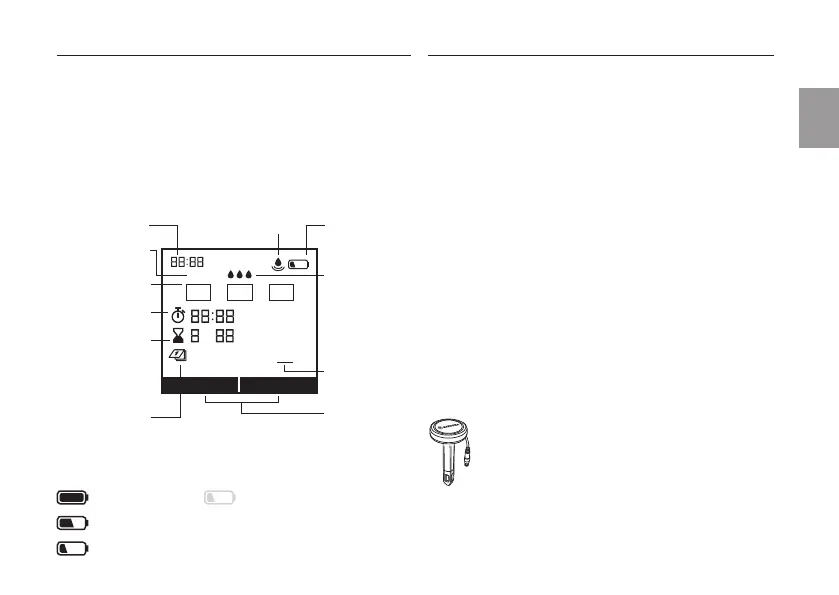
Soil Moisture Sensor, Art.1867
(optionally available)
1 Connecting the sensor
An operating point must then be defined.
This is the soil moisture level at or above which
watering is not to be carried out (see GARDENA
Soil Moisture Sensor Operating Instructions).
There are 3 levels to choose from.
3. FUNCTION v (Fig. F)
You can change the settings or move to the next
setting by turning the knob. You can confirm the
respective input by pressing the rotary knob.
Pressing the knob for a minimum of 3 seconds
locks or unlocks the display.
*
Battery
Condition *
Programs
Time
Connected
sensor
Start Time
(0 – 23) hrs (0 – 59) min.
Run Time
(0 – 7) hrs (1 – 59) min.
Frequency
(weekdays)
Today
Active Watering
Schedule
active /
deactive
ON OFF
hrs min
Mo Tu We Th Fr Sa Su
Sensor
P1 P2 P3
Soil Moisture
0 – 3 drops =
very dry /
rather dry /
humid /
very humid
max. 1 year
min. 4 weeks
max. 4 weeks
too weak for opening again
If you will be away for long periods of
time, please replace the battery when
the battery symbol blinks – otherwise
the watering system may fail.
EN
15