Do you have a question about the Gardener's Titan A-Frame Trellis and is the answer not in the manual?
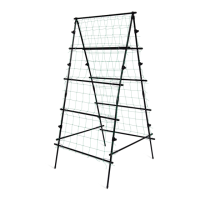
Identify and organize all parts on a clean, level surface before assembly.
Attach two Staked Supports to a Side Support using Connectors to form one side of the Trellis.
Place a Trellis Support into clips on Side Supports and stand it upright for stability.
Attach a Trellis Support to Staked Supports about 14" from the bottom using Sure-Clips.
Repeat Step 4 to attach another Trellis Support to the opposite side of the Trellis.
Attach the remaining eight Trellis Supports to the front and back, spacing them about 14" apart.
Unfold and spread the Netting over the Frame, looping it into the hooks on the Trellis Supports.
Place Net Clips along the sides of the Trellis, pressing down on the tab to lock the Netting.
Place the Trellis in a protected location and press Staked Supports into the ground 12-14" for security.
The Titan A-Frame Trellis is a gardening accessory designed to support the growth of squash and cucumbers, offering several benefits for gardeners. Its primary function is to provide a vertical structure for these vining plants, which helps save garden space, reduce the incidence of plant diseases, and make harvesting easier.
The trellis works by allowing vining plants like squash and cucumbers to grow upwards rather than spreading horizontally across the ground. This vertical growth habit is beneficial for several reasons. Firstly, it maximizes garden space, making it an excellent solution for smaller gardens or for gardeners who wish to cultivate more plants in a limited area. By training plants to grow vertically, the footprint they occupy is significantly reduced. Secondly, elevating the plants off the ground improves air circulation around the foliage and fruit. This enhanced airflow helps to keep the leaves dry, which is crucial in preventing common fungal diseases that thrive in damp conditions. Additionally, keeping fruits off the soil protects them from rot and pests that might otherwise damage them. Thirdly, the vertical orientation makes harvesting much more convenient. Fruits are easier to spot and reach, eliminating the need to bend over or search through dense foliage on the ground. This not only saves time and effort but also reduces the likelihood of missing ripe produce. The design of the trellis ensures that the plants are well-supported throughout their growth cycle, from initial vining to fruit production, providing a stable and reliable structure.
The Titan A-Frame Trellis is designed for ease of assembly and long-term use. It is constructed from polyethylene-coated steel, a material chosen for its durability and resistance to environmental elements. The polyethylene coating serves a dual purpose: it provides a clean, aesthetic look and protects the steel from rust and corrosion, ensuring the trellis will last for many years. The steel tubing itself is lightweight, which simplifies the assembly process, yet robust enough to provide the necessary strength and stability to support heavy loads of fruit-bearing plants.
Assembly of the trellis is straightforward, though it is recommended to have two people for easier setup. The process begins by identifying and organizing all the components on a clean, level surface. The trellis consists of several key parts: Side Supports, Staked Supports, Support Connectors, Trellis Supports, Sure-Clips, Net Clips, and Netting.
The first step involves forming the two sides of the trellis. This is achieved by attaching two Staked Supports to a Side Support using the provided Support Connectors. This process is then repeated to create the second side of the trellis. Once both sides are formed, a Trellis Support is placed into the clips on top of the Side Supports. The trellis is then carefully stood upright, with its legs spread apart to ensure stability.
Subsequent Trellis Supports are attached to the sides of the trellis using Sure-Clips. These clips are designed to be tight, providing a secure attachment. When attaching a Trellis Support with Sure-Clips, it's important to remember that the support should always be on the outside of the trellis, and the curved part of the clips should face towards the inside of the A-Frame Trellis. The looped end of a Sure-Clip is slid over one end of the Trellis Support, positioned so the rounded part fits around the side of the trellis, and then the open ends of the clip are bent around the Cross Support to secure it in place. This process is repeated for all remaining Trellis Supports, ensuring they are spaced approximately 14 inches apart for optimal plant growth and support.
After all Trellis Supports are in place, the Netting is carefully unfolded and spread over the frame. The Netting is then looped into the hooks located on the ends of the Trellis Supports. To further secure the Netting to the frame, Net Clips are placed along the sides of the trellis. These clips have a tab in the back that, when pressed down, locks them into place, ensuring the Netting remains taut and secure.
The final step involves selecting an appropriate location for the assembled trellis. It is crucial to choose a spot that is protected from high winds to prevent the trellis from tipping over. Additionally, the trellis should be placed away from children's play areas, as it is not designed as a play structure and should not be climbed on. Once the location is chosen, the Staked Supports are pressed firmly into the ground, to a depth of at least 12-14 inches, to ensure the trellis is securely anchored and stable.
The Titan A-Frame Trellis is designed for minimal maintenance, primarily due to its durable construction materials. The polyethylene-coated steel is inherently resistant to rust and corrosion, eliminating the need for frequent painting or protective treatments. The coating also provides a smooth, non-porous surface that is easy to clean. Should the trellis become dirty from soil, plant residue, or environmental exposure, it can typically be wiped down with a damp cloth or rinsed with a hose. This simple cleaning routine helps maintain its clean look and extends its aesthetic appeal.
The tight fit of the Sure-Clips and the locking mechanism of the Net Clips ensure that the components remain securely in place throughout the growing season. However, it is a good practice to periodically inspect all connections to ensure they remain tight and secure, especially after strong winds or heavy rain. If any clips appear loose, they can be re-secured or adjusted as needed.
At the end of the growing season, after plants have been harvested and removed, the trellis can be disassembled for storage if desired, though its durable construction also allows it to be left outdoors year-round in many climates. If disassembled, storing the components in a dry place will further prolong their lifespan. The Netting, being a flexible component, can be cleaned of any remaining plant debris and stored to prevent tangling or damage.
Overall, the Titan A-Frame Trellis is a robust, user-friendly, and low-maintenance gardening tool that effectively supports vining plants, enhances garden productivity, and simplifies harvesting. Its durable construction ensures many seasons of reliable use, making it a valuable addition to any garden.
| Type | A-Frame Trellis |
|---|---|
| Material | Powder-coated steel |
| Height | 72 inches |
| Width | 48 inches |
| Depth | 24 inches |
| Weight | 15 pounds |
| Color | Green |
| Assembly Required | Yes |