V Rev /#
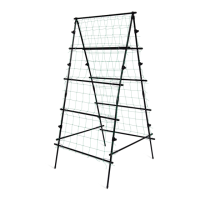
Titan Pea Tunnel
Growing peas on a trellis saves space, reduces disease problems and makes harvesting a breeze. The Pea Tunnel is made
from polyethylene-coated steel that will last for years to come.The polyethylene is non-degradable and provides a clean look
while protecting the steel from the elements. The steel tubing provides strength and durability, yet is also lightweight and easy to
assemble.
Parts
() Arches
() Staked Supports
() Cross Braces
() Metal Inserts
() Sure-Clips
() Net Clips
() Netting
Assembly
NOTE: Assembly is easiest with people.
Step 1. Identify and organize all parts on a clean, level surface. NOTE: We recommend assembling
your Pea Tunnel at the spot you intend to install it.
Step 2. Attach Cross Braces together by sliding half of a Metal Insert into the open end of one
Brace and the other half into the other Brace (Figure ). Repeat until you have assembled
Cross Braces.
Step 3. Stand the Arches upright and place an assembled Cross Brace along the top of them.
Spread the Arches apart so they are evenly spread out (Figure ).
Step 4. Make sure the Cross Brace is positioned correctly, then attach it to each Arch using the
Sure-Clips and the instructions below:
Tip: When attaching a Cross Brace using the Sure-Clips, remember that the Brace should always be on the outside of the Arches and
that the curved part of the Clips (Figure ) will always be facing towards the inside of the Pea Tunnel.
Slide the looped end of a Sure-Clip over one end of the Cross Brace (Figure ) and position it so the curved part of the Clip fits around
the closest Arch. Bend the open ends of the Clip around the Cross Brace, securing the Sure-Clip into place. NOTE: This may take
some extra strength as the Clips are made to be tight. Repeat with the other outside Arch.
To attach the Cross Brace to the middle Arches, slide the open ends of the Sure-Clips around the Cross Brace and then follow the
instructions above (Figure ).
Step 5. Repeat Step to attach more Cross Braces to the spots shown in Figure . NOTE: You should have Cross Braces left.
over please
Metal Insert
Cross Braces
Figure 1
Figure 3
The curved part of the Sure-Clip will
always be facing towards the inside of
the Pea Tunnel.
Arches
Arches
Cross Braces
Sure-
Clip
Outside Arch
Cross Brace
Sure-Clip
Middle Arch
Cross Brace
Figure 2