This document outlines the installation, operation, and maintenance procedures for the Garland XHP Broiler, model GTXHP36, a professional-grade charbroiler designed for commercial kitchen environments. The manual emphasizes safety, proper handling, and routine care to ensure optimal performance and longevity of the equipment.
Function Description
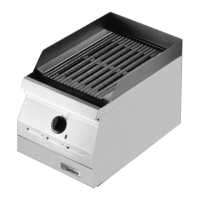
The Garland XHP Broiler is a high-performance charbroiler engineered to deliver consistent cooking results by vaporizing grease drippings, which imparts a unique flavor to food. Unlike traditional broilers, this unit is designed to generate more smoke as part of its cooking process due to the vaporization of fats and oils by its ceramic bed. This characteristic contributes to a distinct taste profile for charbroiled items. The unit features individual burner controls, allowing for precise temperature management across different sections of the cook surface. Each burner has a power switch to control its on/off status and a knob to adjust the flame height, providing flexibility for various cooking needs. An LED indicator for each burner signals a lockout condition, aiding in troubleshooting. The charbroiler is intended for indoor use only and must be installed under an appropriate ventilation hood to manage the smoke and combustion by-products effectively.
Usage Features
The XHP Broiler is designed for professional use and should be operated by qualified personnel. Before initial use, it is crucial to burn off any manufacturing oils from the cook grates by running the unit on high for approximately 30-45 minutes. This seasoning process also helps smooth out natural pitting from the cast moldings and prevents food from sticking. The cook grates are coated with an organic, FDA-approved, food-safe anti-rust oil.
To turn on the grill, simply activate the power switch for the desired burner. The grill will automatically attempt to light the burner within 10-30 seconds. If a red indicator light illuminates, the burner has "locked out," requiring the power switch to be toggled off and on again to reattempt ignition. Once the burner is lit, the control knob allows for temperature adjustment, with low settings maintaining 500-550°F and high settings reaching 700-750°F. The unit typically takes 30-45 minutes to heat up and be ready for cooking. For optimal ignition, setting the knob to the middle position is recommended.
During operation, the temperature of the cook surface can be individually controlled for each section. Heat is evenly distributed across the cook surface, with slightly cooler spots directly above the burners. A scraper and brush combination tool is provided for cleaning cook grates as needed during operation. The unit does not have a grease collection drawer because grease drippings are vaporized by the hot ceramic bed. To ensure effective vaporization, the ceramic bed must be sufficiently hot, which is why a 30-45 minute preheating time is recommended. If cooking must occur before the grill is fully heated, it is advised to run the unit for at least 30 minutes after cooking to vaporize any remaining grease/drippings stuck to the ceramics.
Users should exercise caution when operating the grill due to high temperatures. Surfaces near the cooking area, including side panels and the front rail, can become hot and cause burns. Appropriate personal protective equipment (PPE), such as long-sleeved flame-retardant gloves and safety goggles, is recommended, especially when cooking fatty foods prone to flare-ups. Hands and arms should be kept away from the cook surface, and any product manipulation should be done quickly.
In the event of a power outage, the gas valves will close, and all burners will turn off for safety. Users must toggle off the power switch(es) to prevent automatic re-ignition when power is restored, which could pose a fire hazard if flammable materials are left unattended near the appliance.
Maintenance Features
Regular cleaning and maintenance are essential for the XHP Broiler's maximum efficiency and trouble-free operation. Before any cleaning or maintenance, the unit must be cooled down, and the power cord disconnected to prevent electrical shock.
Daily Cleaning Summary:
- Cool Down: Allow the grill to cool for at least 20 minutes. Turn off all main power switches.
- Remove Components: Remove slow cook racks, slow cook shelf, and cook grates. These can be washed in a sink. The provided cleaning tool can assist in prying up the grates.
- Clean Burner Cap: Remove the burner cap and wash it in the sink. Season the burner cap after washing to prevent rust.
- Remove Ceramic Ring: Carefully remove the ceramic ring, as it is fragile.
- Vacuum Debris: Vacuum all debris from the ceramics and around the burner and flame sense/igniter probe.
- Clean Flame Sense/Igniter Probe: Use an abrasive strip to remove salts and oils from the metal portion of the flame sense rod. Wipe the white ceramic and metal portion of the probe with a dry cloth. This probe is crucial for flame rectification, and a dirty probe can cause the burner to "lock out."
- Clean Ceramics: Use a damp cloth or non-metallic scour pad with mild detergent to clean any fats/oils stuck on the ceramics. Avoid using excessive water, cleaning chemicals, metal scour pads, or sharp tools on the ceramics. Wipe dry with a clean cloth.
- Season Grates: After washing, season the cook grates with cooking oil to prevent corrosion.
- Reassemble: Replace the ceramic ring, cast iron cap, and cook grates.
- Clean Exterior: Clean the outside stainless steel panels with a soft cloth and mild detergent. For stubborn spots, a non-metallic scouring pad can be used, rubbing in the direction of the grain. Avoid spraying water or cleaning solutions into openings on the grill or using high-pressure jets.
Additional Maintenance Notes:
- Never cover the cook surface with sheet pans or aluminum foil, as this can damage the electronics. The unit has a temperature sensor that will shut it down if this condition is detected.
- Interior cleaning, beyond routine cleaning, must be performed by a qualified service technician.
- Avoid using high-pressure water jets, hose-downs, power cleaning equipment, steel wool, scrapers, or wire brushes on stainless steel or painted surfaces.
- Do not use acid-based, caustic, or alkaline cleaning solutions on any part of the equipment. Use mild, non-abrasive soaps or detergents.
- Warning labels on the equipment must be kept legible and observed at all times.
- If the flame sense probe issue persists after cleaning, contact an authorized service agent. Warranty claims related to a dirty probe will be rejected if the cleaning instructions were not followed.