Do you have a question about the Garmin GT30-TM and is the answer not in the manual?
Highlights critical warnings and cautions regarding safe operation, potential damage, and personal protective equipment.
Instructions for copying the software update file to a memory card for device updates.
Step-by-step guide to updating the device software using a memory card and following on-screen prompts.
Lists essential tools required for the transducer installation process.
Explains the function of the transducer in transmitting and receiving sound waves for sonar.
Details on how to physically assemble the transducer mount using provided screws and washers.
Guidance on selecting the optimal position for the transducer on the transom for performance.
Instructions for drilling pilot holes and securely attaching the transducer bracket to the transom.
Steps to install the cable-entry cover to prevent water entry after routing the cable through the transom.
Advises checking the boat for leaks after installation, especially around holes below the waterline.
Procedures for testing the transducer's sonar performance in open water and adjusting its depth as needed.
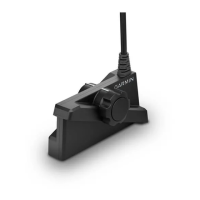
This document provides installation instructions for a Garmin Transom-Mount Transducer, designed to enhance your awareness of the water beneath your boat by relaying sound-wave information to your Garmin sonar device. Proper installation is crucial for optimal performance and to prevent damage to your boat or the transducer itself.
The Garmin Transom-Mount Transducer transmits and receives sound waves through the water, converting them into electrical signals that your Garmin sonar device interprets to display depth, bottom structure, and underwater objects. This technology assists in safe navigation and fishing by providing a visual representation of the underwater environment. The transducer is designed to be mounted on the transom of your boat, ensuring it operates in clean, non-turbulent water for accurate readings. It is an essential component for any Garmin sonar system, allowing you to effectively utilize the sonar capabilities of your chartplotter.
To ensure the best performance, the transducer should be mounted as close to the center of the boat as possible, avoiding areas behind strakes, struts, fittings, or water intake/discharge ports that create air bubbles or turbulent water. For single-drive boats, it should not be mounted in the path of the propeller to prevent cavitation, which can degrade performance and damage the propeller. On twin-drive boats, mounting between the drives is recommended.
The installation process involves several steps. First, the transducer mount is secured to the transducer using M4 screws, flat washers, and split washers. Then, the mount is attached to the bracket with additional M4 screws, flat washers, and lock nuts. A 7 mm wrench is recommended to hold the lock nut while tightening the screws.
For transom mounting, the transducer mount should be positioned so that the center of the bottom of the transducer is level with the bottom edge of the transom and parallel to the water line. Pilot holes are drilled for the mounting screws, and marine sealant is applied to the screws before attaching the transducer assembly to the transom. A third screw in the lower center hole provides additional stability.
Cable routing is another critical aspect. If routing the cable through the transom, a pilot-hole location should be chosen well above the waterline. Cable clamps are used to secure the transducer cable to the transom, preventing strain and damage. A pass-through hole is drilled using a 25 mm (1 in.) drill bit, and the cable is fed through. For through-transom routing, a cable-entry cover is installed to prevent water from entering the boat. The cover is placed over the hole with the opening pointing downward, and pilot holes are drilled for its mounting screws. Marine sealant is applied generously to fill the pass-through hole and around the cable to ensure a watertight seal. If not routing through the transom, the cable should be routed up and over the top of the transom, avoiding electrical wires or other sources of interference.
After installation, it is crucial to test the transducer in open water, free of obstacles. With the boat in the water, turn on the chartplotter and drive at a slow speed, observing the sonar readings. Gradually increase speed while monitoring the chartplotter. If the sonar signal is lost or degraded at certain speeds, note the speed and make moderate turns in both directions. If the signal improves while turning, adjust the transducer to extend slightly further (1/8 in. or 3 mm) below the transom. This process should be repeated until degradation is eliminated. If the signal does not improve after adjustments, the transducer may need to be moved to a different location on the transom, and the test repeated.
To ensure the longevity and proper functioning of your transducer, regular maintenance is important. After installation, always check your boat for leaks around any screw holes added below the water line before leaving it in the water for an extended period. This prevents water intrusion and potential damage to your boat.
The transducer cables should never be cut, as this voids your warranty and can compromise the integrity of the signal. When drilling, cutting, or sanding during installation or maintenance, always wear safety goggles, ear protection, and a dust mask to protect yourself from debris and noise. Additionally, always check what is on the opposite side of the surface before drilling or cutting to prevent accidental damage to other boat components.
If you are mounting the bracket on fiberglass, using a countersink bit to drill a clearance counterbore through only the top gel-coat layer is recommended. This helps prevent cracking of the gel-coat layer when the screws are tightened, preserving the aesthetic and structural integrity of your boat. Applying marine sealant generously during installation, especially around screws and cable pass-throughs, is critical for creating a watertight seal and preventing water damage. Any excess sealant should be wiped away after installation.
Periodically inspect the transducer for any signs of damage or wear, especially if your boat is frequently launched, hauled, or stored in a way that might jar the transducer. Keeping the transducer clean and free of marine growth will also help maintain optimal performance. If you experience persistent issues with the sonar signal, consult the troubleshooting steps outlined in the manual, such as adjusting the transducer depth or relocating it, before seeking professional assistance.
For software updates, which can improve device performance and add new features, you will need to load the latest software onto a memory card. This involves inserting a memory card into your computer, navigating to the Garmin support website, downloading the appropriate marine network software, agreeing to the terms, and then transferring the file to the memory card. Once the software is on the memory card, insert it into your chartplotter after it has fully booted, and follow the on-screen instructions. Allow several minutes for the update to complete, and ensure the memory card is not removed until the device has fully restarted. This proactive approach to software maintenance ensures your Garmin sonar device operates with the most current and efficient programming.
| Model | GT30-TM |
|---|---|
| Power | 500 W |
| Cable Length | 20 ft |
| Connector Type | 12-pin |
| Mounting | Transom mount |
| Compatibility | Garmin echoMAP, GPSMAP |