This document provides an instruction manual for the GASLAND chef Electric Ceramic Hob, covering installation, use, and maintenance for models CH30BF, CH60BF, CH77BF, and CH90BF.
Function Description
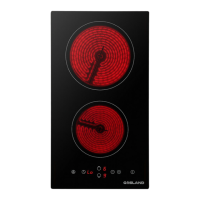
The ceramic cooker hob is designed to meet various cooking demands through resistance wire heating, micro-computerized control, and multi-power selection. It offers an ideal cooking solution for modern families. The hob features multiple cooking zones with varying power outputs, controlled via touch-sensitive panels. Key functions include ON/OFF control, power/timer regulation, key lock, heating zone selection, and timer control. Some models also include dual zone and triple zone functions for enhanced versatility.
Important Safety Instructions
User safety is paramount. Before using the cooktop, it is crucial to read and understand all safety warnings.
- Electrical Shock Hazard: Always disconnect the appliance from the mains electricity supply before any maintenance. A good earth wiring system is essential. Alterations to domestic wiring must be performed by a qualified electrician. Failure to comply can result in electrical shock or death. Do not cook on a broken or cracked cooktop; switch it off immediately and contact a qualified technician.
- Cut Hazard: Panel edges are sharp. Exercise caution to avoid injury or cuts. The razor-sharp blade of a cooktop scraper is exposed when retracted; use with extreme care and store safely out of reach of children.
- Hot Surface Hazard: Accessible parts of the appliance become hot during use and can cause burns. Avoid contact with the glass surface until it cools. Do not place metallic objects (knives, forks, spoons, lids) on the hob as they can become hot. Keep children away. Saucepan handles can be hot; ensure they do not overhang other active cooking zones and keep them out of reach of children.
- General Safety: Do not place combustible materials or products on the appliance. Ensure the appliance is installed and earthed by a suitably qualified person according to instructions. It must be connected to a circuit with an isolating switch providing full disconnection from the power supply. Incorrect installation may invalidate warranty claims. Never leave the appliance unattended when in use, as boil-overs can cause smoking and ignite greasy spills. Do not use the appliance as a work or storage surface, or for warming the room. Always turn off cooking zones and the cooktop after use using the touch controls. Do not allow children to play with, sit on, stand on, or climb on the appliance. Do not store items of interest to children in cabinets above the appliance. Children climbing on the cooktop can be seriously injured. Children or persons with reduced physical, sensory, or mental capabilities, or lack of experience, should only use the appliance under supervision and after receiving instruction on safe use and understanding hazards. Children should not clean or perform user maintenance without supervision. Unattended cooking with fat or oil can be dangerous and lead to fire; never extinguish a fire with water, but switch off the appliance and cover the flame with a lid or fire blanket. Do not store items on cooking surfaces. If the surface is cracked, switch off the appliance to avoid electric shock.
- Maintenance: Do not repair or replace any part unless specifically recommended in the manual; all other servicing must be done by a qualified technician. Do not use a steam cleaner. Do not place or drop heavy objects on the cooktop. Do not stand on the cooktop. Do not use pans with jagged edges or drag pans across the glass surface, as this can scratch it. Do not use scourers or harsh abrasive cleaning agents, as they can scratch the glass. If the supply cord is damaged, it must be replaced by the manufacturer, service agent, or similarly qualified persons to avoid hazard.
- Intended Use: This appliance is intended for household and similar applications, including staff kitchen areas in shops, offices, and other working environments; farm houses; by clients in hotels, motels, and other residential type environments; and bed and breakfast type environments.
- Children: Children under 8 years of age should be kept away unless continuously supervised. Children aged 8 and above, and persons with reduced capabilities, can use the appliance if supervised and instructed on safe use.
Important Technical Specifications
The document provides detailed specifications for different models:
Model CH60BF:
- Cooking Zones: 4 zones
- Frequency: 50/60Hz
- Supply Voltage: 220-240V~
- Rating Power: 5490-6533W
- Product Size (LxWxH): 590mm x 520mm x 52mm
- Built-in Dimension (AxB): 560mm x 490mm
- Zone Power: max. 1800 W (x2), max. 1200 W (x2)
Model CH77BF:
- Cooking Zones: 4 zones
- Frequency: 50/60Hz
- Supply Voltage: 220-240V~
- Rating Power: 6039-7186W
- Product Size (LxWxH): 770mm x 520mm x 52mm
- Built-in Dimension (AxB): 560mm x 490mm
- Zone Power: max. 2200W (1000W), max. 1200 W (x2), max. 2000W (1100W)
Model CH90BF:
- Cooking Zones: 5 zones
- Frequency: 50/60Hz
- Supply Voltage: 220-240V~
- Rating Power: 6130-7295W
- Product Size (LxWxH): 900mm x 520mm x 52mm
- Built-in Dimension (AxB): 870mm x 490mm
- Zone Power: max. 1200 W (x2), max. 2300/1600/800 W, max. 2000/1100 W, max. 1800 W
Model CH30BF(US):
- Cooking Zones: 2 zones
- Frequency: 50/60Hz
- Supply Voltage: 220-240V~
- Rating Power: 2745-3267W
- Product Size (LxWxH): 11in x 20in x 2in
- Built-in Dimension (AxB): 10 1/2in x 19 4/5in
- Zone Power: max. 2000 W, max. 1500 W
Model CH77BF(US):
- Cooking Zones: 4 zones
- Frequency: 50/60Hz
- Supply Voltage: 220-240V~
- Rating Power: 6039-7186W
- Product Size (LxWxH): 30in x 20in x 2in
- Built-in Dimension (AxB): 22 1/5in x 19 1/2in
Weight and dimensions are approximate and subject to change due to continuous product improvement.
Usage Features
- Touch Controls: The controls are touch-sensitive, requiring no pressure. Use the ball of your finger. A beep confirms each touch. Keep controls clean, dry, and uncovered, as even a thin film of water can hinder operation.
- Cookware Selection: Use cookware with smooth, flat bases that sit flush against the glass and match the cooking zone size. Always center the pan. Avoid cookware with jagged edges or curved bases, and do not slide pans to prevent scratching.
- Starting Cooking: After power-on, the buzzer beeps, and indicators light up for 1 second before going out, signifying standby mode. Touch the ON/OFF control, and all indicators will show "-". Place a suitable pan on the desired cooking zone, ensuring the pan bottom and cooking zone are clean and dry. Select a heating zone and adjust the heat setting using the "-" or "+" controls. If no heat setting is chosen within 1 minute, the hob automatically switches off.
- Dual/Triple Zone Activation: For models with dual or triple zones (CH77BF-AU, CH77BF-US, CH90BF-AU), these can be activated or deactivated by pressing the corresponding control.
- Finishing Cooking: To turn off a cooking zone, select the zone and scroll the heat setting down to "0". For CH90BF-AU, after showing "0", it will display "H" for residual heat.
- Residual Heat Warning: An "H" display indicates the cooking zone is hot to touch. It disappears when the surface cools to a safe temperature. This can be used as an energy-saving function to heat further pans.
- Auto Shutdown Protection: The hob automatically shuts down if a cooking zone is left on for an extended period. Default working timers vary by power level (e.g., 8 hours for power levels 1-3, 4 hours for 4-6, 2 hours for 7-9).
- Locking Controls: Controls can be locked to prevent unintended use, such as by children. When locked, all controls except ON/OFF are disabled. To lock, touch the keylock control; the timer indicator will show "Lo". To unlock, ensure the hob is on, then touch and hold the keylock control for a while. In lock mode, the ON/OFF control can still turn off the hob in an emergency, but unlocking is required for subsequent operation.
- Over-Temperature Protection: A temperature sensor monitors the hob's internal temperature. If excessive temperature is detected, the hob automatically stops operation.
- Timer Function: The timer can be used as a minute minder (up to 99 minutes) without affecting cooking zones, or to turn off a specific cooking zone after a set time.
- Minute Minder: With the cooktop on (even without a cooking zone selected), touch the timer control. The minder indicator will flash, and "30" will appear. Adjust the time using "-" or "+" (single touch for 1 minute, touch and hold for 10 minutes). Once set, it counts down, and the display shows remaining time. When finished, the buzzer beeps for 30 seconds, and the indicator shows "--". The cooker continues to operate as this is a minute minder only.
- Cooking Zone Timer: Select the desired cooking zone, then touch the Timer control and adjust the time using "-" or "+". A red dot next to the power level indicator illuminates, showing the zone is selected. When the timer expires, the corresponding cooking zone switches off automatically. Other active cooking zones continue to operate. To cancel, touch "-" until "00" appears.
- Power Management (Group A): For models with power management (e.g., CH90BF), if two zones in Group A are operating at or above power stage 7, they will automatically switch on and off in turns, controlled by software. If only one zone is on, or both zones are below power stage 7, there is no software limitation.
- Power Management (Group B): All zones in Group B can work together without limitation.
- Cooking Guidelines:
- Reduce temperature settings once food boils.
- Using a lid reduces cooking times and saves energy.
- Minimize liquid or fat for faster cooking.
- Start cooking on high, then reduce heat once food is hot.
- Simmering/Rice: Simmering occurs around 85°C (185°F). Some tasks like rice absorption may need a higher setting than the lowest.
- Searing Steak: Bring meat to room temperature. Heat a heavy-based frying pan. Brush steak with oil, add a small amount of oil to the pan, then place steak. Turn only once. Cooking time varies by thickness (2-8 minutes per side). Rest steak on a warm plate before serving.
- Stir-frying: Use a ceramic-compatible flat-based wok or large frying pan. Prepare ingredients in advance. Cook in smaller batches if quantities are large. Preheat pan, add oil. Cook meat first, set aside. Stir-fry vegetables until hot but crisp, then return meat and add sauce. Stir gently to heat through. Serve immediately.
- Heat Settings: Guidelines are provided for various cooking tasks, from delicate warming (1-2) to boiling water (9).
Maintenance Features
- Everyday Soiling (fingerprints, marks, non-sugary spills):
- Switch off power to the cooktop.
- Apply a cooktop cleaner while the glass is still warm (not hot).
- Rinse and wipe dry with a clean cloth or paper towel.
- Switch power back on.
- Important: Even when off, the cooking zone may still be hot. Avoid heavy-duty scourers or harsh/abrasive cleaners that can scratch the glass. Always read cleaner labels for suitability. Never leave cleaning residue, as it can stain the glass.
- Boil-overs, Melts, Hot Sugary Spills:
- Remove immediately with a fish slice, palette knife, or razor blade scraper suitable for ceramic glass cooktops.
- Switch off power at the wall.
- Hold the blade/utensil at a 30° angle and scrape the spill to a cool area.
- Clean the spill with a dishcloth or paper towel.
- Follow steps for everyday soiling.
- Important: Remove stains as soon as possible; if left to cool, they may be difficult to remove or permanently damage the glass. The scraper blade is razor-sharp; use extreme care and store safely.
- Spills on Touch Controls:
- Switch off power to the cooktop.
- Soak up the spill.
- Wipe the control area with a clean, damp sponge or cloth.
- Wipe the area completely dry with a paper towel.
- Switch power back on.
- Important: Spills can cause the cooktop to beep, turn off, or make controls unresponsive. Ensure the control area is dry.
Installation
- Work Surface Preparation: Cut the work surface according to the provided dimensions. A minimum of 50mm (2 inches) space must be preserved around the hole. The work surface thickness must be at least 30mm (1 1/5 inches) and made of heat-resistant material to prevent deformation from hotplate radiation.
- Ventilation: Ensure the ceramic cooker hob is well-ventilated, and air inlets and outlets are not blocked. This ensures the hob operates correctly.
- Safety Distance: The safety distance between the hotplate and the cupboard above it should be at least 760mm (30 inches).
- Fixing Brackets: Place the hob on a stable, smooth surface (e.g., packaging). Do not apply force to the protruding controls. Fix the hob to the work surface by screwing two brackets on each side after installation. The bracket position can be adjusted for different work surface thicknesses.
- Electrical Connection: The power supply must comply with relevant standards and use a single-pole circuit breaker. If the cable is damaged, it must be replaced by an after-sales technician. For direct connection to mains, an omnipolar circuit breaker with a minimum 3mm gap between contacts must be installed. The installer must ensure correct electrical connection and compliance with safety regulations. The cable must not be bent or compressed and should be checked regularly.
Disposal
This appliance is labeled in compliance with European directive 2012/19/EU for Waste Electrical and Electronic Equipment (WEEE). It should not be disposed of as unsorted municipal waste. Instead, it must be taken to a collection point for the recycling of electrical and electronic goods to prevent environmental and human health damage. For more information on treatment, recovery, and recycling, contact your local council, household waste disposal service, or the shop where the product was purchased.