EasyManua.ls Logo

Gastroback Mini - User Manual

Gastroback Mini
15 pages
Print Icon
To Next Page IconTo Next Page
Loading...
Art.-Nr. 42399 Automatic Milk Frother - Mini
Operating Instructions
Automatic Milk Frother - Mini
Read all provided instructions before first usage!
Model and attachments are subject to change!
For domestic use only!

Questions and Answers

  • S
    Sarah HubbardJul 26, 2025
    Why Gastroback Kitchen Appliances unit does not operate or no operating light?
    • D
      David HessJul 26, 2025
      If your Gastroback Kitchen Appliances unit doesn't operate and there is no operating light, there might be a few reasons: * The unit might not be plugged in. Ensure it is properly connected to both the wall outlet and the power receptacle in the unit. * The unit could be in a safety cool-down period. Rinse the pitcher in cold water, add cold water to the empty pitcher, and wait a few minutes until it cools down. * The ON switch might not be properly engaged. Try pushing the ON switch firmly.
  • T
    Tiffany AlvarezJul 31, 2025
    What to do if Gastroback Kitchen Appliances froth overflows?
    • S
      Sarah WrightJul 31, 2025
      If the froth is overflowing in your Gastroback Kitchen Appliances, it's likely because you're using too much milk. For the best results, make sure you only add milk up to the FILL LINE.
  • S
    sean79Aug 5, 2025
    What to do if Gastroback Kitchen Appliances unit does not restart and Operating Light stays on?
    • J
      jennifer00Aug 5, 2025
      If your Gastroback Kitchen Appliances unit doesn't restart and the operating light stays on, it might be because the lid was removed while the unit was operating. To fix this, unplug the unit from the power outlet, then plug it back in. After that, press the ON switch to restart the unit.
  • Z
    Zachary KimAug 10, 2025
    How to fix Gastroback Kitchen Appliances unit not properly frothing?
    • M
      Mary BautistaAug 10, 2025
      If your Gastroback Kitchen Appliances unit isn't frothing properly, consider the following: * Ensure the Froth Whip and/or Whip Holder are correctly snapped into the Lid. See ´Operation´. * Make sure you're using the right amount of milk; add milk to the FILL LINE for optimal results. * Check for residue buildup on the bottom, inside the Pitcher, and/or the Whip. Remove any milk residue with a scrubber sponge. * Consider that the brand or type of milk you're using might not froth well. Some types of milk just don't froth as well as others. * Ensure the pitcher is cooled down. Rinse it in cold water, add cold water to the empty pitcher, and wait a few minutes until it is cool.
  • M
    Mike HarrisonAug 16, 2025
    How to clean milk residue on Gastroback Kitchen Appliances?
    • D
      Deborah JohnsonAug 16, 2025
      To remove milk residue from the bottom and inside of the Gastroback Kitchen Appliances pitcher, and/or the whip, clean the pitcher with a scrubber sponge after each use. If cleaning is delayed, add warm water to soak. You can also add ½ to 1 cup of water with a very small amount of dishwasher detergent and run a full cycle, then rinse. Using a milk frother cleaner can also help.
  • J
    James HollandAug 20, 2025
    Why Gastroback Kitchen Appliances froth whip not rotating?
    • L
      Lee PearsonAug 20, 2025
      If the froth whip isn't rotating on your Gastroback Kitchen Appliances, it could be due to a few reasons: * The froth whip might not be properly seated in the whip holder. Verify that it is correctly seated and locked in place. * The lid might not be properly seated. Check that the whip holder is fully snapped onto the lid. * The electrical cord might not be fully plugged into the base unit or wall outlet. Check that the lid is fully seated on the electrical connector of the base unit. * Check all electrical connections.

Summary

Knowing the Milk Frother

Important Safeguards

Important Safeguards for Electrical Appliances

Basic safety precautions for electrical appliances to reduce risk of fire, shock, and injury.

Hot Surfaces - Risk of Burns

Technical and Setup Information

Technical Specifications

Key technical details of the milk frother including power, dimensions, and certifications.

Before first usage

Instructions for initial setup, unpacking, and preparation before the first use.

Operation

Care and Cleaning

Recipes

Troubleshooting Guide

Storage, Disposal, Warranty, and Service

Storage

Instructions for storing the appliance safely when not in use.

Notes for disposal

Guidelines for disposing of the appliance in accordance with local regulations.

Warranty

Information regarding the product's warranty coverage and claim process.

Information and Service

Contact details and resources for customer support and additional product information.

Overview

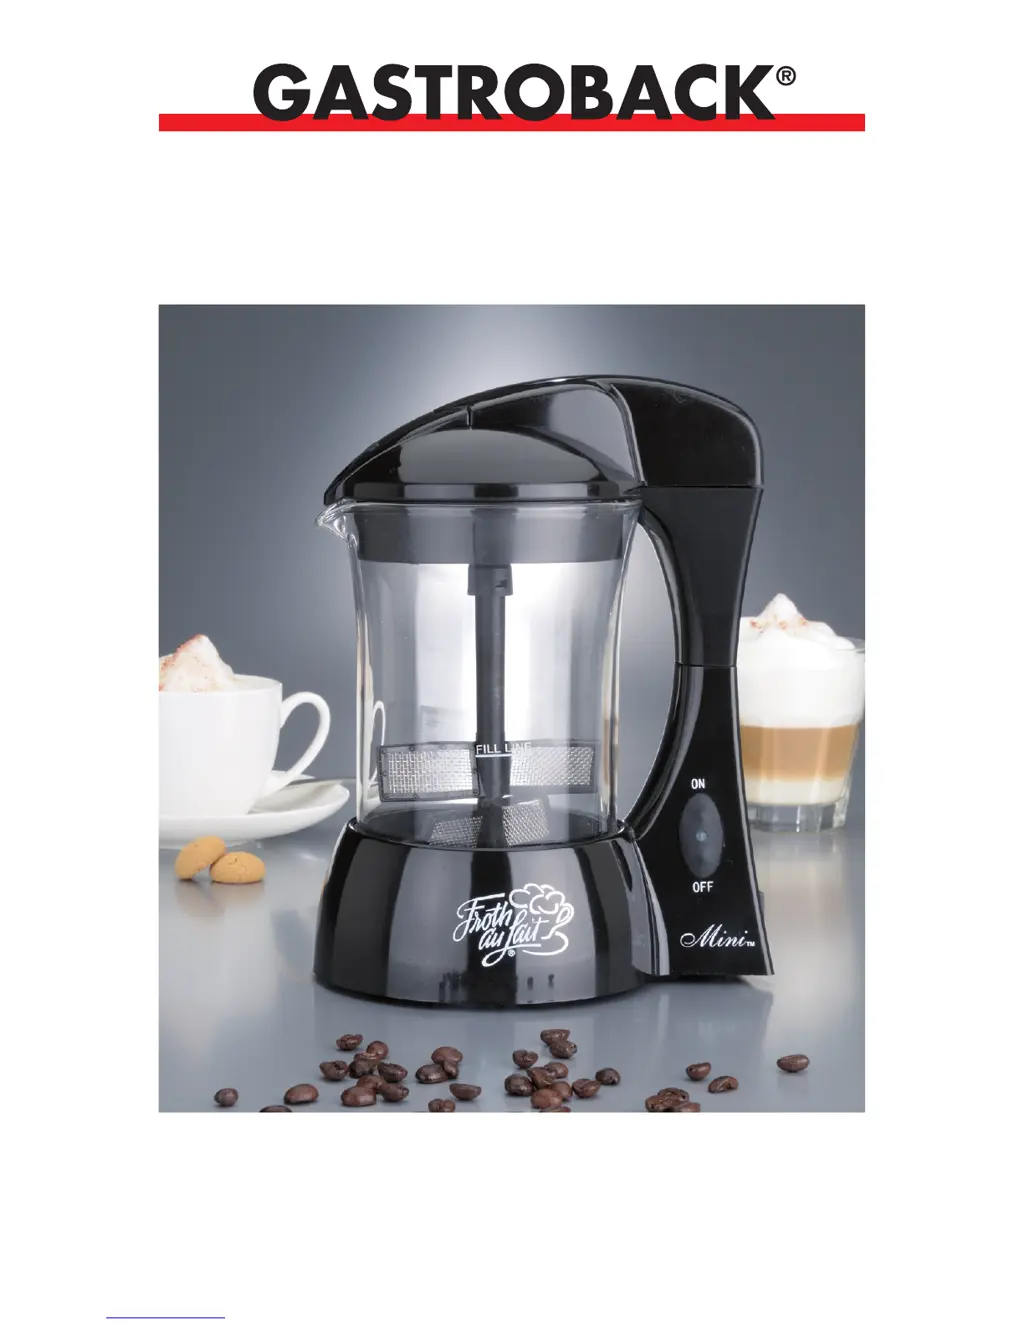
The GASTROBACK Automatic Milk Frother - Mini is designed to produce delicious milk froth within minutes, offering a quiet and easy-to-clean experience. This appliance allows users to prepare their own flavored milk froth by adding fruit syrup, flavor syrup, or flavored powders through the integrated Flavour Hatch.

Function Description:

The milk frother operates by heating and frothing milk. Users pour refrigerated milk into the Frothing Pitcher up to the FILL LINE. The device is equipped with a Froth Whip and Whip Holder, which are securely attached to the Lid. Once the milk is added and the Lid is in place, pressing the ON switch initiates the frothing cycle, indicated by the Operating Lamp. The unit automatically shuts off after approximately three minutes, once the heating and frothing cycle is complete. This process yields a substantial volume of rich, thick milk froth. For thinner froth with more milk, suitable for lattes, an additional amount of milk can be added above the FILL LINE. The heating and frothing cycle can be manually stopped at any time by pressing the OFF switch.

Usage Features:

To begin, the unit should be placed on a stable surface, and the modular power cord connected to the unit and a power outlet. The Froth Whip and Whip Holder must be correctly assembled and snapped into place on the Lid. For optimal froth quality and temperature, it is recommended to fill the pitcher with refrigerated milk to the FILL LINE. The volume and texture of the froth can vary based on the milk's fat content; fat-free milk generally produces the greatest volume, while whole milk yields good froth at a reduced volume.

The Flavour Hatch is a key feature for customizing drinks. Approximately 1½ minutes into frothing, or when the pitcher feels warm, the Flavour Hatch can be opened to pour in desired flavorings such as syrups, powders, sugar, or liqueurs. After adding ingredients, the Hatch should be closed. The device is designed to prevent overheating and will not restart immediately after reaching its shut-off temperature; users must either add cold water or wait a few minutes for the unit to cool down. If the froth loses its richness or temperature, pressing the ON switch can refresh it. After frothing, it's advised to allow 30-60 seconds for the hot milk to settle before pouring. When serving hot milk, especially to children, it's important to allow it to cool slightly or stop the unit early.

The manual provides various recipes, including Classic Milk Froth, Flavored Milk Froth, Milk Froth Floaters, Espresso Latte, Instant Frothy Coffee or Cappuccino, Velvety Hot Chocolate, Classic or Flavored Guilt Free Whipped Topping, Caramel Macchiato, Rainbow Froths, The Raj's Chai, Golden Zabaglione, Sippin' Chocolate Mousse, and Black Russian Royales. These recipes demonstrate the versatility of the frother for creating a wide range of beverages and desserts. For instance, in flavored froths, syrups or powders are added through the Flavour Hatch during the frothing cycle. For recipes involving powders that require mixing, it might be necessary to temporarily stop the unit, remove the Lid, add the powder, replace the Lid, and then restart.

Maintenance Features:

Proper care and cleaning are essential for the longevity and performance of the milk frother. Before first use and after each subsequent use, the appliance must be cleaned. It is crucial to always unplug the power cord from the unit before cleaning and never immerse the unit in water. The Frothing Pitcher should be rinsed with cold water between consecutive cycles to help cool it down. After four consecutive cycles, the unit should be shut off for approximately 10 minutes to cool.

To clean thoroughly, the Lid, Froth Whip, and Whip Holder should be removed. The Whip is detached from the Whip Holder by grasping the Whip Holder firmly and pulling outward, and the Whip can be further removed from the Whip Holder by turning it counterclockwise. The Frothing Pitcher, Froth Whip, and Lid should be washed with warm, soapy water using a scrubber pad or sponge. All milk residue, especially from the pitcher bottom, must be completely removed. After washing, rinse and dry with a soft towel. If cleaning is delayed, a small amount of warm water can be poured into the pitcher to soak and prevent milk and flavorings from drying. The milk frother is not dishwasher safe. For occasional thorough cleaning, it is recommended to operate the unit with water up to the FILL LINE and a small amount of non-sudsing dishwasher detergent, followed by a second rinse cycle with water only. The manual explicitly states that only liquids or powdered mixes should be used; solid food items can damage the Froth Whip.

Gastroback Mini Specifications

General IconGeneral
TypeMini Oven
Timer60 minutes
MaterialStainless Steel
FunctionsBaking, Toasting, Grilling
ColorSilver

Related product manuals