Installation Instructions
19
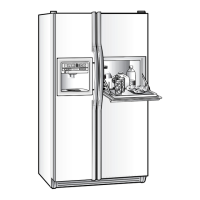
TRANSFER FREEZER DOOR
HANDLE TO THE RIGHT
Remove the screws holding the handle to the top and
bottom of the door. Remove handle.
7
Move the screws on the right side of the door to the
handle screw hole on the left side.
Reattach the handle on the opposite side using the
holes closest to the edge of the door.
Screws
Move the large plug button from the left edge of the
door and insert it into the hole on the opposite side.
Plug Button
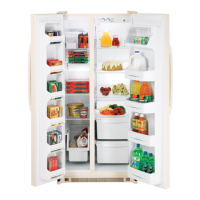
REHANG THE
REFRIGERATOR DOOR
Replace the base grille. Lower the refrigerator door
onto the bottom hinge pin.
8
Shut the door, making sure to align the door with the
cabinet. Secure the door to the cabinet with masking
tape. Make sure the gasket on the door is flush against
the cabinet and is not folded.
 Loading...