Do you have a question about the GE GRCR3960ZWW and is the answer not in the manual?
Range must be secured by the anti-tip bracket. Improper installation could lead to tipping and injury.
General safety precautions for using the appliance to minimize risks of fire, explosion, electric shock, or injury.
Ranges can tip and cause injury. Attach to floor using the anti-tip device supplied.
Stove requires a 240V receptacle. Must be installed by a licensed electrician.
Ensure stove is level by adjusting leveling screws at each corner.
Understand controls, check interior, read tips. Note initial burning smell.
Flattened metal tubing with resistance wire. Heats by direct contact and air heating.
Provides low temperatures for melting butter, heating delicate sauces, or maintaining coffee.
Recommended for glass cooktops. Good conductivity. Thin weight aluminum is not recommended.
Heavy weight recommended. Good conductivity. Residues may appear as scratches if not cleaned.
Recommended. May leave residues. Overheated metal can bond to glass cooktops.
Recommended if completely covered with porcelain enamel. Caution for uncoated cast iron.
Use only flat-bottomed woks. Do not use woks with support rings.
Canning should be done on cooktop. Use appropriate cookware. Generates steam, use care.
Instructions on how to set the stovetop controls, including turning them on and off.
Understand controls, check interior, read tips. Note initial burning smell.
Roasting is dry heat cooking. Use BAKE or TIME BAKE controls. Low, steady temperatures are best.
Broiling uses intense radiant heat. Follow steps to minimize spattering and smoking.
Guides on choosing between convection bake/roast and traditional bake/roast for best results.
Ideal for evenly browned baked foods on multiple shelves. Good for large quantities.
Uses top element and fan. Browns meat on all sides. Seals in juices for moist, tender product.
Ensure cookware allows air circulation. Metal pans heat fastest. Darkened pans bake faster.
Adapt recipes by reducing temp by 25°F. Preheat only for delicate foods or short cook times.
Allows excellent results on 2 or 3 shelves due to even heat circulation.
Meats brown well and are tender/juicy. Cooking time reduced by 10 min/hr. Use thermometer.
Reduce temperature by 25°F. Preheat not necessary for foods >15 minutes.
Use lowest shelf position (A), roasting rack on broiler pan/grid for best results.
Probe designed for high temps. Do not use during self-clean. Test doneness by internal temp.
Set time of day for proper operation of automatic timing functions.
Set timer for cooking or other activities up to 11 hrs 59 min. Does not control oven functions.
Set bake temperature between 170-550°F. Oven ON light indicates pre-heat status.
Set start time and cook time. Oven turns off automatically at end of set time.
Set oven to turn on later, cook for set time, and turn off automatically.
Convection bake/roast modes pre-heat oven. Temp reduction not needed for convection bake.
Select broil mode, leave door open at broil stop position. Oven ON light indicates broiling.
Increase or decrease oven baking temperature by up to 35°F.
Prevents accidental heating modes. Selector switch does not initiate heat when locked.
Change oven temperature display between Fahrenheit (F) and Celsius (C).
Program oven to shut off automatically after 12 hours of continuous cooking.
Ensure oven is cool. Remove cookware, probe, foil. Wipe heavy soil, clean front frame.
Allow oven to cool, unlock door. Wipe white ash. Clean door gasket carefully.
Slide latch, push/turn selector to CLEAN. Set cleaning time (2-4 hours) using UP/DOWN buttons.
Set self-clean cycle to start at a future time within 12 hours.
Clean spatters with damp cloth. Remove knobs for easier cleaning. Do not use abrasives.
Clean with abrasive cleanser or steel wool. Oil edges for easier sliding. Can be cleaned in self-clean oven.
Remove drawer by tilting front up and pulling out. Remove shipping bar for access.
Do not clean in self-cleaning oven. Soak for burned-on food. Can be cleaned in dishwasher.
Clean outside with soap/water or glass cleaner. Inside gasket cleaned during self-clean (if applicable).
Ensure cool. Remove cover, replace bulb with 40-watt appliance bulb.
Disconnect power. Lift cover, grasp bulb ends, rotate quarter turn, pull out.
Disconnect power. Locate fuses under cover. Replace with same amperage.
Remove knobs, pull glass forward. Replace by centering glass and pushing in.
Pull glass independently. Catch retainers. Reinstall retainers properly.
Support cooktop up with side supports for cleaning. Be careful not to pinch fingers.
Clean with soap/water or scouring pad. Cool before cleaning. Do not immerse in water.
Coils burn off soil. Do not immerse elements. Remove elements to clean drip bowls.
Remove elements, lift bowls. Clean by hand or dishwasher. Avoid foil near receptacle.
Troubleshooting issues like stove/oven not operating, cooktop element problems, or faulty oven light.
Addressing poor cooking results, oven steaming, and condensation formation.
Resolving issues with oven temperature being too hot/cold or self-clean cycle problems.
Troubleshooting oven door not opening and timer display flashing (power failure).
Addressing burning/oily odors and excessive smoking during broiling.
Set clock, understand OFF function, and notes on self-cleaning and cooling.
Instructions for Clock, Kitchen Timer, Bake, Broil, Convection, and Timed Cooking.
Procedures for Self Clean Now and Self-Clean Later, including latching and cooling.
Adjust oven temp +/- 35°F by pressing UP/DOWN ARROWS for 5 secs.
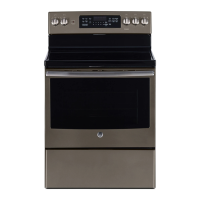
| Brand | GE |
|---|---|
| Model | GRCR3960ZWW |
| Type | Convection Oven |
| Fuel Type | Electric |
| Color | White |
| Capacity | 5.3 cu. ft. |
| Power Source | Electric |
| Voltage | 240 V |
| Number of Racks | 2 |
| Convection Fan | Yes |
| Timer | Yes |
| Control Type | Digital |
| Interior Light | Yes |
| Convection | Yes |
| Oven Features | Self-Cleaning |
| Cooking Modes | Convection Bake, Convection Roast, Broil |