EasyManua.ls Logo

GE JGB720EEJES - User Manual

GE JGB720EEJES
64 pages
Print Icon
To Next Page IconTo Next Page
Loading...
49-85220 07-15 GE
Safety Information ............2
Warranty ........................7
Assistance / Accessories ......8
Using The Cooktop
In Case of a Power Failure .........10
Surface Burners ...................10
Griddle ............................12
Using The Oven
Oven Controls .....................14
Oven Air Vents ....................15
Special Features ..................16
Sabbath Mode ....................17
Cooking Modes ...................18
Cookware Guidelines ..............18
Aluminum Foil and Oven Liners ....18
Oven Racks .......................19
Broil Drawer ......................19
Cooking Guide ....................20
Care and Cleaning
Cleaning the Oven ................21
Cleaning the Cooktop .............22
Cleaning the Door and Drawer .....25
Maintenance ......................26
Troubleshooting Tips .........30
Ranges
Single Oven Gas
Write the model and serial
numbers here:
Model # __________________
Serial # ___________________
You can find the rating label on the
front behind the range drawer.
In Canada contact us at:
www.GEAppliances.ca
For a Spanish version of this
manual, visit our website at
GEAppliances.com.
Para consultar una version
en español de este manual
de instrucciones, visite
nuestro sitio de internet
GEAppliances.com.
Owner’s Manual
Question and Answer IconNeed help?

Do you have a question about the GE JGB720EEJES and is the answer not in the manual?

Overview

This document describes the GE Single Oven Gas Range, a cooking appliance designed for residential use. It includes detailed information on its functions, technical specifications, usage, and maintenance.

Function Description:

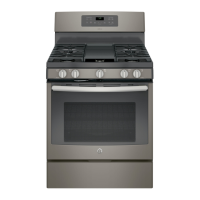
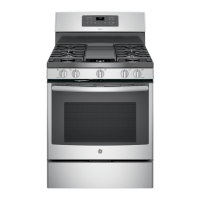
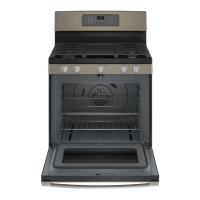
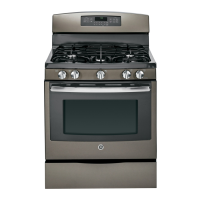
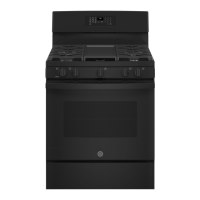
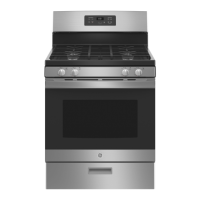
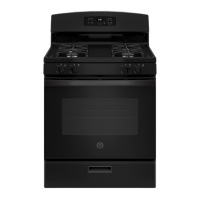
The GE Single Oven Gas Range is a versatile cooking appliance that combines a gas cooktop with a gas oven. The cooktop features sealed gas burners for various cooking applications, including simmering and rapid boiling. Some models include a griddle for additional cooking flexibility. The oven offers multiple cooking modes, including Traditional Bake, Broil Hi, Broil Lo, and Convection Bake (on some models). It also incorporates self-cleaning features, such as Self Clean and Steam Clean (on some models), to simplify maintenance. A Sabbath Mode is available for continuous or timed baking in compliance with specific religious observances. The range is designed for installation with natural gas but can be converted for use with propane gas by a qualified technician.

Important Technical Specifications:

  • Power Supply: 120-volt grounded outlet.
  • Gas Type: Shipped for natural gas, convertible to propane gas.
  • Oven Temperature Adjustment: Can be adjusted up to 35°F hotter or down to 35°F cooler (affects all cooking modes except broil).
  • Oven Auto Shut-Off: 12-hour auto shut-off for continuous operation.
  • Oven Light Bulb: 40-watt household appliance bulb.
  • Cooktop Burners: Sealed gas burners, including a simmer burner and an extra-large burner (some models with POWER BOIL™ setting for cookware 11 inches or larger).
  • Griddle (on some models): Nonstick aluminum or preseasoned reversible cast-iron griddle, designed for use over the center oval burner. Maximum diameter for woks is 14 inches.
  • Oven Racks: Six rack positions in the main oven. Self-clean (black) oven racks may remain during self-clean cycle; nickel-plated (silver) racks should be removed.
  • Broil Drawer (on some models): Three broiling positions (A, B, C) for varied searing and doneness.

Usage Features:

  • Cooktop Operation:
    • Burners are ignited by pushing and turning the control knob to the LITE position, producing an electric spark.
    • Flame size should match cookware size for efficient and safe cooking.
    • Cookware recommendations are provided for aluminum, stainless steel, cast-iron, enamelware, glass, and heatproof glass ceramic.
    • Woks should be flat-bottomed, 14 inches or less in diameter, and used without a support ring.
    • Griddles (on some models) require preheating for 2-5 minutes on Hi before adjusting to the desired cook setting (Med, Lo, Med-Hi, Med-Lo depending on food).
  • Oven Operation:
    • Controls: Oven controls include pads for Bake, Broil Hi/Lo, Cancel/Off, Self Clean, Steam Clean (on some models), Conv Bake (on some models), Timer, Set Clock, Cook Time, Delay Time, Oven Light (on some models), and Lock Controls (on some models).
    • Cooking Modes:
      • Bake: Uses heat from the lower burner; preheat is recommended for baked goods.
      • Broil Hi: Intense heat from the upper burner for searing thinner cuts of meat. No preheating required.
      • Broil Lo: Less intense heat for thicker cuts of meat, allowing thorough cooking and surface browning. No preheating required.
      • Convection Bake (on some models): Uses a convection fan for even cooking on multiple racks. Auto Recipe Conversion adjusts temperature automatically. Preheat is recommended.
    • Rack Placement: Six rack positions are available; recommended positions are provided in the Cooking Guide for various food types. Unused racks should be removed for faster preheat and improved efficiency.
    • Broiling: Always broil with the oven door and drawer closed. Adjust rack positions to control heat intensity.
    • Sabbath Mode: Disables all tones and allows continuous or timed baking. The oven light must be removed to prevent it from turning on when the door is opened.
    • Delay Time: Allows setting a future start time for baking or cleaning cycles.
    • Cook Time: Automatically turns off the oven after a programmed cooking duration.
    • Cookware Guidelines: Dark, coated, and dull pans absorb more heat, resulting in browner crusts; shiny pans produce more even results. Glass and ceramic pans heat slowly but retain heat well.
    • Aluminum Foil and Oven Liners: Should not cover the oven bottom or entire racks to prevent blocking airflow, melting, and potential hazards. Foil can be used on a lower rack to catch spills, maintaining a 1-1/2" distance from oven walls.

Maintenance Features:

  • General Cleaning: All controls should be off and surfaces cool before cleaning. Mild soap and water or a 50/50 vinegar and water solution are recommended. Abrasive cleansers, steel wool, and oven cleaners should be avoided on most surfaces.
  • Control Panel and Knobs: Knobs are removable for cleaning by hand or in a dishwasher.
  • Stainless Steel Surfaces (on some models): Clean with warm sudsy water or a stainless steel cleaner/polish, wiping in the direction of the grain. Oxalic acid cleaners can remove rust and blemishes.
  • Cooktop Surface: Clean with mild soap and water or a 50/50 vinegar and water solution.
  • Surface Burners:
    • Burner Caps: Wash in hot, soapy water or in a dishwasher.
    • Burner Heads: Wash in hot, soapy water with a plastic bristled brush. Ensure burner ports and the small hole in the notch for the electrode are clear. Do not wash in a dishwasher.
    • Electrode: Clean carefully; avoid hitting with hard objects. Lightly polish with a nail file or sandpaper if needed.
    • Reassembly: Ensure burner caps and heads are thoroughly dry and correctly seated.
  • Burner Grates:
    • Manual Cleaning: Wash in hot, soapy water. For stubborn food, soak in ammonia solution.
    • Self Clean Mode (on some models): Grates without rubber bumpers can be self-cleaned in the oven. Place grates on racks (positions 1, 3, 5 or 2, 4) or on the oven bottom (upright, stacked configuration). Remove rubber-bumpered grates and nickel-plated racks before self-cleaning to prevent damage or tarnishing.
  • Grate Support Bumpers (on some models): Replace missing or damaged rubber bumpers by inserting the cone-shaped end into the cooktop hole and twisting.
  • Griddles (on some models): Wash nonstick aluminum griddles with dish soap and hot water (do not use abrasive pads). Do not wash in dishwasher or self-cleaning oven. Clean grease spills promptly.
  • Oven Interior: Clean manually with mild soap and water or a 50/50 vinegar and water solution.
    • Steam Clean Mode (on some models): For light soil, pour one cup of water onto the oven bottom, close the door, and run the 30-minute cycle. Wipe softened soil after cooling.
    • Self Clean Mode (on some models): For moderate to heavy soil, run a 3-5 hour cycle at high temperatures. Remove all items except self-clean (black) racks and grates. Ensure adequate ventilation.
  • Oven Exterior: Clean with mild soap and water or a 50/50 vinegar and water solution. For persistent stains on door vent trim, use a mild abrasive cleaner and sponge-scrubber.
  • Oven Racks: Clean manually with abrasive cleaner or steel wool. Lubricate with vegetable oil after cleaning to improve sliding.
  • Removable Storage Drawer (on some models): Remove for cleaning under the range. Clean with a damp cloth or sponge. Do not store plastics or flammable materials.
  • Oven Light: Disconnect electrical power before replacing the 40-watt bulb. Remove the glass cover by sliding it from its indent. Allow bulb and cover to cool before handling.
  • Lift-Off Oven Door: The door is heavy and should be handled carefully. To remove, fully open the door, slide hinge locks up, grasp both sides near the handle, close the door to approximately 3" from the frame, and lift up and away. Reinstall by aligning hinge arm notches with slots, pushing hinge locks down, and closing the door.

GE JGB720EEJES Specifications

General IconGeneral
BrandGE
ModelJGB720EEJES
CategoryRanges
LanguageEnglish

Related product manuals