STEP 7
ECONOMYWATER USAGE
The pressu_e switch is set in the
iactory for the oormal water kwcl and
Hsage.
To change setting from _?ormal water
leve! to economy:
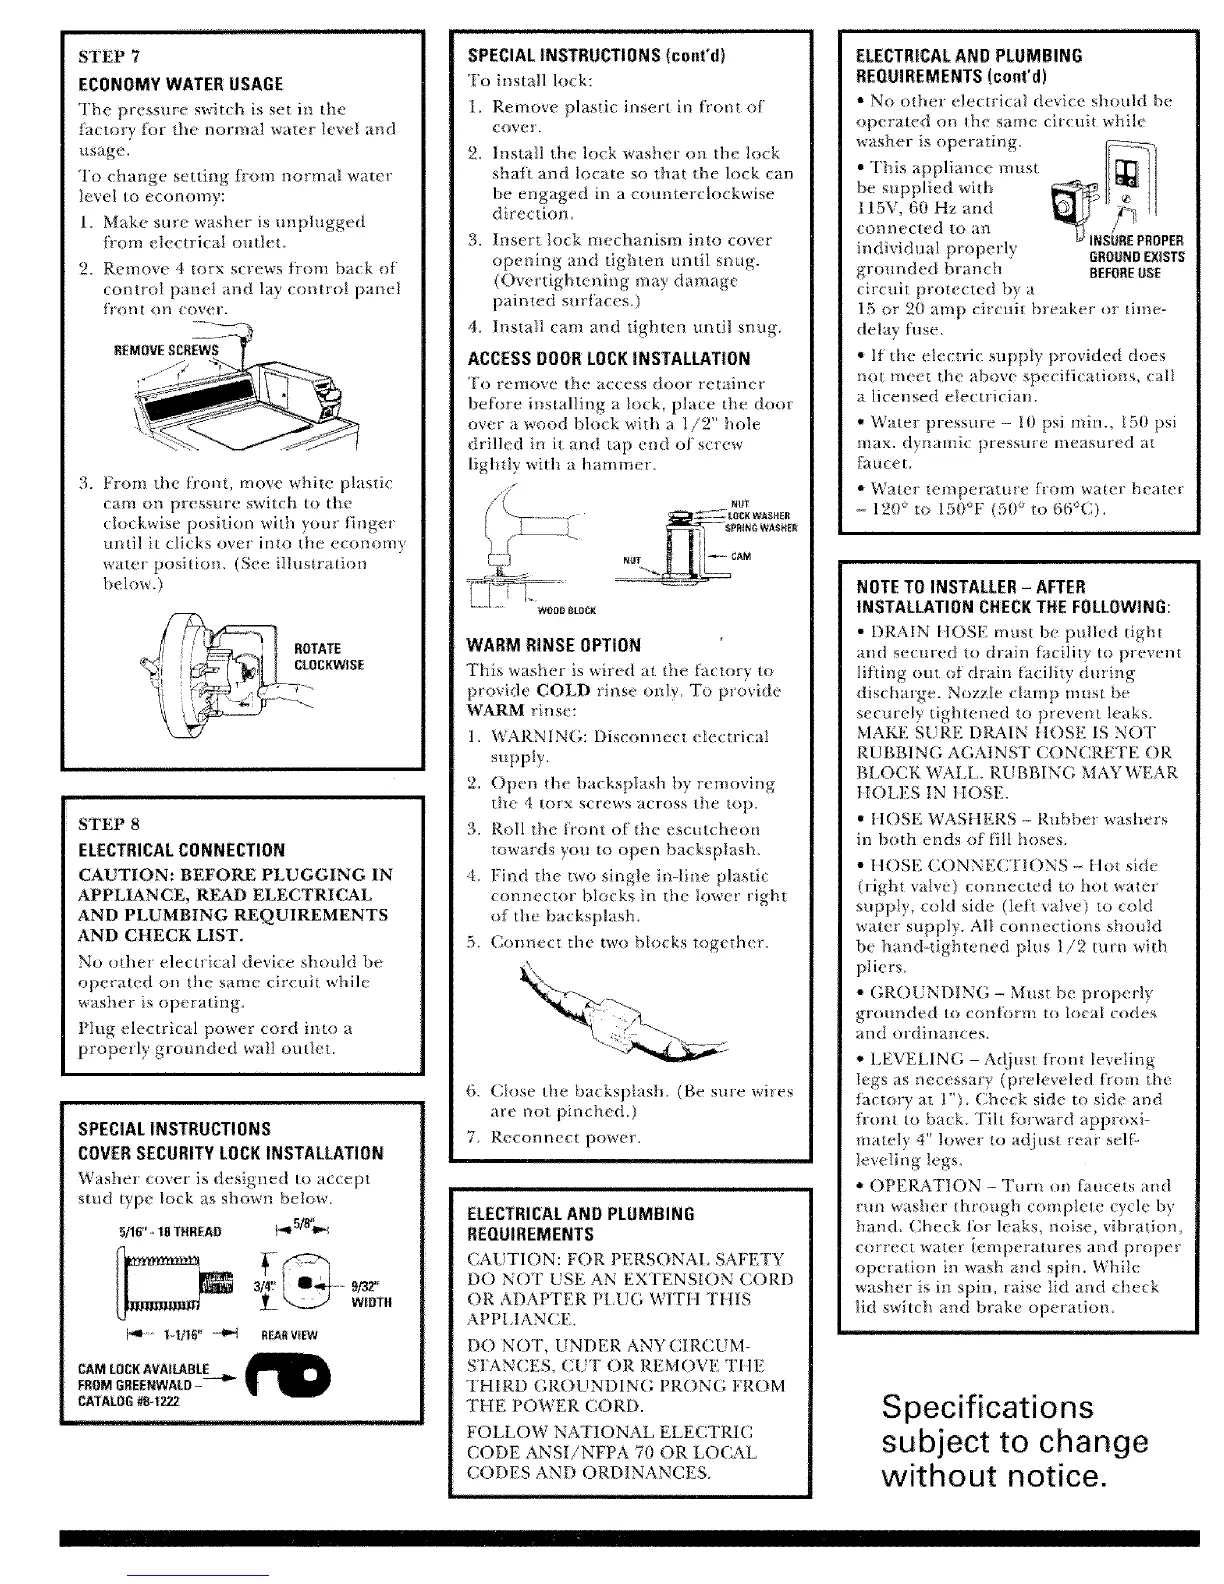
1. Make sure washer is unplugged
from electrical outlet.
2. Remove 4 torx screws fl'om back of
control panel and lay control panel
_:roilt O1| cover.
3. F_om the front, move white plastic
cam on pressure switch to the
clockwise position with your fiuger
m_til it dicks over imo the eco_omy
water positio,_. (See illnstr _tion
below.)
STEP 8
ELECTRICALCONNECTION
CAUTION: BEFORE PLUGGING IN
APPLIANCE, READ ELECTRICAL
AND PLUMBING REQUIREMENTS
AND CHECK LIST,
No od_el electrkal device should be
operated on file same circuit while
washer is operating.
Plug electrical power cord into a
properly grotmded wall outlet.
SPECIALINSTRUCTIONS
COVERSECURITYLOCKINSTALLATION
'Washer {over is designed to accept
stud type lock as shown below.
5/16"-18THREAD p,_5,_.,,._
l+l/lg _ -4_ REARViEW
CAM LOCKAVAILABLE
FROM OREENWALD---q_
CATALOG#8+t_
SPECIALINSTRUCTIONS (toni+d)
Fo install 1o k:
1. Remove plastic insert in frontof
cover.
2. Install the lock washer on the k_ck
shaft and locale so that d?e lock can
be engaged in a counterclockwise
d rectiom
3. Iusert lock mechanism into cover
opening ai}d tighten until snug.
(Overtigbtening may damage
painted surLaces.)
4_ Iustall cam and tighten until snug.
ACCESSDOORLOCRINSTALLATION
To remove the access door retainer
before i_lstalli_g a !ock, place the door
over a _ood block with a I/2" hole
drilled in it and mp end of screw
lightly with a hammer_
.I _ _+SPFI+P+ _ WASP+ER
g_0_
WODE_ ElL(_gK
WARM RINSE OPTION
This wasl+er is wired a_ the factory to
provide COLD ri_*se only, To provide
WAA_-M rinse:
1, WARNING: Disconnect (lectrical
supply.
2. Open the backsp_ _sh by removing
the 4 form screws across the _op.
3. Roll the front of the escutcheon
towards yo/i to open backsplash+
4. Find the two single in-line plas+ic
connector blocks in tbe lower right
of the backsptash+
5+ (onnect the two blocks together.
6. Close the backsptash. (Be sme wi*es
are not pinched.)
7+ Reconnect power.
ELECTRICALAND PLUMBING
REQUIREMENTS
CAL!TION: FOR PERSONAI SAFETY
DO NOT USE AN EXTENSION CORD
OR ADAPTER PI U(', WITtl THIS
APPLIANCE.
DO NOT, LINDER ANYCIR(IM-
STANCES.(I I'ORREMOVETIIE
THIRD (;ROUNI)IN(; PRONG FROM
THE POWER CORD.
FOLLOW NATIONAL ELECTRIC
CODE ANSI/NFPA 70 OR LO<YL'_L
CODES AND ORDINANCES.
ELECTRICALAND PLUMBING
REQUIREMENTS(toni'd)
• No o_her electrical device should be
operated on Ihe same eirctlit wililt +
washer is operating.
• This appliance must
be supplied wlth
tlSV, 60 Hz and
connected to an
individual properly
grounded b_ancb
circuit p_oteeted by a
INSUREPROPER
GROONDEXIST5;
BEFOREUSE
15 or 20 amp circui_ breaker or time-
detay fuse.
• If the electric supply provided does
not mtet die above spe(ifieati{ms, call
a licensed electrician.
+ Water pressure - i0 psi n]iH., !50 psi
max. dynamic pressme llleastned at
t_u ce t+
• Water temperature from water heater
+ 1_0 _ to 150+F (50 _ to 66+C}.
NOTETO INSTALLER+ AFTER
INSTALLATION CHECKTHE FOLLOWING:
• DRAIN IIOSE must be pulled tight
az_d seemed to drain ia{ility to I}tevenl
lifting om o} drain t+acili_y during
discharge. Nozzle clamp muse be
secure y _ightened to p,e_em leaks.
MAKE SI RE DRAIN IIOSE IS NOT
RUBBING AGA1NSI CONCRETE OR
BI,OCK WAId,. RIIBBING MAYWEAR
tIOLES tN tlOSE.
• IIOSE WASIIERS + Rubber washers
in both ends {if 1111hoses.
• ttOSE CONNECTIONS ,+ Itot side
(right valve) connected to hot water
supply, cotd side (Iett ,,alve) to cold
water supply. All conBections should
1)e hand+tightened plus l/2 turn with
pliers.
° GROt NDING _ Must be properly
grounded to conlorm to k}cal <+:{}des
alld olalinalices.
•' LEVELING - Adius_ irc, nt leveling
legs as necessary (preleveled tiom the
f:_ctory at t")+ {beck side to side and
from to back+ Tilt forward approxi-
mat{ly 4" lower to adjust _eat selt 2
tevelh_g legs.
• OPERATION - Turn o_* fat*eeLs and
run washer through compIele cycle h)
hand_ Cheek fm leaks, noise, vibration,
cnrrect water temperatures and proi)eF
operation in wash and spin While
washer is in spin, raise lid a+*d check
lid switch and brake operation
subject to change
without notice.


 To Next Page
 Loading...