Do you have a question about the GE WR30X10093 and is the answer not in the manual?
Instructions for removing the ice bucket, chiller shelf, and the existing icemaker.
Steps for preparing and installing the fill cup and icemaker insert into the new unit.
Guidance on plugging in the icemaker and securing it to the bracket.
Final steps including reconnecting power and verifying icemaker function.
Procedure to detach the ice bucket and the old icemaker from the unit.
Steps for removing old parts and installing new fill cup, insert, and stripper plate.
Instructions for attaching the icemaker to the bracket and plugging it in.
Finalizing the icemaker installation by reconnecting power and checking operation.
Steps to disconnect and remove the old icemaker from the freezer wall.
Guidance on assembling the fill cup, plugging in the new icemaker, and mounting it.
Finalizing the process by reconnecting power and verifying the icemaker.
Procedure for disconnecting and removing the old icemaker unit.
Instructions for transferring the feeler arm and mounting the new icemaker.
Final steps including reconnecting power and ensuring proper icemaker function.
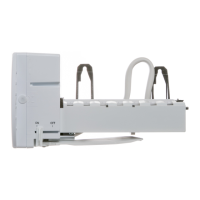
This manual provides comprehensive instructions for the installation of a new icemaker in various GE refrigerator models, specifically those with metal interior lined side-by-side, plastic interior lined side-by-side, top-freezer, and GE Monogram side-by-side or bottom-freezer configurations. The primary function of this device is to automatically produce and store ice, enhancing the convenience and functionality of your refrigerator.
The icemaker is designed to continuously produce ice, which is then dispensed into an ice bucket within the freezer compartment. This automated process eliminates the need for manual ice trays, ensuring a constant supply of ice for beverages and other uses. The system operates by filling a mold with water, freezing it, and then ejecting the formed ice cubes into the storage bucket. A feeler arm monitors the ice level in the bucket, pausing ice production when the bucket is full and resuming when the level drops, thus preventing overfilling and ensuring a steady supply.
The installation process is designed to be user-friendly, with clear, step-by-step instructions for removing the old icemaker and installing the new one. Before beginning, it is crucial to disconnect power to the refrigerator and wait at least 5 minutes to ensure safety. The manual emphasizes the importance of carefully reading all instructions to ensure a successful installation.
For metal interior lined side-by-side refrigerators, the process begins with removing the existing ice bucket and chiller shelf (if applicable) to gain access to the old icemaker. The old icemaker is typically secured by Phillips head or Hex head screws. These screws should be loosened, but not completely removed, allowing the icemaker to slide upwards and be detached from its bracket. Unplugging the icemaker involves locating and uncliping restraints on each side of the plug. The fill cup and icemaker insert from the old unit must be removed and, if not supplied with the new icemaker, reinstalled into the new one. The new icemaker is then plugged into the socket, ensuring the restraints click into place. Finally, the new icemaker is mounted onto the bracket, making sure the fill tube aligns with the fill cup opening, and the unit is level. Power is reconnected, the icemaker switch is set to ON, and the ice bucket and chiller shelf are replaced. Ice production will begin after several hours as the freezer reaches its selected temperature.
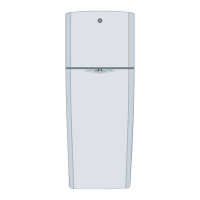
For plastic interior lined side-by-side refrigerators, the initial steps are similar, involving the removal of the ice bucket and existing icemaker. However, a key difference is the requirement to completely remove the mounting screws from the old icemaker. Additionally, for these models, the old plastic stripper plate must be removed from the old icemaker and reattached to the new one, as the new icemaker's stripper plate cannot be used. This involves gently pulling out the center of the plastic stripper to disengage it from the housing and then reattaching it to the new icemaker, ensuring the grooves align with the mold body. The remaining steps for plugging in and mounting the icemaker, reconnecting power, and replacing components are consistent with other models.
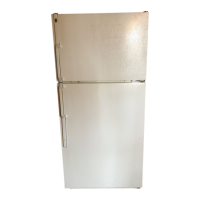
Top-freezer refrigerators follow a similar removal and installation procedure for the icemaker, including loosening mounting screws (but not completely removing them) and unplugging the unit. The emphasis remains on ensuring the fill tube is correctly positioned in the fill cup opening and that the icemaker is level once mounted.
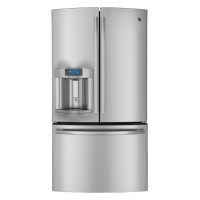
For GE Monogram side-by-side refrigerators and bottom freezers, the instructions largely mirror those for metal interior lined side-by-side units, with the same emphasis on loosening screws, unplugging the unit, and ensuring proper alignment during installation. A unique feature for these models is the replacement of the new icemaker's feeler arm with the feeler arm from the old icemaker. This involves removing the feeler arm, screw, and spring from both units, discarding the new feeler arm, and reassembling the old feeler arm onto the new icemaker. Critical attention is paid to the correct insertion of the spring ends, ensuring they are parallel and the screw is tightened to a specific torque (7 to 10 inch-pounds). This ensures proper ice level sensing and production.
The manual primarily focuses on installation rather than ongoing maintenance. However, implicit maintenance features include:
Overall, the device is designed for convenience and reliability, with a straightforward installation process that allows users to quickly restore or upgrade their refrigerator's ice-making capabilities.
| Category | Refrigerator |
|---|---|
| Product Type | Water Filter |
| Part Type | Replacement Filter |
| Brand | GE |
| Model Number | WR30X10093 |
| Filter Life | 6 months or 300 gallons |
| Flow Rate | 0.5 gallons per minute |
| NSF Certified | Yes |
| Reduces Contaminants | Chlorine taste and odor, lead, mercury, asbestos, certain pesticides, and pharmaceuticals |