913218/CP0307 54 PRINTED IN U.S.A.
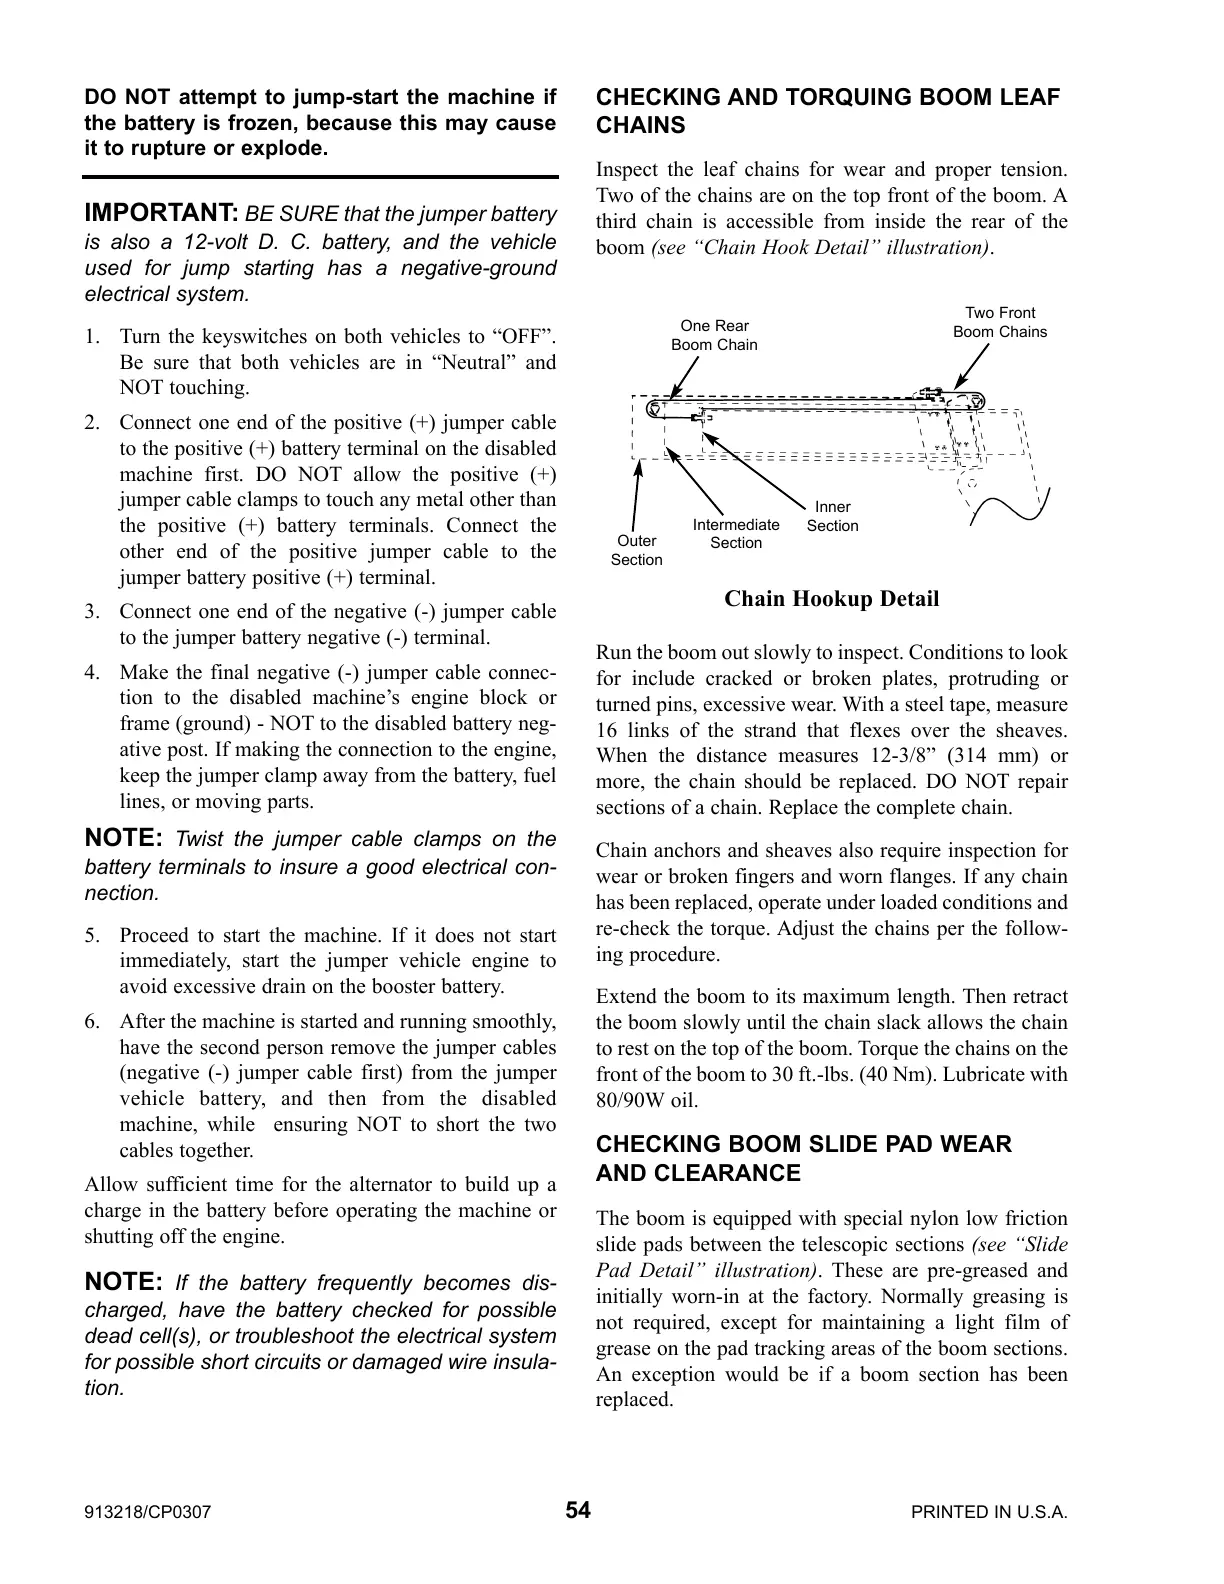
CHECKING AND TORQUING BOOM LEAF
CHAINS
Inspect the leaf chains for wear and proper tension.
Two of the chains are on the top front of the boom. A
third chain is accessible from inside the rear of the
boom (see “Chain Hook Detail” illustration).
Run the boom out slowly to inspect. Conditions to look
for include cracked or broken plates, protruding or
turned pins, excessive wear. With a steel tape, measure
16 links of the strand that flexes over the sheaves.
When the distance measures 12-3/8” (314 mm) or
more, the chain should be replaced. DO NOT repair
sections of a chain. Replace the complete chain.
Chain anchors and sheaves also require inspection for
wear or broken fingers and worn flanges. If any chain
has been replaced, operate under loaded conditions and
re-check the torque. Adjust the chains per the follow-
ing procedure.
Extend the boom to its maximum length. Then retract
the boom slowly until the chain slack allows the chain
to rest on the top of the boom. Torque the chains on the
front of the boom to 30 ft.-lbs. (40 Nm). Lubricate with
80/90W oil.
CHECKING BOOM SLIDE PAD WEAR
AND CLEARANCE
The boom is equipped with special nylon low friction
slide pads between the telescopic sections (see “Slide
Pad Detail” illustration). These are pre-greased and
initially worn-in at the factory. Normally greasing is
not required, except for maintaining a light film of
grease on the pad tracking areas of the boom sections.
An exception would be if a boom section has been
replaced.
IMPORTANT: BE SURE that the jumper battery
is also a 12-volt D. C. battery, and the vehicle
used for jump starting has a negative-ground
electrical system.
1. Turn the keyswitches on both vehicles to “OFF”.
Be sure that both vehicles are in “Neutral” and
NOT touching.
2. Connect one end of the positive (+) jumper cable
to the positive (+) battery terminal on the disabled
machine first. DO NOT allow the positive (+)
jumper cable clamps to touch any metal other than
the positive (+) battery terminals. Connect the
other end of the positive jumper cable to the
jumper battery positive (+) terminal.
3. Connect one end of the negative (-) jumper cable
to the jumper battery negative (-) terminal.
4. Make the final negative (-) jumper cable connec-
tion to the disabled machine’s engine block or
frame (ground) - NOT to the disabled battery neg-
ative post. If making the connection to the engine,
keep the jumper clamp away from the battery, fuel
lines, or moving parts.
NOTE: Twist the jumper cable clamps on the
battery terminals to insure a good electrical con-
nection.
5. Proceed to start the machine. If it does not start
immediately, start the jumper vehicle engine to
avoid excessive drain on the booster battery.
6. After the machine is started and running smoothly,
have the second person remove the jumper cables
(negative (-) jumper cable first) from the jumper
vehicle battery, and then from the disabled
machine, while ensuring NOT to short the two
cables together.
Allow sufficient time for the alternator to build up a
charge in the battery before operating the machine or
shutting off the engine.
NOTE: If the battery frequently becomes dis-
charged, have the battery checked for possible
dead cell(s), or troubleshoot the electrical system
for possible short circuits or damaged wire insula-
tion.
Chain Hookup Detail
Inner
Section
Outer
Section
Intermediate
Section
Two Front
Boom Chains
One Rear
Boom Chain
DO NOT attempt to jump-start the machine if
the battery is frozen, because this may cause
it to rupture or explode.
 Loading...