EasyManua.ls Logo

Genelec 8050A User Manual

Genelec 8050A
2 pages
To Next Page IconTo Next Page
Page #1 background imageLoading...
Page #1 background image
WALL MOUNT for GENELEC 8030A, 8040A, 8050A
max. load 15 kg, easy handling, adjustable direction and angle
instruction manual
1. separate swivel joint from wall bracket 3. wall mount options
1.a
Loosen lower
bolted assembly
1.b
Gather swivel joint from
wall bracket
2.a
Adjust wall
plate vertically
2.b
Anchor holes drilling (4x)
diameter
-6 mm steel-anchor-bolt
-8 mm universal frame fixing set
2. wall bracket fastening
concrete wall - e.g.: steel-anchor-bolt M6 x 65 mm
-drill and blow out hole, place anchor, wall bracket and
washer, tighten hexnut
perforated bricks - e.g.: unsiversal frame fixing set 8 x 80 mm
-drill, countersink and blow out hole, place anchor and bracket, fix hexagon
head wood screw
C injection-molded-anchor
without sieve bushing for concrete wall - with sieve bushing for perforated bricks / optional with threaded bolt M6 or threaded bushing M6
Advantages: fixing without pressure, enables repeated mounting, capable for diverse wall materials
Advantages: (please notice instructions of anchor manufacturers).
GENELEC Oy
Olvitie 5, Fin-74100 Iisalmi, www.genelec.com
24475-000-55/57 Rev.03 03-80-486-00 7/06

Other manuals for Genelec 8050A

Question and Answer IconNeed help?

Do you have a question about the Genelec 8050A and is the answer not in the manual?

Genelec 8050A Specifications

General IconGeneral
Product colorBlack
Recommended usageStudio
Multi-Room Streaming (MRS) support-
TweeterYes
Speaker type2-way
Speaker placementTabletop/bookshelf
Audio output channels1.0 channels
Woofer diameter (imperial)8 \
Tweeter diameter (imperial)1 \
Frequency range35 - 21000 Hz
RMS rated power270 W
Signal-to-Noise Ratio (SNR)110 dB
Amplifier/receiver input interface typeXLR
Connectivity technologyWired
AC input voltage230 V
Power source typeAC
Weight and Dimensions IconWeight and Dimensions
Width286 mm
Height452 mm
Weight12700 g

Summary

Separate Swivel Joint from Wall Bracket

Loosen Lower Bolted Assembly

Loosen the lower bolted assembly to separate the swivel joint.

Gather Swivel Joint

Gather the swivel joint from the wall bracket.

Wall Bracket Fastening

Adjust Wall Plate Vertically

Adjust the wall plate vertically for proper alignment.

Anchor Holes Drilling

Drill anchor holes (4x) for wall bracket fastening.

Wall Mount Options

Concrete Wall Mounting

Mounting for concrete walls using M6 x 65mm steel anchor bolts.

Perforated Brick Mounting

Mounting for perforated bricks using frame fixing set 8 x 80 mm.

Injection-Molded Anchor

Use of injection-molded anchors for diverse wall materials.

Installation Steps

Bolt T-Adaptor

Bolt T-Adaptor for vertical or horizontal speaker mounting.

Alternative T-Adaptor Removal

Remove T-Adaptor for alternative mounting configurations.

Replace Swivel Joint

Replace the swivel joint with the mounted speaker into the bracket.

Secure Swivel Joint

Secure swivel joint to wall bracket by tightening lower assembly.

Settings and Adjustments

Angular Adjustment

Continuously adjustable up to 30° via upper bolted assembly.

Vertical Pivoting

Pivoting attachment allows adjustment around the vertical axis.
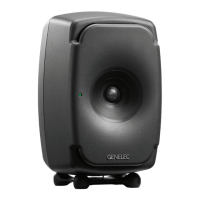
Dimensions

Safety Instructions