4
1.1 UNPACKING
• Remove all packaging material.
• Remove separate accessory box.
• Remove the generator from carton.
1.1.1 ACCESSORY BOX (COMMON)
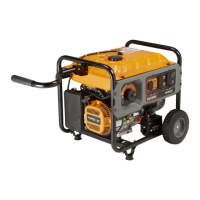
GP2600/2800
• 1-Owner’s manual
• 1- Bottle of oil SAE 30
• 1-Frame Foot (E)
• 2-Wheels (H)
• 1-Axle (K)
• 1-Handle with Grip (L)
• 1-Plastic Spacer (M)
• 1-Handle Bracket (N)
• 1-Hardware bag (containing the following):
– 2-M8 Flange Nuts (C)
– 2-Rubber Feet (D)
– 2-M8 x 16 Bolts (F)
– 2-Cotter Pins (J)
– 2-M8 x 40 Bolts (P)
– 1-M6 x 40 Bolt (T)
– 1-M6 Lock Nut (U)
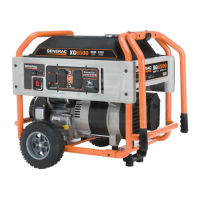
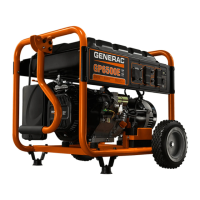
GP5000/GP6000E/GP6500E
• 1-Owner’s manual
• 1- Bottle of oil SAE 30
• 2-Frame Foot (E)
• 2-Wheels (H)
• 1-Handle Assembly (Q)
• 2-Long Carriage Head Bolts (A)
• 2-Flange Nuts (electric start only)
• 1-Battery Charger (electric start only)
• 1- Adapter Cable (if equipped)
• 1-Hardware bag (containing the following):
– 4-M8 Flange Nuts (C)
– 2-M6 Flange Nuts (S)
– 2-Rubber Feet (D)
– 4-M8 Bolts (F)
– 2-M6 bolts (R)
– 2-Cotter Pins (J)
– 2-Acorn Nuts (B)
– 2-Axle Pins (G)
– 2-Washers (I)
1.2 ASSEMBLY
The generator requires some assembly prior to using it. If
problems arise when assembling the generator, please call an
authorized dealer at 1 800 333 28 for Australia and 09 269 1160
for New Zealand.
1.2.1 ASSEMBLING THE ACCESSORY KIT
Refer to the instructions below and Figures 1A through 1E to install
the handle, feet, and wheels. Note: the handle components are
already pre-assembled from the factory. The wheels are designed
to greatly improve the portability of the generator. You will need the
following tools to properly install the accessory kit:
• Ratchet and a 13 mm socket (GP5000/GP6000E/GP6500E)
• Ratchet and 10 mm and 12 mm Socket (GP2600/GP2800)
• 13mm box wrench (GP5000/GP6000E/GP6500E)
• 10 mm and 12 mm box wrench (GP6000E/GP6500E)
• Needle nose pliers
Handle (GP5000/GP6000E/GP6500E) (Figure 1A)
1. Install the handle assembly to the frame by using bolts (A) and
nuts (B).
Handle (GP2600/GP2800)
2. Refer to Figure 1B to install the handle assembly as shown.
– Install the handle bracket (N) to the frame using two Bolts (P) (if
not already assembled).
– Slide the plastic spacer (M) onto the handle assembly (L) then
align with the holes in the handle bracket (N) (if not already
assembled).
– Secure the handle assembly (L) to the handle bracket (N) using the
Bolt (T) and one hex flange nut (U).
Feet (Figure 1B & 1C)
3. Use nuts (C) to mount the rubber feet (D) to the foot bracket
(E) (if not already assembled).
4. Mount the foot bracket (E) to the frame with two bolts (F)
(Figure 1B) and 4 M8 flange nuts (Figure 1C).
Wheels (GP5000/GP6000E/GP6500E) (Figure 1D)
5. Slide axle pin (G) through wheel (H), washer (I), and through
the bracket on the frame.
6. Secure axle pin (G) to the frame with the cotter pin (J).
7. Use a pliers and bend one tab of cotter pin (J) outward to lock
into place.
8. Repeat steps 5, 6, & 7 for other wheel.
Wheels (GP2600/GP2800)
9. Refer to Figure 1E to install the wheels as shown.
– Slide the axle (K) through the frame brackets.
– Slide on the wheels (H) then install the cotter pins (J).
General Information
 Loading...